Configure Dashboard Access Control Using Other OpenID Connect Providers
MATLAB® Production Server™ Dashboard supports the use of any OpenID Connect (OIDC) identity provider for role-based access control for the dashboard. Role-based access control allows server administrators to grant access to specific areas of the dashboard to certain users or groups of users. For more information about the roles that the dashboard supports, see Dashboard Access Control.
To enable dashboard access control, configure the OIDC provider and specify dashboard access control policies, in consultation with the OIDC provider administrator.
Configure Identity Provider
To configure an identity provider:
Log in to the dashboard to retrieve the redirect URI of the dashboard.
At the identity provider's website, use the redirect URI to register the dashboard as a client application with the provider.
In the dashboard, enter values specific to the registered application and identity provider.
Retrieve Redirect URI from Dashboard
To retrieve the redirect URI, start creating a configuration for your identity provider in the dashboard:
Navigate to either the Dashboard Access Control tab or the Manage Identity Providers tab.
Click Create and select Other.
In Create Identity Provider for Dashboard Access Control, note the redirect URI of the dashboard.
Later, you return to this view to specify the values required to configure your identify provider in the dashboard.
Register Application with Identity Provider
Register an application with the OIDC provider for MATLAB Production Server Dashboard. Consult the OIDC provider administrator to register the application. When registering the application, provide the redirect URI of the MATLAB Production Server Dashboard.
Specify Values in Dashboard
After you register the application with the identity provider, you receive application-specific values such as the client ID and client secret. Enter the values in the dashboard under Create Identity Provider for Dashboard Access Control.
The following table describes the values that you must enter. Click Create after you enter the values.
| Field | Description |
|---|---|
| Client ID | Application ID of the registered client application |
| Client Secret | Client secret of the registered client application |
| OIDC Issuer | Discovery endpoint URI of the OIDC provider |
| JWT Issuer | JWT issuer metadata of the OIDC provider |
| JWKS URI | URI to retrieve the JSON Web Key Set (JWKS) |
Under Create Identity Provider for Dashboard Access Control, you have the option to provide values other than the defaults for UserAttribute ID and GroupAttribute ID. UserAttribute ID is the JWT claim name that uniquely identifies a user. GroupAttribute ID is the JWT claim name that lists the groups that a user belongs to. Depending on the identity provider you use, you might have to change the defaults.
Specify Dashboard Access Control Policy
Before you can specify dashboard access control policies, you must have users, and if applicable, groups, set up in the identity provider. Consult the OIDC provider administrator for this setup.
The access control policies define areas of the dashboard that users or groups of users can access and tasks that they can perform in these areas.
On the Dashboard Access Control tab of the dashboard, select the identity provider that you want to use.
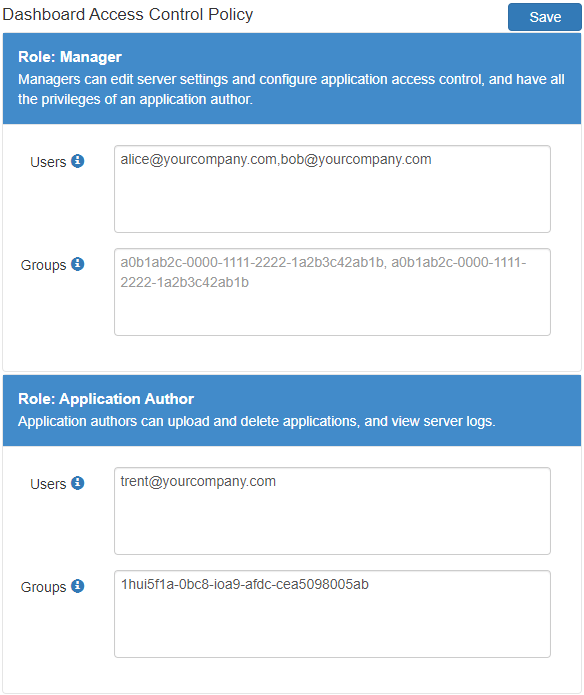
In the Dashboard Access Control Policy section, enter identity provider specific user names and group IDs to assign manager and application author roles to users or groups of users in your organization. Use a comma to separate multiple user names or group IDs. Click Save after you enter the values.
For example, in the following illustration, the users
alice@yourcompany.comandbob@yourcompany.comhave the manager role. The usertrent@yourcompany.comand all users that belong to group ID1hui5f1a-0bc8-ioa9-afdc-cea5098005abhave the application author role.
Enable Dashboard Access Control
After you configure the identity provider and specify access control policies, you must enable dashboard access control by selecting the Yes option. After enabling dashboard access control, a dashboard login URL that supports single sign-on (SSO) becomes available. Share this URL with managers and application authors.

Related Topics
You can also select a web site from the following list
Americas
- América Latina (Español)
- Canada (English)
- United States (English)
Europe
- Belgium (English)
- Denmark (English)
- Deutschland (Deutsch)
- España (Español)
- Finland (English)
- France (Français)
- Ireland (English)
- Italia (Italiano)
- Luxembourg (English)
- Netherlands (English)
- Norway (English)
- Österreich (Deutsch)
- Portugal (English)
- Sweden (English)
- Switzerland
- United Kingdom (English)
Asia Pacific
- Australia (English)
- India (English)
- New Zealand (English)
- 中国
- 日本Japanese (日本語)
- 한국Korean (한국어)