Synchronize Requirements Traceability in IBM DOORS by Using Surrogate Modules
You can establish traceability between elements in your Simulink® model and requirements in IBM® DOORS® without modifying the IBM DOORS requirements module by using surrogate modules. A surrogate module is a DOORS module that contains proxy objects that represent model elements from a Simulink model. You can use surrogate modules to see the traceability between DOORS requirements and Simulink model elements without opening the Simulink model. This image shows the relationship between the Simulink model, the surrogate module, and the IBM DOORS requirements modules.

You can establish the links by using Requirements Toolbox™ or IBM DOORS. After you establish the links and synchronize the traceability information between Requirements Toolbox and IBM DOORS, you can view the traceability information from the surrogate module. When you make changes to the Simulink model or add and remove links from the Simulink model to the surrogate module or to requirements in IBM DOORS, you can re-synchronize Requirements Toolbox and IBM DOORS to update the surrogate module and reflect the traceability changes.
Note
If you want to use Requirements Toolbox analysis tools such as implementation status, verification status, change tracking, and traceability matrices, you must import your third-party requirements to Requirements Toolbox. For more information, see Import Requirements from IBM DOORS.
Choose Traceability Source of Truth
Before creating a surrogate module, you must decide if Requirements Toolbox or IBM DOORS is the traceability source of truth. When you add or remove links in the source of truth, you can synchronize the traceability to the other application. Both tools allow you to create links without modifying the IBM DOORS requirements module.
You can make Requirements Toolbox the traceability source of truth by creating direct links from the Simulink model to the requirements in IBM DOORS. When you synchronize the traceability information to IBM DOORS, Requirements Toolbox creates links from the surrogate module to the IBM DOORS requirements module that match the direct links from the Simulink model.
Alternatively, you can make IBM DOORS the traceability source of truth by creating the surrogate module, then creating links from the surrogate module to requirements in IBM DOORS. When you synchronize the traceability information to Requirements Toolbox, Requirements Toolbox creates links from the Simulink model to the IBM DOORS requirements module that match the links from the surrogate module.
| Traceability Source of Truth | Benefits | Link Creation and Synchronization |
|---|---|---|
| Requirements Toolbox |
|
|
IBM DOORS |
|
|
If you choose Requirements Toolbox as the traceability source of truth, disable bidirectional linking before you create the links from the Simulink model, because creating bidirectional links modifies the IBM DOORS requirements module. To disable bidirectional linking:
Open the Requirements Editor.
In the Links section, click
 .
.In the Requirements Settings dialog box, select the Selection Linking tab.
Under When creating selection-based links, clear Modify destination for bidirectional linking.
Create Surrogate Modules
Before you can create a surrogate module, you must configure Requirements Toolbox for interaction with IBM DOORS. For more information, see Configure Requirements Toolbox for Interaction with Microsoft Office and IBM DOORS.
Note
You can only create surrogate modules for Simulink models that link to requirements in IBM DOORS and contain Simulink or Stateflow® model elements. You cannot create surrogate modules for Simulink data dictionaries, MATLAB® code files, Simulink Test™ files, System Composer™ models, or for models that contain other types of model elements.
To create the surrogate module:
Open an IBM DOORS project.
Open the Simulink model that contains direct links to requirements in IBM DOORS.
Open the Requirements Manager app. In the Simulink model, in the Apps tab, under Model Verification, Validation, and Test, click Requirements Manager.
In the Requirements tab, click Share > Synchronize with DOORS.
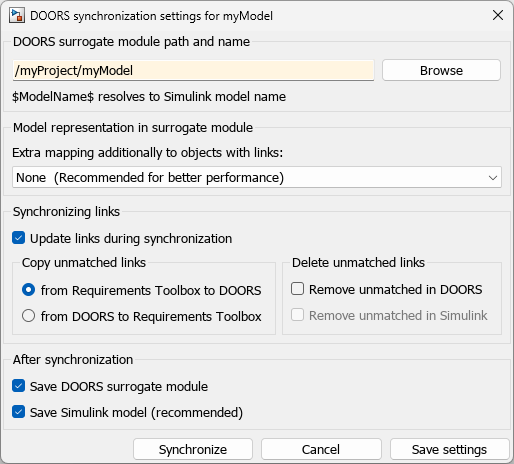
In the DOORS synchronization settings dialog box, set the file path and name for the surrogate module. Under DOORS surrogate module path and name, enter the path and name. You must specify the IBM DOORS project by using a relative path or a full path, followed by the surrogate module name.
To add the surrogate module to the currently open IBM DOORS project, specify a relative path by entering a forward slash, and then
./in front of the surrogate module name. For example, specifying./MySurrogateModeladds a surrogate module calledMySurrogateModelto the current IBM DOORS project.To add the surrogate module to a specified IBM DOORS project, specify the full path by entering the project name and the surrogate module name, separated by a forward slash. For example, specifying
/MyProject/MySurrogateModeladds a surrogate module calledMySurrogateModelto the IBM DOORS project calledMyProject.
You can also get the full path of an IBM DOORS project or existing surrogate module by clicking Browse, selecting the project, and clicking OK.
Choose extra Simulink model elements to include in the surrogate module. Under Extra mapping additionally to objects with links, select an item from the list. If you choose
None, the surrogate module contains only the Simulink model elements that link directly to requirements in IBM DOORS and their parent objects.Tip
If IBM DOORS is the traceability source of truth, choose any setting except
Noneso the surrogate module contains items that you can link to.Choose whether to synchronize the traceability information:
If Requirements Toolbox is the traceability source of truth, under Synchronizing links, select Update links during synchronization. Under Copy unmatched links, select from Requirements Toolbox to DOORS.
If IBM DOORS is the traceability source of truth, under Synchronizing links, clear Update links during synchronization.
Choose whether to save the surrogate module and Simulink model after synchronization by selecting or clearing Save DOORS surrogate module and Save Simulink model (recommended) under After synchronization.
To save the current synchronization settings, click Save settings.
Create the surrogate module by clicking Synchronize.
If IBM DOORS is the traceability source of truth:
Create the links from the requirements module to the surrogate module. For more information, see Creating Links (IBM).
In Simulink, in the Requirements tab, click Share > Synchronize with DOORS.
Under Synchronizing links, select Update links during synchronization.
Under Copy unmatched links, select from DOORS to Requirements Toolbox.
Under Delete unmatched links, clear the selection.
Click Save settings.
Click Synchronize.
Requirements Toolbox adds links to the Simulink model to match the links from IBM DOORS requirements to the surrogate module.
If you create the surrogate module with incorrect settings, you can create a new surrogate module. In the Requirements tab, click Share > Synchronize with DOORS. In the DOORS synchronization settings dialog box, choose a different name for the surrogate module, update your settings, then click Synchronize. The Requirements: Surrogate Module Mismatch dialog indicates that the Simulink model was previously synchronized with a different surrogate module. Click Continue to create the new surrogate module.
For an example of creating surrogate modules, see Create Surrogate Module for a Fault-Tolerant Control System.
Navigate Between Simulink and IBM DOORS
After you synchronize the traceability between Requirements Toolbox and IBM DOORS, you can navigate between the Simulink model, the requirements in IBM DOORS, and the surrogate module.
To navigate from elements in the Simulink model to linked requirements in IBM DOORS, right-click the model element, select Requirements, and select the linked requirement in IBM DOORS.

To navigate from elements in the Simulink model to the corresponding item in the surrogate module, right-click the model element and select Requirements > 1. "DOORS Surrogate Item".
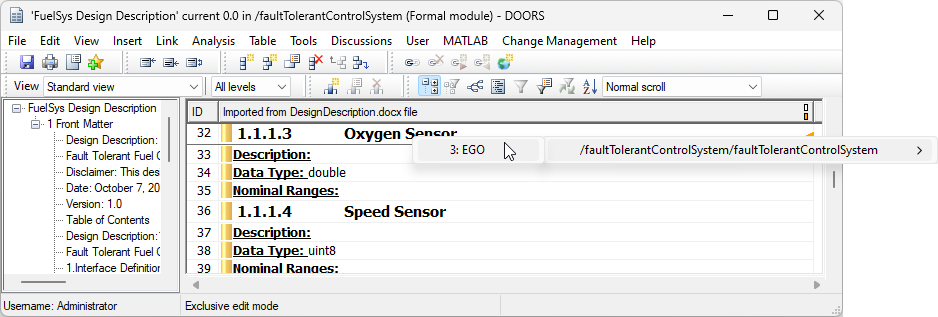
To navigate from requirements in IBM
DOORS to linked items in the surrogate
module, right-click the orange in-links arrow icon ![]() and, in the context menu, select the linked item in
the surrogate module.
and, in the context menu, select the linked item in
the surrogate module.
To navigate from items in the surrogate module to the linked requirements in
IBM
DOORS, right-click the red out-links arrow
icon ![]() and, in the context menu, select the linked
requirement.
and, in the context menu, select the linked
requirement.
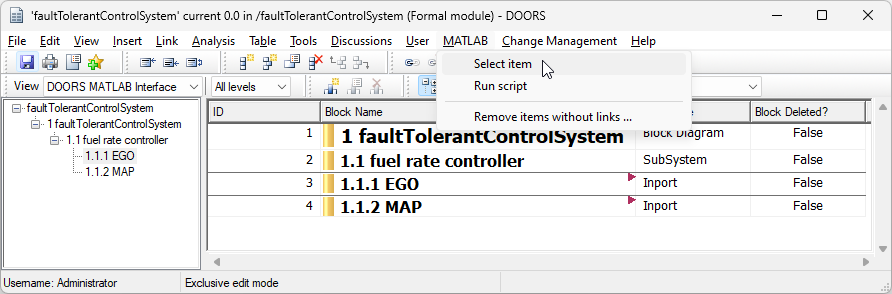
To navigate from items in the surrogate module to the model element in the Simulink model, in IBM DOORS, click the item and select MATLAB > Select item.
Re-Synchronize to Reflect Changes
If you make changes to the Simulink model, you can re-synchronize Requirements Toolbox and IBM DOORS to update the surrogate module. Additionally, if you add or remove links in the traceability source of truth, you can re-synchronize to reflect those changes in the other tool.
To re-synchronize Requirements Toolbox and IBM DOORS:
In Simulink, open the Requirements Manager app.
In the Requirements tab, click Share > Synchronize with DOORS.
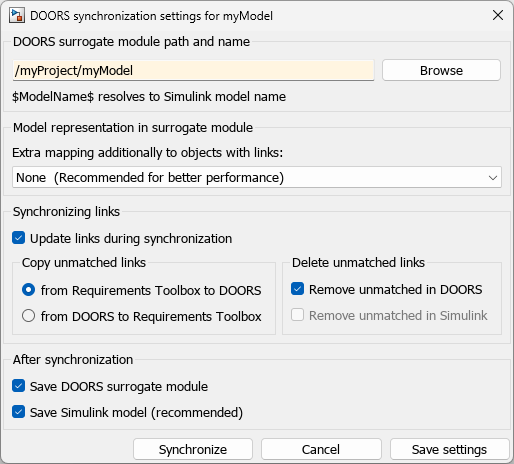
To enable updating the links, enable link synchronization. Under Synchronizing links, select Update links during synchronization.
To synchronize the links between Requirements Toolbox and IBM DOORS, under Copy unmatched links, select from Requirements Toolbox to DOORS or from DOORS to Requirements Toolbox, depending on which is the traceability source of truth.
To delete links from the surrogate module that no longer have a matching link from the Simulink model to the requirements in IBM DOORS, under Delete unmatched links, select Remove unmatched links in DOORS. To delete links from the Simulink model that no longer have a matching link from the surrogate module to the requirements in IBM DOORS, under Delete unmatched links, select Remove unmatched links in Simulink.
Click Save settings.
Click Synchronize.
If you removed model elements from the Simulink model, the model elements remain in the surrogate module but the Block deleted? column in IBM DOORS indicates that the model element no longer exists in the Simulink model.
Related Examples
- Create Surrogate Module for a Fault-Tolerant Control System
- Import Requirements from IBM DOORS by Using the API
- Working with IBM DOORS Requirements
More About
You can also select a web site from the following list:
Americas
- América Latina (Español)
- Canada (English)
- United States (English)
Europe
- Belgium (English)
- Denmark (English)
- Deutschland (Deutsch)
- España (Español)
- Finland (English)
- France (Français)
- Ireland (English)
- Italia (Italiano)
- Luxembourg (English)
- Netherlands (English)
- Norway (English)
- Österreich (Deutsch)
- Portugal (English)
- Sweden (English)
- Switzerland
- United Kingdom (English)