Deploying ECG Classification Using a Transfer Learning Model | AI Techniques for ECG Classification, Part 5
From the series: AI Techniques for ECG Classification
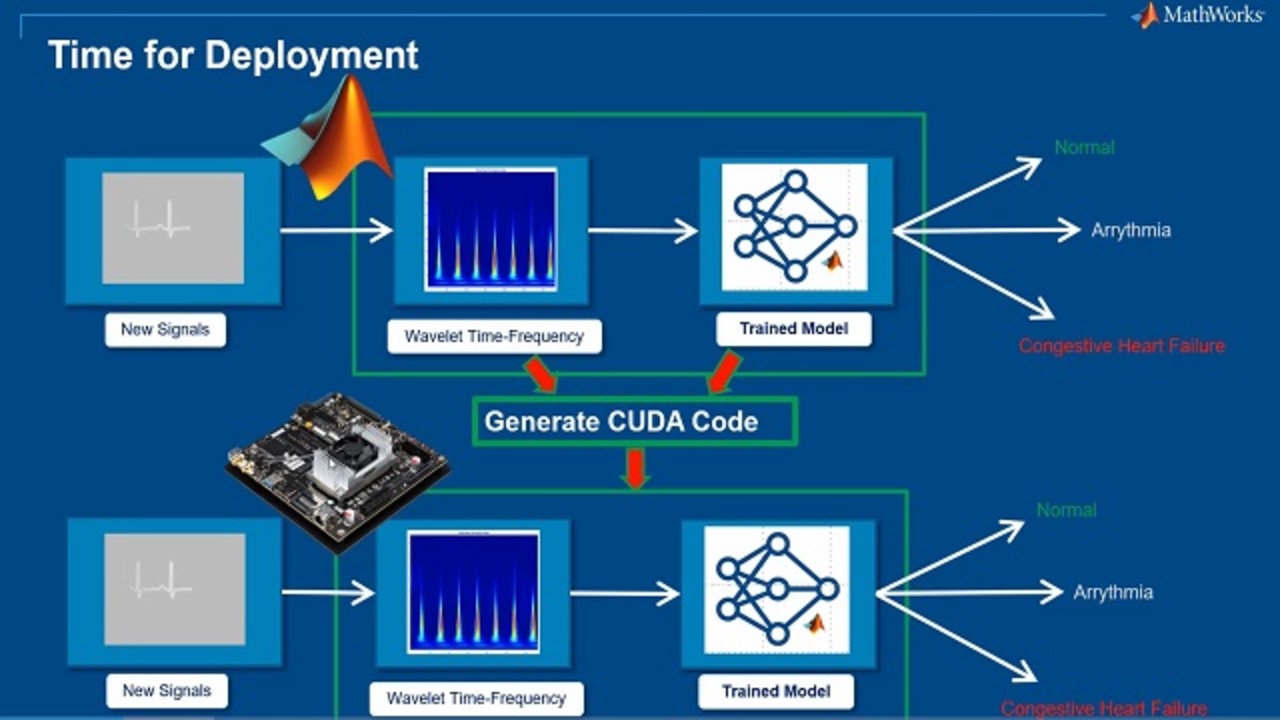
Learn how you can automatically generate CUDA code from transfer learning pipelines developed in MATLAB® to target an NVIDIA Jetson® IoT GPU platform.
Published: 28 Jan 2021
Hello. Welcome to the final part of this video series on developing AI models for biomedical ECG signals. In this part we'll explore how we would take our ECG classifier trained using the transfer learning approach and deploy it automatically on a IoT platform such as a NVIDIA Jetson board.
So let's revisit the AI workflow one more time. So the first step was to prepare the data. So we did the labeling of the ECG data samples. And then we went ahead and trained various models for deep learning and machine learning.
And the final step is what we're going to do now, which is the deployment of the system. Because now we already have a classified in place and what we really want is to have that classified work on an edge device which can take any lie of ECG signals and do the predictions in real time.
So how do we achieve this? Now, because we are working with deep learning models and there's advanced signal processing involved, what we'd like to do is put that application on a GPU device-- such as an NVIDIA Jetson board-- so that the inference of this new signals happen in a much faster speed.
That means that our model of functionality for converting the signals into time frequency images, and then calling the deep learning model to do the inference, needs to be converted to CUDA code which gets deployed on this NVIDIA hardware.
So the enabler factor behind doing this is our product called GPU Coder. What it does is it automatically translates the MATLAB code into an optimized CUDA code which can be deployed on a wide variety of NVIDIA GPU platforms such as Tesla, Jetson, DRIVE, and whatnot.
And we also can perform CUDA profiling as well as verification on these embedded GPU devices such as Jetson-- and this one on the picture I have is the Jetson TX2-- directly in MATLAB.
Additionally it's worth noting that we can also convert the deep learning networks to an optimized CUDA code directly from MATLAB by utilizing the CUDA kernels like the TensorRT.
Additionally it's worth noting that for the deep learning networks in particular, we generate the optimized CUDA code leveraging the TensorRT and cuDNN libraries provided by NVIDIA directly, for a high throughput inference.
So let's go ahead and take a look at MATLAB. So this is my MATLAB function over here, which takes in this time series signal which is of a gain of size one by 65,000.
And the task of this function is to first convert it to a CWT image-- a time frequency image-- which is the function over here. It takes it continuously to transform and converts it to an RGB image through this, another function over here.
And the final step is to load the ECG network, which was the Alexnet model with transfer learning, which I already have saved in my MAT file, and call this predict function to output the scores of all the three classes on which this model is trained. So this is the entire workflow which we will deploy on a Jetson board.
And now to do that we can either run the GP CODA through the script more to generate the code, or we can do it through an app. For our demo, we will be using the GPU Coder app and running this to generate the code.
So this is our GPU Coder app. Let's open this. And we need to specify which function we are generating the GP code for-- this model_ predict_ ecg. And I can override it because I've run this previously.
And now it will asks us, like, hey, the time series signal is there as an input, what is the size and type? Because we are now going to generate a CUDA code from it, so we need to define the size and the type of the data types being handled.
So in this case, we can specify we already know that is a 65,000 sample long signal of length by five. And let's check the length again. Five, three, six, so-- six, five, five, three, six. Perfect.
Now we can move on to the next step. And what it says that your code appears to be using deep learning neural networks. Would you like to configure the target library? Yes, I would.
And let's go ahead and check this. So like I said before we can leverage TensorRT or cuDNN. And I'm going to use cuDNN in this case. And we can move on to the next step.
So now we specify what our goal is. So our goal is to generate a standalone executable which would be running not on the host computer but on the NVIDIA Jetson platform. And I can go to more settings.
Now, because I'm going to generate a standalone executable I need to specify where my main.cu file is so that I can specify how the data is being read and how the output data is being written from the Jetson device.
And in our case for demonstration purposes what I have is I already have this main.cu file, which was generated from the code gen process.
We generated a template but I modified it to include two more functions which is called read data for reading up signals from a text file in this case. And then writing the output of the CUDA code to another text file, which was the three scores on the probability that the classes it predict.
A note over here-- this is model_ predict_ ecg function which reads, after reading the data this is sent to the automatic generated code, which corresponds to this MATLAB function which I showed you in the beginning. And it writes output to another area which is the pred class property which gets written out to a text file with the name of pred_ class_ prop.txt.
So like I said before I already have this main.cu main.etch written. But if you are starting from scratch you can navigate to the settings where it says generate example main file.
So you can say generate but do not compile an example main. So it would only generate an example main, and then you can go ahead and modify that example main which I have done already in this case.
So now I will choose do not generate an example main. But what I'll say in the custom code is that hey, add this additional source file main.cu to my build part-- to my Build Directory. So once I've done that I'm all set.
And an additional thing I would like to show you is when I specified NVIDIA hardware we have this hardware tab where we need to specify the device address, and the username, and password to access the device.
So I already have this populated. In this case, I'm working on a Jetson nano board. And let's go ahead and click Generate and generate the code for this MATLAB function.
So we can see that the build has completed. And it did generate a lot of code. And we can actually view the report of the generated code from the GPU Coder app.
And what we can see over here is on the left side bottom for these three functions which we had a model predict ECG, CWT, and conversion to image, it generated a bunch of the .cu files.
And it also generated a lot of this CUDA kernels which is all the parallel processes happening from this function, which is running on the GPU.
Now you can take a look at this. The main file, the source file-- the model_ predict_ ecg .cu, which is being called from our main function which is this guy-- main-- which is our custom main. So it called this model_ predict_ ecg.
And you can see that this function is being called over here. And it would be calling all the kernels, converting the signals to CWT, converting them to images, and then loading them in their deep learning libraries to do the translation and do the prediction.
And now I can go back to my MATLAB and see that it did generate this model_ predict .elf file, which is the one actually deployed on Jetson board.
And at this time I can actually go to my Jetson board and say, in this case so I was using GPU Coder nano two. I can create a SSH connection to my Jetson board. I'll use the same username and password which you saw in the GPU Coder app.
And once I have that you can see that right now in my GPU Coder app I was working on a build directory which was remote build directory, and that's what I would navigate to. That's where my application lives. So I'll just do cd remote build directory.
And in this one so I'm working with MATLAB 2020 A. And listen, guys, I'm navigating all of this in my Jetson board. So it kind of copies the same path as the path I'm working on over here. So we will use this mage as example for Jetson deployment.
And over here if I do c here-- so you see that I have this main.cu file, a cogent folder over here, and then I have this executable model_ predict_ ecg .elf.
But if you remember from main.cu what I do say is that hey, in my main function I'm going to give an input argument as an argv function, which is to the text file of path which has the signal data.
And so I will take this data and choose one of the samples, say 131st sample. And I call it-- in this case that the 131 is actually a normal sinus rhythm. And what I will do is I will write it to a signal data. text file over here and run this hwobga. put file command, which is the heart of an object which is connected to the NVIDIA Jetson.
And now what I'll see is if I go back to this SSH interface of my hardware and I do a list command, I'll see that before we do not have signal data but now we have the signal data .txt file, which I just rolled over here.
So again, guys, this is on the board of Jetson. And what I can do is now since I have the input I'll just run this executable model_ predict .elf. And I will provide the input file, which is signal data .txt
And by the way, everything I'm doing here there's a way in MATLAB. Also you can run this on the Jetson board directly from MATLAB itself. But I just thought like doing it through an SSH directly on the Jetson is more powerful.
So let's go. It did run the routine and let's see the LS now. And you see that it created this spread class prod .txt file, which was not created before running this module.
So we do have an output file now and you can actually take a look in that file too directly from here, but we will actually import that file in MATLAB to do the validation. As you can see it's put out three numbers which are the probability corresponding to the three classes of ECG.
So let's get this result back in MATLAB. And we have this command, which is get file to import a file from the Jetson board back to MATLAB. And I'm going to read the content and display it.
But at the same time you notice over here I'm also calling this function in MATLAB just to have a comparison of the results from Jetson versus MATLAB.
And what we see over here is the prediction is quite accurate on the Jetson board and MATLAB so 77% probability was of NSR, which is our signal in this case. And you see that the numbers are kind of almost very, very close for all these probabilities.
And that's the difference. And this is because of the precision of the processors of my host computer versus the Jetson board.
So now we can re-run the script again one more time with a different class. Let's say I want to sample this index 91, which is arrhythmia. And this is actually an inverted ECG.
So let me do the put file again and copy the signal data .txt to my workspace directory and my Jetson. And if I see or hear the signal data .txt is rewritten but then pred_prob is from the previous run, I can actually remove this third class property so that now I can just re-run my executable again and regenerate the pred_ plus probability file .txt.
So let's go ahead and do that. It just take a few seconds to run on the Jetson board. And now if we check, we already have this file pred_ class_ prod .txt And I can get these results back in MATLAB using this command get file.
And now we see that the arrhythmia probability is actually 99% in both the MATLAB results as well as Jetson results. The two are kind of very, very close to each other.
So thus we see that how we can translate automatically this MATLAB code functions to a native CUDA code and which gets written onto a IoT platform directly like a NVIDIA Jetson board.
And using from MATLAB you can still have the control on doing the IO for reading and writing the signals, or you already have this application compiling a standalone .elf file on your Jetson board.
And you can modify this main.cu to specify your IO routine, maybe even from the hardware, or maybe from a USB port, or maybe an audio port, or whatnot. And have that application run live on this Jetson board and get the inferences for your application.
Featured Product
MATLAB
Up Next:

Related Videos:


Seleccione un país/idioma
Seleccione un país/idioma para obtener contenido traducido, si está disponible, y ver eventos y ofertas de productos y servicios locales. Según su ubicación geográfica, recomendamos que seleccione: United States.
También puede seleccionar uno de estos países/idiomas:
América
- América Latina (Español)
- Canada (English)
- United States (English)
Europa
- Belgium (English)
- Denmark (English)
- Deutschland (Deutsch)
- España (Español)
- Finland (English)
- France (Français)
- Ireland (English)
- Italia (Italiano)
- Luxembourg (English)
- Netherlands (English)
- Norway (English)
- Österreich (Deutsch)
- Portugal (English)
- Sweden (English)
- Switzerland
- United Kingdom (English)