Obstacle Avoidance Using a Camera Sensor
From the series: Perception
Discover how you can autonomously navigate your vehicle through obstacles using the vehicle's front facing camera.
Design an optical flow algorithm using the Computer Vision Toolbox™ to steer the vehicle away from the obstacles. Understand how you can design the control strategy to maneuver using Stateflow®. Visualize the behavior in the arena using Simulink 3D Animation™.
You can find the example models used in the example on the MATLAB Central File Exchange.
Published: 19 Oct 2021
Hello, everyone and welcome to the MATLAB and Simulink Robotics Arena. My name is Maitreyee and in today's video, we will see how you can navigate your aerial vehicle through a series of obstacles from the takeoff location to the ending location using the eyes or the front facing camera of the drone. We will first briefly understand the problem statement and the arena that we are working on. We will then understand how we have implemented an obstacle avoidance algorithm using an image processing technique called optical flow, state machines, and controllers. You will then understand how you can tune this model to use for your test and then conclude with some key takeaways.
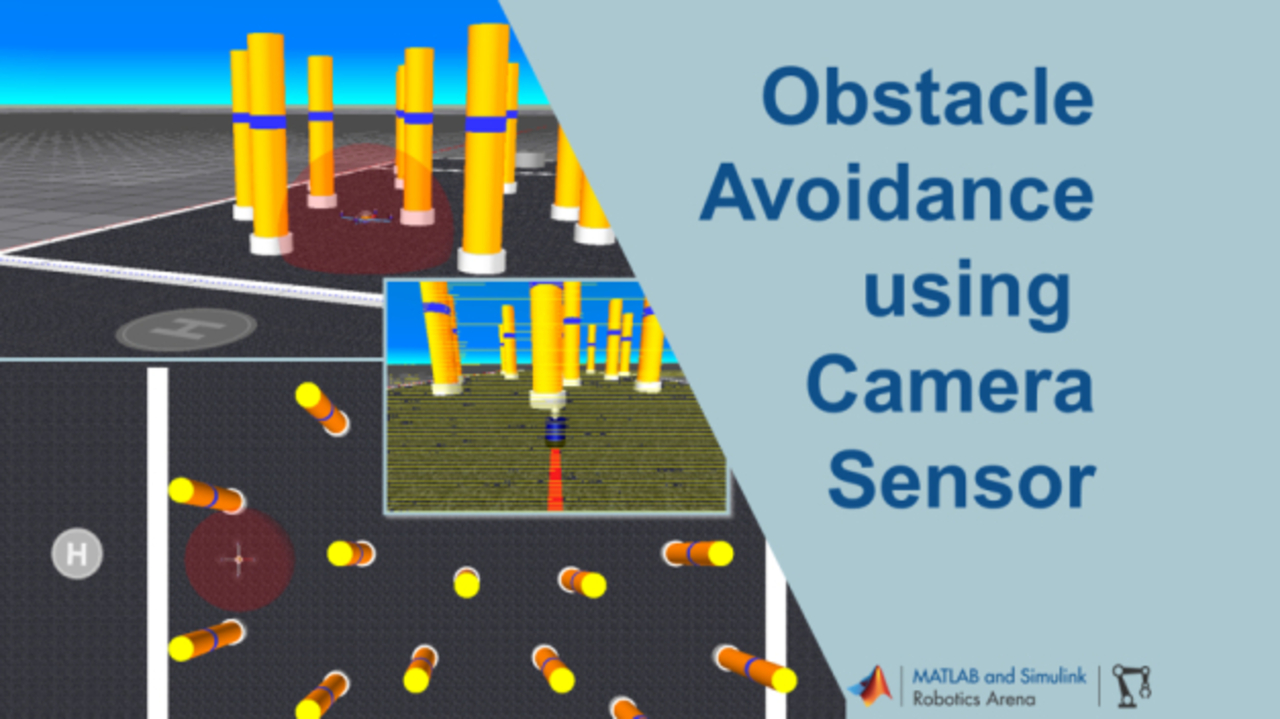
Today we are going to go to a virtual arena where we are trying to navigate a drone from the takeoff point to the landing point. We will take off the drone and ask it to move into space autonomously to steer its way through the pillars to reach this line. After the drone reaches this line, the control algorithm picks up the PID controller to direct the drone to land on the helipad. But before we start, let's understand what optical flow is. Optical flow is an image processing algorithm which helps us find apparent velocities of objects between two consecutive images.
It is a commonly used computer vision technique to characterize and quantify the motions of object in a video screen. It is typically used for motion estimation but we will use this algorithm today to maneuver to avoid obstacles. There are multiple approaches. Let's say using deep learning using point clouds that can be used to tackle the problem of autonomously traversing through objects to avoid them. Today we will showcase one of these techniques which can be used for obstacle avoidance using a simple algorithm using the front facing camera of a vehicle. Let's directly dive into the Simulink model and open this file.
Here you see that we have five parts or subsystems. The input from sensors, which will tell us the feed from the camera and the details about the position of the drone. Second is calculating the optical flow lines between consecutive image frames. Third is where we use these optical flow lines to avoid the obstacles. Fourth is to check if we have reached the landing location. And the fifth one is visualization block that has been implemented using Simulink 3D animation. Let's go into the sensor inputs.
Here we are using two Simulink 3D animation blocks. The first one is a VR source block where we are getting the information about the translation of the position of the UAV. To get the translation values we used a VR source block. Provided are details about the virtual world that we are using. Select the parameter that we want at the output, which is the translation details of the UAV, set up the sampling time, and connect it to the output.
And for the second block, which is the onboard camera, we will select the VR, that's virtual reality to video block. We will again provide the environment that will be working on. Set the sample time and provide the dimensions that we want for the video stream. We'll take this to be 320 by 480. Click on Apply. Set up and preview the video output and ensure that the viewpoint is set to both sides. And so when you open it the next time, it is the broadside output. Click on OK and connect us with the output.
The next block is where we're calculating the optical flow lines. So here we convert the RGB image into intensity image and use it for the optical flow block from computer vision toolbox. Here, you can select which are the two frames between you want the optical flow lines to be calculated. For us, it is just the immediate frames. Hence, we selected N is one. We selected the Horn-Schunck method and used the magnitude square values as the output. The next step is the algorithm. How we are avoiding the obstacles? Let's see the floor differences MATLAB function.
Here you see that we are summing up the optical values for the left half of the video and the right half of the video. If there are more obstacles on the right half of the screen, the sum of the magnitude of optical flow on the right half of the screen will be more. Hence, we would want to go in the direction of lesser objects. So we steer away in the direction which has laser optical flow. We find the difference between these two values, that's the right and the left, and find out which is the direction in which you must steer.
The next step is to control the position and the orientation of the drone. We do this using state machines. We have modeled the work into two parallel tasks. First is to control the position and the second is to control the orientation. First, is to menu other drone autonomously using optical flow. The second is to navigate the drone to hover over the helipad land location by kicking the PID controller after it crosses the line. And the third is to actually land the drone on the helipad.
In the first step, all we control is the y direction linear velocity. We do this to move the drone to the right or to the left depending on the optical flow input. We then implement a controller, in our case a basic PID controller, to hover the drone over the landing location. And these are the values where the drone would hit. And then eventually we land the drone on the helipad. We do something very similar with the orientation too.
Before we reach the x limit, that is this line, you would be avoiding obstacles using optical flow, essentially changing the sign of angular velocity in the y direction, that's omega y. And to land, we will use fixed angular velocities. And we use the position and orientation outputs from this subsystem into a Simulink 3D visualization arena using the virtual reality synch block. If we go to a simulation and block parameters, we see that we have provided that details about the arena that we are using, the sampling time, and the inputs that we need, which is the rotation translation and the other parameters.
And in the last block, you just see if the drone has reach near the landing location. And then just stop the simulation. However, in this example, we have not modeled the dynamics of the drone. We have considered that our drone is a point mass, but you can add your own drone dynamics if you need and then model its behavior it's run the simulation and visualize the performance.
You see that the drone is using optical flow to avoid obstacles right now. Once we cross line, it gets to the hovering point and then lands on the helipad. But the next question that you may have is, is this model going to work in a different environment? What happens if we move some pillars to a different location, or let's say change the carpet, or use a different kind of an obstacle altogether? Let's go to the Simulink 3D Animation Arena and change the location of one of the pillars. Let's change the location of bowl one from minus 0.53 to let's say minus 1.4. Upon reload, we see that the ball has moved. Let's run the simulation.
You see that the drone avoids obstacles, but it does need some tuning. But you go to the startScript.m and probably increase the linear velocity in y direction to deflect it a little quickly. Run the MATLAB script and run the simulation. You see that the drone performs a little better than what we saw in the last time. So your model would need tuning if you change the arena.
Before we conclude this video, let's talk about some of the key takeaways. First, is you can design a system that works for different domains in one Simulink model. In this example, we combine an image processing system with the control strategy to display the visualization using Simulink 3D animation. There are various algorithms that MATLAB and Simulink has that you can use to design your image processing system, like the optical flow that we used, state machines, and controllers.
And the last thing that we learned is that one needs to tune the parameters of the algorithms to get the performance exactly as they're desired. The models used in this video are available on GitHub and on File Exchange. We should be able to find the link in the description. Feel free to use them in maneuvering your vehicles autonomously through obstacles. However, if you come across any obstacles when you're working on this model, please feel free to reach out to us at roboticsarena@mathworks.com. Thank you.


Seleccione un país/idioma
Seleccione un país/idioma para obtener contenido traducido, si está disponible, y ver eventos y ofertas de productos y servicios locales. Según su ubicación geográfica, recomendamos que seleccione: United States.
También puede seleccionar uno de estos países/idiomas:
América
- América Latina (Español)
- Canada (English)
- United States (English)
Europa
- Belgium (English)
- Denmark (English)
- Deutschland (Deutsch)
- España (Español)
- Finland (English)
- France (Français)
- Ireland (English)
- Italia (Italiano)
- Luxembourg (English)
- Netherlands (English)
- Norway (English)
- Österreich (Deutsch)
- Portugal (English)
- Sweden (English)
- Switzerland
- United Kingdom (English)