Scenario-Based Virtual Validation of Automated Driving Systems
Explore options for creating virtual driving scenarios such as scenario designs, using scripts and graphical user interfaces, importing scenarios from existing libraries, and generating scenarios using data recorded by in-vehicle sensors. Learn how to programmatically create variations of an existing scenario. You can use generated scenarios in closed-loop simulations to model and test controllers.
Published: 9 Dec 2020
Welcome to this presentation with the title Creation and Variation of Traffic Scenarios for Virtual Validation of Automated Driving System. My name is Marco Roggero, and I am working at the Application Engineering Department at my MathWorks with a focus on automated driving system and autonomous systems. What are we going to see today? We have three topics. The main one is the efficient creation of traffic scenarios. We will see there how you can efficiently create scenes with the tool which is called RoadRunner for 3D simulations.
Then, we will see two options for scenario simulation, one with cuboid scenarios and another one with traditional 3D scenarios. Will see later in the detail what are the differences between these two kinds of scenarios and how you can work in both cases. Then, we will see an overview on the options that we have for generation of synthetic sensor data. And then, also, how you can automate the test for validation of automated driving system using multiple scenarios.
Now, before we start, I would like to show you some examples that we are going to see today and also to explain the reason why these points are so important. So an objective that we have with the validation of automated driving system is that we want to reduce the set of our known and unsafe scenario as required, for example, from the SOTIF standard. And this is an objective that we have.
To do that, we have a challenge that is that we need a huge number of realistic scenarios. And these scenarios have to include variations of scenario parameters and also have to introduce a possibility to test different conditions and also dangerous conditions. And here, you see a video in which we use a tool which is called RoadRunner to easily and efficiently build roads and define from one side road networks and from the other side, also, the environment which is around this road networks.
You will see a little bit later how you can use this tool, but this is just a video example. You see, you can add many details, and you can also specify the quality of the signals that you have on the roads. And it is a way to describe, in a very precise way, a 3D simulation.
Another option that we have is to describe these cuboid scenarios, what we call cuboid scenarios. These are scenarios in which we have less information in the simulation about the environment. We have information about the topology of the road, the characteristic of the actors, so the vehicles, the pedestrians, the cyclists that are on the road. And, yeah, these are the two options that we call 3D scenario, the first one that we have seen, and this one we call it cuboid scenarios.
And the advantage of using this kind of simulation is that we have a workflow that allows to generate these scenarios and to automatically change them. And so these cuboid scenario and 3D scenarios allow us to simulate millions of kilometer. Another challenge that we have is that to make simulation based validation, we need to generate a realistic and reliable sensor data out of these scenarios, these cuboids and 3D scenarios.
And here you see an example in which we can generate from the cuboid scenarios, sensor data, synthetic sensor data modeling, for example, here radar and a lidar sensor. And you can use, for example, this synthetic data as an input for your perception algorithm so that you can model them and then you can validate them with many tests.
Another example that you can see here is the options for 3D scenarios in which we can run much more realistic simulation and extract other kinds of datas. As you can see here, for example, in this picture, we have generated this point cloud while the vehicle is moving through a detailed city scenarios. And here, you see how you can use the same point cloud, for example, to generate a map of the environment that you are moving through.
So synthetic sensor data allows the simulation and validation of perception algorithms. A third point that we have on the agenda address the fact that we need to test our vehicle on millions of kilometers. And to do that, we need to use these different scenarios, and we have to organize the test in an automated way. And this is something which is possible.
So from one side, you can really run this kind of simulation as you see here. It's close to simulation in which you model what is happening on the road. You model what the sensor will see and how the car will behave. And we will see that there are options to automate this kind of test. And, yeah, doing that allows us to validate in an efficient way our automated driving system.
And now, let's start with the core of the presentation. So we have the topic creation of traffic scenarios. Let's start with the first slides. So at MathWorks, we are working since a long time on automated driving system. We have a wonderful team of developers that is working to develop new solutions. And we are focusing on three topics where customers customer asking us for a good solution.
So from one side, we have a first point, which is analysis and synthesis of scenarios. Then, the second point is, how can I model and design and test my perception planning and control algorithm? And then, how can I test all these systems together and also integrate all the different kind of frameworks and toolchain that are used on the application of automated driving?
Now today, we will focus on the synthesis of scenarios. And just to give you an overview, if you are speaking about scenarios, you have a problem is to define the scene that you want to simulate. Then a second step is to define the actors and to animate them, and so define the trajectory, how they should be. And a third step is to generate these sensor datas. And actually, these are all the topics that we have on the agenda today.
Now, let's focus on the efficiency generation and description with RoadRunner. We have this tool called RoadRunner since the release 20a that allows us to simulate scenes in which you can introduce a lot of information. And the scenes that you use can be then exported to different external simulators like IPG, VIRES, the list is very long. Then, actually, all the simulators that are used for automated driving and, also, you can export to the scenes that we have created in MATLAB and Simulink and use the simulators that are typical of the MATLAB and Simulink toolchain.
Now, VectorZero is the company that designed and developed RoadRunner and put it on the market, I think about three years ago. And now VectorZero, the entire VectorZero company is part of MathWorks. RoadRunner is actually the best tool known for scenario generation. It is a product which is very well compatible with MATLAB and Simulink as well as with other simulators that you have for automated driving. And also, if it is really well compatible with MATLAB and Simulink, it is independent. So you can use RoadRunner also if you don't have a MATLAB license.
And the RoadRunner product family is composed of three products. One is the basic RoadRunner tool which allows you to define topology of the roads and of the days. We have also an asset library which provide you a library of objects that you can use and to import them directly in the scene that you are describing.
And we have also a new tool with the version 20b which is called RoadRunner Scene Builders that allows you to import and create import data from HD maps and create, in a very efficient way, large road networks for many, many kilometers with actually an automatic debugging system that allows you to create the road networks with a quality that do not need too much debugging then from you or your colleagues that have the objective to build the scene.
And in RoadRunner, we have the option to insert many kinds of information and vision profile of the road and also signals or different objects next to the road. You see here you have, also, the options, you can introduce several techniques of defect of the materials that is composing the different kind of objects that you have in this scene. And here in this video that we have already seen before, you can see how intuitive it is to generate this kind of scene.
Now this video that you are seeing is accelerated but, actually, it is really easy and quick to add to this kind of details when you are working with RoadRunner. You have these objects from the asset libraries that you can import from the road. You have here a number of tools that allows you to make the different kind of operations you see here with how you can just drag and drop objects or properties, and you can really easily and quickly define new scenes.
Once that you are finished with the definition of the scenes, you can export it. And here, for example, we see how you can export it to CARLA. It is just straightforward and easy. You have to select the Export option in the menu, then to select the catalog option, and then to name the file that you want to use. Then, you can import it in the CARLA environment which is using the Unreal Engine that you see here. And then, you will have your scene in the Unreal simulator as you can see.
Here we are. We have reproduced the same scene in Unreal. Perfect. What is the next step then? To add, for example, actors like in this case one car and define the path of this car and let the simulation run and here you will be able to generate the data and to run the various simulation. And you can generate, for example, here in a segmented image that is generated from a synthetic camera which is running through the environment or is mounted on the car.
Of course, we can also simulate not only cameras, but lidar and others. This is depending on the simulator that you are going to use, but we have also in the MATLAB instrument toolchain these options with simulation of vision sensor, cameras. So vision sensor, lidar and radar.
A very important point is how can you import files into RoadRunner. And a classic way to import those with OpenDRIVE. In this video, so we are showing that we are going here on OpenDRIVE.org, and we are downloading just an example of an OpenDRIVE file. And you can import it quickly in the environment. You have just to make some steps to define the coordinates in an automatic way of the object. And then, of the track and then you have this road network imported into RoadRunner. And you add the first scenario to it.
And then, you can proceed and, for example, define the intersection with the kind of maneuver that allowed on it and add many, many level of details. In this video, you see how you can just describe an intersection in RoadRunner with the mouse. You need, at the beginning, to do some practice, but I can really guarantee to you that once that you have tested and you have exercised once how to do an operation with RoadRunner, if you have to repeat it, it will be really automatically and intuitive.
We have a wonderful documentation to learn how you can use the different tools that are available in RoadRunner with many examples. And here, if you have the PDF of this presentation, you can also directly access to the documentation and [? refer ?] to it. We have many examples, as you know, also other MathWorks product. The documentation is one detail which is very important to us and that we take care of. The reason why is that with good documentation, you will be able to ramp up with the tool in a very efficient way.
So I mentioned before that we have an asset library, a library with objects that you can drag and drop in the system. And this is actually an extension. This is a separate tool that you can buy with the RoadRunner. And the name of the tool is RoadRunner Asset Library. It is easy, also, to import 3D objects that are maybe not in the library or that are in another library that you have available. You can import vector graphics and also maps for the elevations which is a very important information if you want to take in account the morphology of that specific depth.
In this video, we see how you can easily import objects by drag and drop in a scene. We are importing, first of all, single objects. You see on the right part of the screen there, the information about the position and rotation and also about the dimension of the different objects. And you can also import group of objects in our scene that you would like to define the surface in which will have many trees with specific distribution. You can also navigate very well in the tool. And, yeah, the usability of the tool is extreme high.
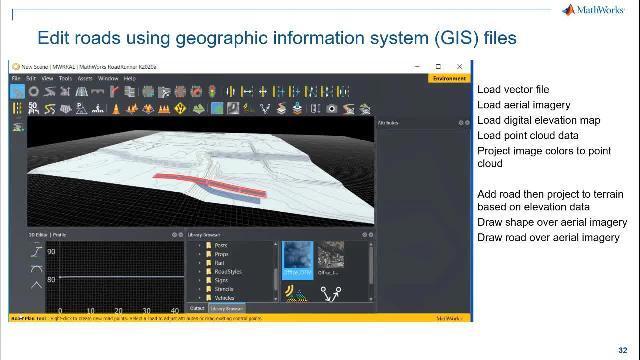
And another very, very important point is that you can also import other information like point cloud, orthoimagery, or vector data that you can use to overlay this kind of information with the scenario that you are creating so that you can then insert the roads in the right position, and you can make a comparison between the road map that you have that generated and the data that you have.
And you can also use this kind of information to generate detailed information about the environment that you have not only for the road, but also for the buildings or the trees or for the rest of the environment. Here, we have a very interesting example in which we are importing a file with elevation information into RoadRunner.
And then, you can define a road just with the mouse. And you see that cutting out this road is suspended, and it is not touching the territory of the elevation map. But we have tools that allows us to project the road on the map and to include in an automatic way this elevation information.
And so we have seen a few examples of how can you work with RoadRunner. And once you have defined the scene, you can export your work to use what you have done in different kind of simulations. So you have two main options to export data which are the Filmbox and OpenDRIVE data formats. And you have also some other, a quite long list, of simulators that are directly support for exporting your work.
So before, we have seen the CARLA simulator which is using the Unreal Engine, but you see the list is long, and it's even not complete on these slides. You can export, really, your work to different kind of simulations that you want to use.
Here, I have a video with another very, very interesting example. It is showing what RoadRunner Scene Builder allows you to do. So you ever hear the possibility to import data from HD Maps and generate automatically a network of road for a large surface and with a really high flexibility and a high quality. So what you have to do is to specify the latitude and longitude of the region that you want to reproduce. And this is what you see here that is being done.
Then, you have somehow to specify the range of the surface that you want to have. And you can import the data. You need to have also a license for the HD Maps. And you will see here that we have already imported all this data. And what you are seeing here is in real time, so the process is really faster. And you see here a classification of the different kind of roads that you have. So green is here for roads that are expected to generate no errors at all, and then red is for roads where there is not this high level of confidence to have a perfect match between the roads.
Then, you have to specify the portion of the network, which is interesting for you, just with the mouse in a very intuitive way. And then, you can ask this Scene Builder to build the road for you. You see here, we have more than 100 kilometers of road in the network, and we are asking to build them. 100 kilometer is a lot, but it's actually really easy to get even higher value of kilometers in a road.
And here, you see this is the region that we have selected. You see how complex this road network is with so many information about the elevation of the roads and many connection between these roads. And have a look to the quality that you have achieved. This is really a powerful capability of the tools. And just think about the amount of hours that you can save in your scene design with a capability like this one. It's just amazing, and I'm so proud to have colleagues in the development that are working on this kind of application and developing these kind of tools.
And once again, this slide which is showing the available documentation that we have. Many, many videos that are available in the documentation. And we have also a YouTube channel with RoadRunner and the method that was prepared from VectorZero. You have examples, written examples and video examples. It's really easy to start, and it's also really fun and it's motivating to work with this tool.
So for RoadRunner, we have seen the three kind of tools that we have in the product family, the basic RoadRunner, the RoadRunner Asset Library, and this RoadRunner Scene Builder that allows us to import efficiently and very quickly information from HD Maps.
Now, this was the first part of the presentation about RoadRunner. And we have seen that we have the possibility to export to the scenes to external simulator. Now, let's have a look to the options and the compatibility between the RoadRunner to the MATLAB and Simulink environment, and also let's have a look to these two kind of scenarios that are supported by MATLAB and Simulink in a direct way.
So the first kind of scenario is the cuboid scenario. This is an easy description of an environment. You have topology information about the roads and you have the possibility to generate sensor data with statistical models of different sensor. And we have a visual sensor, lane detector, radar, and lidar. The second option is 3D simulation. We use Unreal there, and you can there use this kind of more detailed information. And we have options to generate information and synthetic data gained from radar, cameras, and lidars.
Now, let's focus and start with these cuboid scenarios. These cuboid scenarios are very important, maybe also at the beginning of your design of a functionality in which you can quite easily and rapidly define new scenes that have not many details but that are already realistic enough to understand if your algorithm is working properly or not. They are really important. They do not need a really a very powerful computer or graphic card, and they are a great tool.
And here, let's have a look to a tool that we will see in a few seconds or so with a direct example. Here, you see the road which is described. This is the ego vehicle you have seen all the other actors were behaving. And let's have a look to the tool here.
This is the tool that we have seen before. And you have different options to import scenes here. You can, for example, open the different scenes. And you can use a library of pre-built scenarios. And here, you see we have here [? EarnCAP ?] scenarios and other kind of information. And in different categories, we have many, many already existing scenarios that you can take and open.
And you have also other options to import OpenDRIVE file, OpenStreetMaps, and, here, HD Live Map. And you have also options to generate here once that you are finished with the scenario that you are using, you can generate the MATLAB function or export, for example, an OpenDRIVE file.
Now, I will just start by describing a road here. I can describe the road. I can just also add information about the lanes that I want to use. Number of lanes, maybe, I just write two, and I can proceed in adding different kind of details. Then, something that I could do is to add an actor. Just let's add one car here and define the path of this car.
Then another thing that we can do is to add another actor, for example, a truck, and let's position it here. And I am just working quick and dirty here to show you the principal. And you can see, for example, here I can add the forward waypoints and also reverse waypoints so that I can specify a different kind of maneuver that my vehicle are doing. So the traffic move in this direction.
And then, in this example, let's just take a bicycle, and so this bicycle is moving in a dangerous way in the middle of the road. And we add it here. So you see now you have this cuboids. I would like just to take this ego vehicle and let's add one radar here, maybe, in this position. And also, let's add a lidar, let's add it here. It is also possible to choose any other position and orientation of these vehicles.
You have the possibility to define the many, many parameters for every one of the sensors, so it is a complete parameterization which is possible. And then, you can run this kind of simulation with the scenario. And here, you can see, with the lidar, we are using automatically meshes for the animation. And you see here what is happening on the road. And you see here, for example, the lidar point clouds which is generated with the time.
And if we go back, you can see here, also, the radar reflection that have been generated by the time. And let's stop it. And once that you are finished, you can, for example, export an OpenDRIVE file or generic MATLAB function. A comment is that so it is something that I do quite often is to take a scenario for an OpenStreetMap where I have a very good source of information. And import it here directly and to reproduce in a complex network. And then export it to OpenDRIVE so that I can directly use the scenario that I have defined here, also, in RoadRunner.
This is a very important point for the compatibility and the efficiency of the workflow using MATLAB, the Automated Driving Toolbox, and RoadRunner. And also, if you want, you can generate this MATLAB function. And here, you have the possibility to quickly add all the information that you need to reproduce the same scenario in the same kind of simulation. Perfect. Let's proceed with the presentation.
And now, it is possible, also, with this scenario Designer of the Automated Driving Toolbox to import the data from HD Maps or for OpenStreetMaps. Here, you see an example that we have illustrated for HD Maps. We want to generate a specific map for a specific region. Then, we just have to import it. We have to select to give it, as information, the coordinates of the area that we want to reproduce. Then, we have to select the roads that we want to import. And finally, we have our scenario in this simulator that we can animate with the different kind of actors.
And then, you can export it, for example, using this Export MATLAB function or the other options that we have. Perfect. We have also other kinds of options that are really very, very useful. For example, here, you see an example that is a part of the Automated Driving Toolbox in which we use recorded data that we have collected on a test vehicle to automatically generate and reproduce a scenario.
And so we have used the data from GPS, video data, lidar data, and OpenDRIVE maps to reproduce a scenario like this one. You have seen, just now, this vehicle that was performing a cut in maneuver in front of our ego vehicle. You see this complex scenario in India. And we have used OpenDRIVE to recreate the road network, GPS data to create an information about what was my ego vehicle doing, and we have used a list of objects from the lidar detector, from the lidar sensor, to understand what the trajectories of the other vehicles.
And here, you see the results in which we have the ego vehicle here and the other objects on the road. And for example, you see that we are reproducing this cut in maneuver that you have seen at the beginning in the video. This is also a very important example, very useful one. And this example, as all the other examples that you have seen here in this presentation, are available for you and ready to use if you have installed the products.
We have the possibility, also, to generate some intelligent kind of data simulation. And, also here, we have an option which gave us the possibility to automatically create a new scenario by changing, in a programmatic way, the parameters. So we have a workflow in which you can use a script to change the code in your scene. You have, for example, a scenario with an intersection, you can change, with a script, the speed of the cars or the initial distance of the two vehicles or, also, the properties of the two actors.
So starting from a defined scenario, you can make many variations of the same scenario. And you can test how your automated driving system will perform in this new situation. And the workflow that you find here on using this demo is showing you how to run the simulation, for example, in a Simulink closed loop simulation.
So here, you see the examples I was speaking about. And you see there is a lot of information, and this is an example that you can directly run into MATLAB. If you make another step in the documentation, you can see here other examples. These are all the example for programmatic scenario altering in MATLAB.
And here is another example that they find really, really interesting. An example in which you can see how you can import a road network in an automatic way, and then how you can automatically generate traffic by defining areas in from which the vehicles will start and also destination area. And then at the end, you will be able to animate this kind of simulation and to have, actually, automatic generated traffic for a specific area. This is a very interesting and amazing example. OK.
Let's do one step back to the PowerPoint presentation. Once that you have created the scenario, you can simulate them with many kind of sensors. And for example, have a look to the synthetic data that you will generate and then you can develop your sensor fusion and tracking algorithms so your perception path of the algorithm test the formal system.
Now, let's have a look to the options that we have for 3D simulation. Here, we are using Unreal Engine in the Simulink workflow. Simulink and MATLAB are also compatible with the other tools and the simulators that we have mentioned before, for example, for RoadRunner. But this Unreal is the tool which is directly included in the toolchain.
We have a different kind of scenes that we can use and that are already available and provided to you with the Automated Driving Toolbox. You can define the trajectories, for example, with this Driving Scenario Designer. And of course, you can also use the Unreal Editor to change the scene directly in Unreal. You have a library with different kind of scenes that are preset and available.
And now, I would like to speak to you about the workflow to integrate RoadRunner with the MATLAB and Simulink workflows. Now, so if you ever created something with RoadRunner, you can from one side export your work to OpenDRIVE. And to be able to import this kind of information, also, in the Scenario Driving Designer tool. And on the other side, you can also export it with other kind of data, and import them into the game engine. At the end, you can connect to Simulink from both way.
And let's start with an example in which we are creating a RoadRunner scene. You are creating the scene with this on the surface. You are just adding details on the road. So the objects that will also maybe generate some kind of synthetic data you receive. And work on the material description of the asphalt or the description of the road. And, yes, when you are finished, you can export this kind of information, for example, using OpenDRIVE so that you can import this information into the Driving Scenario way that we have seen before and add the vehicles and animate them.
So this is the step that you can do. You can import the data, and you see exactly the same network that we have seen before in RoadRunner. You can add the ego vehicle here with the path, and you can have a look in the Scenario Driver to the scene that you have created, to the scenario in which you have defined the actor and his path. Then, as a further step, you can do the following. Export your scene from RoadRunner to import it to be able to use it in Unreal. And this is something that we are shown here in this video.
So you export it, and it's a quite straightforward process. RoadRunner cuboid highway road. And you can export it into Unreal. And then, you can also generate a plugin so that you can generate the scene which is compatible to be used with a Simulink simulation. OK. Now, we have the scene in Unreal. OK.
And another step that you can do is to generate the Simulink model and to add the information about the scenario, about the vehicle, and about the sensor that you want to model. Here, for example, we see a 3D camera and a lidar and a radar. And then, as a result, you will have the simulation in which you have defined the scene with RoadRunner and you have defined the actor and the path and the behavior of the actors with the MATLAB Driving Scenario app. And you are able to see and test these results that you are seeing here right now. Perfect.
Then, let's have a quick view on the kind of data that you can generate for synthetic sensors. So we have the options to generate a radar vision and lidar data. We have already had a look at for the cuboids. And here, for the Unreal simulation or for the 3D simulation, you can generate the synthetic data from monocular camera, fisheye camera, lidar, and probabilistic radar.
Here, you have an example for the fisheye camera. In this scene, you can see here, this is the synthetic and distorted camera that you can generate, taking into account all the parameters that you need to specify how the camera is behaving. Here, you see the same map for generation of monocular camera, and also you can extract some information and transform the image, also for example, here we have some segmentation of the pixels.
And again, here, you see this example that we have seen at the beginning in which we can generate the point cloud always in this Unreal simulation and this closed loop simulation in which we use Simulink then Unreal Engine and all the algorithms that we have used to model our ego vehicle. And here, you have the possibility, for example, to generate in MATLAB with the lidar reflections that you are collecting when you are running in this environment. And, yes, it is also possible to do the same thing, generating radar reflection in the environment. Perfect.
We are now touching the very last part of the presentation with automated test of automated driving system on multiple scenarios. So we have created many scenarios. Now, we have to test them and to check if the others sort of automated driving functionalities that we have developed do follow the requirements that they have to follow. And we have the possibility to run this kind of closed loop simulation. Here, you see, for example, a lane following system. You can extract different kind of signal, and you can monitor what is happening on the road.
We have a Simulink test that we can use to organize and select a long list of scenarios we want to use for the test. We can add information about the requirements that we want to be expected, again, about the Simulink model that we want to test. And then, as a result, you can have a list of tested scenario with an outcome in which you can see if the requirements have been expected. In this example, all requirements have been expected. If you do not meet the requirements, you will have here a red flag so that you can check, OK, how shall I change my automated driving system and function in order to be able to behave correctly.
And all these things can run automatically in a parallel way and without requiring somebody who is going to run every simulation. And another option that you have is to generate an automatic code coverage report in which you can see what are the portions of the code of your system that have been tested completely or partially or not at all. And that you can add information to this analysis so that you can see, really, for each line of code, if you have been there and how many times, so you can use this information, of course, to understand if you have to introduce a new test situation and use scenarios.
And here the question would be, what shall I test or which kind of scenario and situation shall I introduce to test my system in a complete way? On the other side, I could receive the information here. Here, I have a portion of code in which is never used or really used not often. And these are important kind of information. Perfect.
So we have seen how you can efficiently create scenarios with RoadRunner, with MATLAB, and Simulink environment. And that you have plenty of options. And actually, the toolchain of MathWorks is really flexible and advanced and that will allow you to work there in a very, very efficient way. Then, the second point that we attach was the generation of synthetic sensor data. And then, we have seen that you can automatically organize your test on different scenarios.
And this was all the content of the presentation today. Thanks a lot for your attention so far. And contact us to test these products, these two. They are amazing, and we are here to allow you to use these tools. And I wish you a lot of success with your autonomous driving projects.
Related Products
Learn More
Featured Product
Automated Driving Toolbox


Seleccione un país/idioma
Seleccione un país/idioma para obtener contenido traducido, si está disponible, y ver eventos y ofertas de productos y servicios locales. Según su ubicación geográfica, recomendamos que seleccione: United States.
También puede seleccionar uno de estos países/idiomas:
América
- América Latina (Español)
- Canada (English)
- United States (English)
Europa
- Belgium (English)
- Denmark (English)
- Deutschland (Deutsch)
- España (Español)
- Finland (English)
- France (Français)
- Ireland (English)
- Italia (Italiano)
- Luxembourg (English)
- Netherlands (English)
- Norway (English)
- Österreich (Deutsch)
- Portugal (English)
- Sweden (English)
- Switzerland
- United Kingdom (English)