Taking Financial Documentation to the Next Level: An Application of MATLAB Report Generator
Randy Steenbergen, Kempen & Co
Van Lanschot Kempen, the oldest independent financial institution of the Netherlands, is a specialized wealth manager. As one of its investment solutions, Kempen offers structured products to its clients. To offer these tailor-made instruments, the team needs to provide a lot of mandatory documentation. Randy Steenbergen, a quant analyst in the Quant, Efficiency and Data team at Kempen & Co., talks about how Kempen created a fully automated document generator by integrating MATLAB Report Generator™ in an App Designer UI, designed according to MVP principles.
Published: 14 Nov 2022
So the topics that I will discuss with you today are first a brief introduction about myself and about the company that I work for. Then, I will follow with the motivation for the project, after which I will talk a bit about the implementation, and finally, the next steps going forward. So my name is Randy Steenbergen.
I have a academic background in civil engineering and applied mathematics, which I studied at the Technical University of Delft. And over the past one and a half years, I've been an analyst in the quant team at Von Lanschot Kemper. And Von Lanschot Kemper is one of the oldest independent financial institutions in the Netherlands.
And among the responsibilities of my team is, for example, the pricing library of the structured products desk, but also some price tooling and some other data driven solutions that are used in the dealing room. So to give you a bit of an introduction on what structured products or the SB desk actually does, structured products are investment solutions that offer our clients the opportunity to participate in the stock market with a certain level of protection. And these products can be tailor made to the market view and the risk return profile of the client itself.
And things that you can think of, then, are for example, minimum redemption, leverage, or return in flat or moderately decreasing markets. And with that, there comes a lot of variety in the number of product types that we offer. So for example, you can have trigger notes, but also digital coupon notes, memory coupon notes, and so on. So what does that have to do with the document generator?
That I will tell you in the next section, which is the motivation. Because MATLAB is widely represented in our structured products product chain. So from requesting a quote by a banker until sealing the deal, we have a lot of tools in place that help us doing all this work. So our team actually consists of a trading team, a sales team, and a quant team.
And as a quant team, we've developed, for example, the pricing library, but also some pricing and analysis tools for the trading and the sales team to make their work a lot easier. And as an example, I want to discuss with you the product chain, which is shown on the slide. So for example, we have a website on which the bankers or advisors can actually get a quote for a number of product types.
And on the slide, I have an example here for a trigger note, and the banker can actually fill in all sorts of product details-- for example, the underlying, but also the currency and the maturity. And he can click a button to calculate a coupon, which is done by a pricing engine, which runs on a MATLAB production server. Once this calculation is done, it will send a quote to the website and it will show it to the clients, which can then, if it's through the liking of the customer, request the quote at the SP desk.
So what happens then? A notification will pop up in one of our MATLAB applications called the Dealmaker, in which one of my colleagues is alerted that a client wants to do a trade. And we can either approve or reject this trade. And if we, for example, approve the trade, the client will be alerted via email and a simple record will be created in our database containing the basic information which the banker has filled in on the website.
What is left, of course, are many of the product details such as, for example, the exact issue date or the observation date for all payment settings, for example. And these we have to add in another tool, which is, once again, a MATLAB tool called the product data manager. And here we can, for example, add all these details, but we can also generate some third party documentation, such as the key information document.
What is left then is actually sealing the deal or making up the contractual documentation, for example, the final terms and the term sheet. And unfortunately at the moment or in the past, we did not have the correct tools to integrate this into our systems because we had an Excel VBA-based tool which was not yet connected to our database. So we had to add all this information that we had already stored in our database.
And in our previous product chain, we had to add that manually to the Excel sheet. So therefore, we decided to rebuild this tool into a MATLAB graphical user interface, which is integrated in our current infrastructure, which is easy to maintain, and which has an underlying very dynamic data model, also making it very easy to maintain and to make adjustments to, for example, all the documents. So let's move on to the actual implementation of the tool, and this part consists of three subsections, which is, first of all, the data model, second, the front end, and of course, finally, the back end of the tool.
But before deep diving in each of these sub sections separately, I first want to give you a brief overview of what the end product looks like. So what we've built is in MATLAB application, which the home screen is shown on the slide here, containing two main panels-- one which is dedicated to build new instruments from scratch. So you can choose, for example, the instrument type and the underlying and you can just start working from there.
But, the second option is to load the instrument from a previously created one from the database or either one that has been requested via a quote and is already existing in our database and within the already existing infrastructure. So if either of the two are chosen and the user clicks the Start button in the application, you will end up in he' main screen. And in this main screen, he can add all of the remaining details of the product or of the deal.
And as you can see, there are four panels, which each contain some specific information of the product. So to the left, we have the core deal details-- so for example, which instrument type we've used or which underline we have. Followed by some of the alphabetic data-- so for example, what currency we're using. And these are all dropdown menus integrated in the tables.
Then, we follow with some numerical data, which can be just adjusted in the tables. And finally, there are the dates that can be adjusted by also clicking the calendar objects. So after the user has specified all of this product details, he or she can then click the create, for example, final terms documents. And what will happen in the back end, the tool will actually translate all these user inputs into document details and word templates, which can be shown on the slide, for example.
So if we have an other callable instrument, then this means that we're using a certain type of template, for example, for the final terms header. And this template consists of two main parts being the standard lines of text, but also some blank spaces, which are called holes in our tool. And all of these holes can be filled according to the user input.
So for example, if we have a hole which contains the instrument type, it will be filled with the other callable text. So this is what the tool actually does. It combines all of these templates, it will sort them, and it will fill in all these user inputs in the right places of the document. So for example, with the user input given in the screen, we get a final terms generated for a five year out of callable mode with a one million Euro issue size.
And the tool will make sure that this entire document will be stored in the predefined location for the user. So let's dive, then, into each of the subcomponents of the application. And let's first of all go through the data model, and the data model is a very flexible and dynamic model which allows us to limit the number of hardcoded exceptions in our back end.
And for this, we've chosen to use a SQL database containing, for example, the instrument characteristics, which I showed on the previous slides. But it also stores each of the user inputs when a instrument will be saved, for example. And it also contains all of the mappings between this user inputs and the templates and the contents of the templates themselves. And the dynamic character actually allows us to store different types of instruments and all the inputs corresponding to this, but it also allows us to very easily adjust the templates and add new ones.
And we can very easily make adjustments to the mappings, making it very easy to maintain. And just to give you some examples of what this looks like in practice, I have here on the slide the main screen given that we choose, for example, a out of callable mode as a new instrument. And you can see here in the highlighted section that for the payment settings, for example, we have some of the other callable specific characteristics, which are shown, such as the memory feature, whether or not we have a memory feature.
But if we change this instrument type to one of the other instruments-- for example, the capital protective note, you will see that because we store that in a database, each of these settings will change to the CPN specific characteristics, such as whether or not we have Asianing in a product or whether or not we have a cap. And all of this processing is done after we fill in all of the characteristics.
And what then happens is we have to fill all of these templates and combine them into a single document. And in order to get to know how this actually works, I think it's good to give you a brief overview of how our documents are built up. So what you see on the slide is the hierarchical structure of the documents with on top, for example, the final terms document. And each of these documents contain of a number of sections-- so that could be the header for a section A and a section B.
And for each section, we use a unique template based on the user input. So if we have a certain input, then, for the header, we either use the type I template or we use the type 2 template. And each of these templates then in time consist of a number of lines of standard text and a number of holes. And the mapping of the templates and the holes is rather similar and is shown and can be best explained by an example, which is here contained in the table.
So all of this user input is translated to a single template for a section, and for each hole we have a unique content. So for example, assume that we were looking at the issuer program hole, then the characteristics that decide which content is contained in this hole. We have the instrument type and the issuer.
And if these inputs are, for example, in the callable Von Lanschot Kemper, then we have for the issuer program hole that it will be filled with Von Lanschot Kemper N.V. 2 billion euros structured note program. And all of this these mappings are contained in the database, and thereby we do not have to add any of the code if we want to make adjustments to the mappings later on.
And a similar thing holds for some of the formattings. So for the issue date hold we have, for example, that we want to show the date completely spelled out, such as the 10 tenth of August 2022. But if we decide that we later on want to change that to just a numerical formatting, we only have to adjust one record in the database instead of having to alter the MATLAB code, making it a lot easier for us to make updates to the formatting.
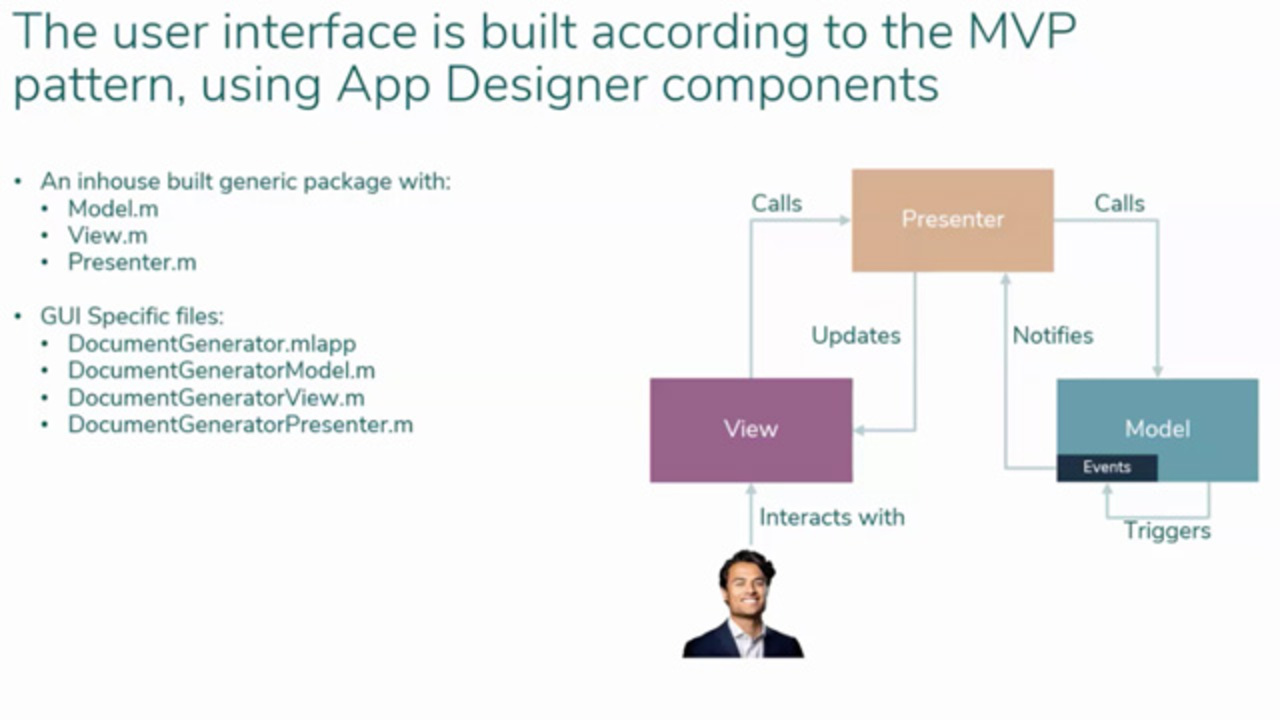
But let's move on to the front end part of our application. And this is a MATLAB user interface based on the model view presenter pattern using App Designer components. And for this, we're using an in-house built generic package containing a model clause, a view clause, and a presenter clause. And for each of the applications that we built according to this principle we have to add four other files being, for example, the document generator MATLAB application, the document generator model, its presenter, and its view.
And just to give you a little insight on how the interaction between the user and this framework works, I will elaborate a bit on in the upcoming slides on the flowchart, which is depicted on the right of the slide. So the document generator view is used to create each of the elements on the screen and it contains little to no logic. So what it actually does it can easily create a figure, and on top of that figure, we'll create a grid layout on which we can create very easily adds, for example, buttons or tables or dropdown menus by just giving a simple commands, such as create button, providing the title of the button and the text that it has to be shown on it.
And if we click this button, the view will only call the presenter, and the presenter actually contains the real callback for this button. And much like the view clause, the presenter contains as few logic as possible, and it acts as a mediator between the view and the model clause, handling all the user interactions. So as you can see in the code snippet here on the left, what it actually does is it will make sure that the view is updated with a progress bar, and then, it will pass on to the correct method of the model clause.
For example, if we click the Create final terms button, then it will make sure that we call the Create final terms method in the model clause. And the model clause, in fact, in turn holds all the data and determines the state of the app, and thereby contains all the logic of it. And it processes the user input as can be seen here, for example, by getting the user input from the application or from the database and passing it on to the actual document generator.
And once it's done, it will emit a signal or it will emit an event to the presenter, and the presenter will make sure to update the view and give the user the feedback that the process of creating, for example, a final terms has been either successful or has not been successful. So so far for the front end of the tool-- so let's go to the final end, which is the actual document generating path. And our document generator is a fully customized report building tool which leverages the capabilities of the report generator Toolbox.
And we've decided to use the report generated Toolbox to generate a Word file. But alternatively, you could also use it to, for example, generate a PDF or a PowerPoint file. But we've chosen to use a Word file because we want to give the user the opportunity to make adjustments even after we've automatically created the contract, for example.
So this part is implemented as an object-oriented modular tool consisting of three main parts. And these three main parts are the processors, the templates, and finally, the generators. And since the processors simply retrieve and process the inputs, I will not go into too much detail because not really a lot of interesting stuff is happening in these functions.
But I will rather focus on the templates, which are the clausees representing the documents and its sections and the generators that are filling and generate the actual documents or final terms, for example. But the structure of the folders containing these templates actually reflect the documents hierarchical structure, which I showed in one of the previous slides. So basically, we have, for each type of document, separate package folder.
So that would be the final terms, the product leaflet, and the term sheet. And each of these folders consists of a number of subfolders and files. And in the first layer, for each section of a document, we have a separate subfolder. And we have a so-called document clause, which is represented by the final terms generator on the slide here.
And each of these section folders consist of two separate subparts being the resources folder and the section clause. And the resources folder is the folder which contain the Word templates. So to dive a little deeper into how this actually looks like, we can, with the help of the report API package, very easily implement this. We can very easily create this folder structure using the customized report constructor.
And what it does is actually creates the folder structure, as we saw on the previous slide, and it provides us with the section clause, which is illustrated with the code snippet on the right here. And this section clause is a subclause of the MATLAB reporter clause. However, in order to fully utilize the Toolbox capabilities, we have to make some adjustments to have it working to our liking.
And first of all, what we have to do is we have to add all of our customized templates to the default file. And we do this by storing them in the Quick Parts library in the Word's template file. So that could be multiple templates, for example, the add callable basket or add callable single, but we can store all kinds of templates in this library for each file.
Furthermore, we would like to use the append command, which is import and integrated in the report generator Toolbox. And this command allows us to append all the user inputs to each of the holes in the template with just a single line command. But in order to do so, we have to add each of the holes as properties to the section clausees, and this is visualized in this highlighted section on the right.
And finally, if we do so, we still have to add the append command in one of the methods of this section clausees. But if we have to do this in all section clausees separately, we would have a lot of repetitive code, and that is why we've chosen to replace the MATLAB report generator reporter superclause with our own documents Filler clause so that all this processing can happen in a central function or a clause.
So by filling all holes in a single file, we actually keep a clear overview, and things are really easy to maintain. And the document filler is the actual dedicated file to assign the data to the template holes, and also do all the formatting to these holes. So you can think of a whole types that can be, for example, images, but they can also be graphs and tables.
And if at a later stage, you would like to adjust the formatting, then it comes in really handy that you have all these formatting methods in one single file, which is the document filter in our case. So the document filler and the section clausees cannot function separately, of course. For that, we need a very similar structure for the entire document.
So that would be, in our case, the document clause and the document creator. And very much like these section clauses, the document clause has a property for every section that is contained in a document type, as can be seen on the slide. So for the final terms, we have four different sections for which we each, we have a property stored in the clause. And these clauses are kept as brief as possible.
So they only contain some document specific checks. So our all sections available and our all sections passed on by the processors. And they also contain might contain some document specific exceptions, which, for example, is pre-processing some templates if you want to combine them and use both templates as one single section, for example. And finally, what's left is the document creator, which is the superclause of the document clauses themselves.
And I refer to this clause as the brains of the actual document generator because once the data has been passed on to the document creator, it will make sure that each of the sections are assigned to correct templates. It will make sure that the document filter is called. And if all these documents are filled, then it will make sure that some post-processing happens to them.
So that is, for example, ordering each section, but also assigning some additional characteristics such as headers, footers, and page numbers. And once this is done, it will combine each of the document sections into a single file, and it will make sure that the Word file is stored at a pre-specified location and is available to the user. So as to conclude our document generator satisfies our main criteria, and we have achieved our objective with a tool that is right now integrated in the current infrastructure.
It's very easy to maintain, as that in the previous slides, we have two clauses in which the main processing happens being a document filter and a creator. And it has a very dynamic data model underneath the hood. So going forward, this is already proving its value as we are currently rebranding all of our company documents.
And what we have to do is only two steps that are involved. So we only have to create the new templates containing the same information as the old ones. And we only have to add these templates to the resource folders in our sections. And the entire process does not involve any adjustments to our MATLAB code or our database, which saves us a lot of time and effort, I would say.
Featured Product
MATLAB Report Generator


Seleccione un país/idioma
Seleccione un país/idioma para obtener contenido traducido, si está disponible, y ver eventos y ofertas de productos y servicios locales. Según su ubicación geográfica, recomendamos que seleccione: United States.
También puede seleccionar uno de estos países/idiomas:
América
- América Latina (Español)
- Canada (English)
- United States (English)
Europa
- Belgium (English)
- Denmark (English)
- Deutschland (Deutsch)
- España (Español)
- Finland (English)
- France (Français)
- Ireland (English)
- Italia (Italiano)
- Luxembourg (English)
- Netherlands (English)
- Norway (English)
- Österreich (Deutsch)
- Portugal (English)
- Sweden (English)
- Switzerland
- United Kingdom (English)