Deploy PyTorch Image Classification Model on Host and Raspberry Pi
This example demonstrates how to generate C/C++ code for a classification application based on a RepViT [1] PyTorch model and deploy it.
RepViT is a lightweight CNN that achieves superior performance and low latency on mobile devices by incorporating efficient design principles inspired by vision transformers.
The workflow covers running inference on your development host and on a Raspberry Pi® hardware.
Third-Party Prerequisites
This example requires a Raspberry Pi hardware.
Download the Model
Download the RepViT model exported from PyTorch, and unzip it to working directory.
zipFile = matlab.internal.examples.downloadSupportFile("coder","RepVit/m1_0_distill_450e_timm/repvit.zip");
unzip(zipFile);
Create MATLAB Entry-Point Function
Define an entry-point function PyTorch_classification_predict.m that loads the PyTorch RepVit model, prepares the input image, then performs the prediction. Use a persistent object for efficiency.
type pytorch_classification_predictfunction out = pytorch_classification_predict(img)
%#codegen
% Copyright 2026 The MathWorks, Inc.
net = loadPyTorchExportedProgram("repvit.pt2");
img_input = preprocess(img);
out = net(img_input);
end
The preprocess function applies the standard resize, crop, and normalize preparations to input image.
type preprocessfunction [preprocessed_input, img_cropped] = preprocess(img) %#codegen % Copyright 2026 The MathWorks, Inc. [h, w, ~] = size(img); shortest_edge = min(h, w); scale = 224 / shortest_edge; new_h = round(h * scale); new_w = round(w * scale); img_resized = imresize(img, [new_h, new_w], "bilinear"); crop_size = 224; start_h = floor((new_h - crop_size)/2) + 1; start_w = floor((new_w - crop_size)/2) + 1; img_cropped = img_resized(start_h + (0:crop_size - 1), start_w + (0:crop_size-1), :); img_rescaled = single(img_cropped) / 255; meanVec = coder.const(single([0.485, 0.456, 0.406])); stdVec = coder.const(single([0.229, 0.224, 0.225])); meanImg = reshape(meanVec, [1 1 3]); stdImg = reshape(stdVec, [1 1 3]); img_normalized = (img_rescaled - meanImg) ./ stdImg; preprocessed_input = permute(img_normalized, [4 3 1 2]);
Perform Classification in MATLAB
Call the entry-point function to get predictions.
img = imread("peppers.png");
scores = pytorch_classification_predict(img);
Loading the model. This may take a few minutes.
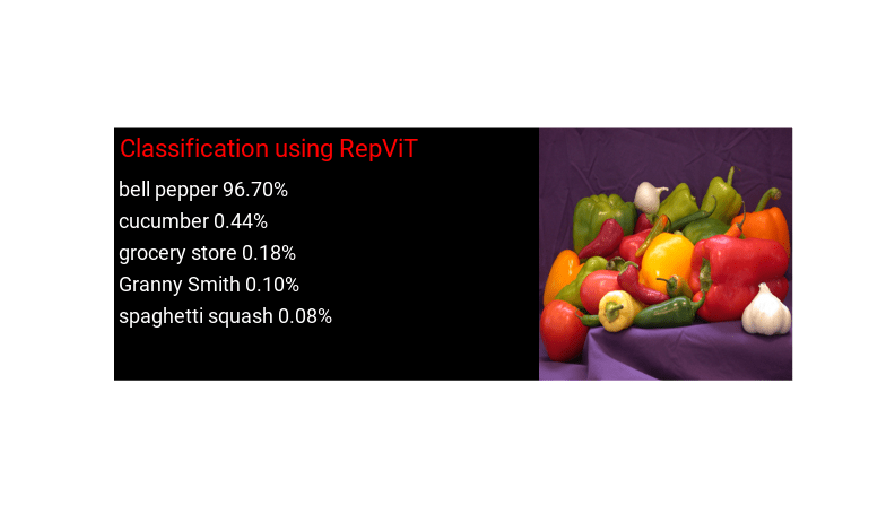
Define a function to calculate top 5 predictions and display the labels on original image.
type display_predictionsfunction display_predictions(PredictScores, I)
% Copyright 2026 The MathWorks, Inc.
labels = labelData();
softmaxProbs = exp(PredictScores) ./ sum(exp(PredictScores), 2);
softmaxProbs = softmaxProbs * 100;
[top5Preds,top5Indices]= maxk(softmaxProbs,5);
top5Labels = labels(top5Indices);
im = imresize(I, [224 224]);
outputImage = zeros(224,600,3, "uint8");
for k = 1:3
outputImage(:,377:end,k) = im(:,:,k);
end
scol = 1;
srow = 1;
outputImage = insertText(outputImage, [scol, srow], "Classification using RepViT", TextColor = "r", FontSize = 22, BoxColor = "black");
srow = srow + 40;
for k = 1:5
outputImage = insertText(outputImage, [scol, srow], [top5Labels{k},' ',num2str(top5Preds(k), '%2.2f'),'%'], TextColor = "white", FontSize = 18, BoxColor = "black");
srow = srow + 28;
end
imshow(outputImage);
end
Display labels with the top 5 scores on input image.
display_predictions(scores,img);

Perform Classification by Running Generated MEX on Host
Generate MEX Function
Create a configuration for mex code generation.
cfg = coder.config("mex");
codegen pytorch_classification_predict -config cfg -args {img};
Code generation successful.
Run Generated MEX
Call the mex function to predict and get the scores.
scores_mex = pytorch_classification_predict_mex(img);
Display labels with the top 5 scores on input image.
display_predictions(scores_mex,img);

Generate Code for Classification Application, Deploy and Run on Raspberry Pi
Use the Raspberry Pi Blockset function raspi to create a connection to the Raspberry Pi.
The raspi function reuses these settings from the most recent successful connection to the Raspberry Pi hardware. This example establishes an SSH connection to the Raspberry Pi hardware using the settings stored in memory.
r = raspi;
If this is the first time connecting to a Raspberry Pi board or if you want to connect to a different board, use the following line of code:
r = raspi("raspiname","username","password");
Replace raspiname with the name of your Raspberry Pi board, username with your user name, and password with your password.
Generate PIL MEX Function
To generate a PIL MEX function for a specified entry-point function, create a code configuration object for a static library and set the verification mode to 'PIL'. Set the target language to C++.
cfg = coder.config("lib", ecoder = true);
cfg.VerificationMode = "PIL";
Create a coder.hardware (MATLAB Coder) object for Raspberry Pi and attach it to the code generation configuration object.
hw = coder.hardware("Raspberry Pi");
cfg.Hardware = hw;
If your Raspberry setup is Pi 2 or later, set InstructionSetExtensions to "Neon v7" to utilize the Neon extension.
cfg.InstructionSetExtensions = "Neon v7";On the MATLAB, run the codegen command to generate a PIL MEX function pytorch_classification_predict_pil.
codegen pytorch_classification_predict -config cfg -args {img};
### Connectivity configuration for function 'pytorch_classification_predict': 'Raspberry Pi'
Location of the generated elf : /home/pi/g3788162/MATLAB_ws/R2026a/home/user/Documents/MATLAB/ExampleManager/user.Bdoc.j3101634.RepVitDemo/coder_ai-ex89434054/codegen/lib/pytorch_classification_predict/pil
Code generation successful.
Run Generated PIL
Run the generated MEX by passing the input image I1.
scores_pil = pytorch_classification_predict_pil(img);
### Starting application: 'codegen/lib/pytorch_classification_predict/pil/pytorch_classification_predict.elf'
    To terminate execution: clear pytorch_classification_predict_pil
### Launching application pytorch_classification_predict.elf...
Display labels with the top 5 scores on input image.
display_predictions(scores_pil,img);
Clear Generated PIL Executable
clear pytorch_classification_predict_pil### Host application produced the following standard output (stdout) and standard error (stderr) messages:
Reference
[1] Wang, Ao, Hui Chen, Zijia Lin, Jungong Han, and Guiguang Ding. “Rep ViT: Revisiting Mobile CNN From ViT Perspective.” 2024 IEEE/CVF Conference on Computer Vision and Pattern Recognition (CVPR), June 2024, 15909–20. https://doi.org/10.1109/CVPR52733.2024.01506.
See Also
Functions
codegen|loadPyTorchExportedProgram|summary|inputSpecifications|outputSpecifications|invoke