Relocate Scenarios
In RoadRunner Scenario, you can move scenarios around within a scene and relocate scenarios to different scenes entirely. By relocating scenarios, you can test how driving algorithms handle the same scenario in various environments.
Relocate Scenario Within a Scene
RoadRunner Scenario uses an anchoring system in which you position the actors and path waypoints relative to specific anchor points, such as a point on a road or a point specifying an actor location. If you drag an anchor along a road, any actors that are attached to that anchor move with it. For example, this figure shows a scene anchor, and the scenario attached to it, moving from a straight portion of a road to a curved portion.

You can drag anchors along only the road that they belong to. To move a scenario to an entirely new road, you must update the parent anchor of each actor. For more details on changing parent anchors, see Change Anchor Parent.
When relocating scenarios along a road, actors maintain their lane-relative positions. For example, suppose a car is in the rightmost lane (zero lanes from the road edge) and a turning lane forms as the road approaches an intersection. If you move the anchor along the road toward the intersection, the car moves into the turning lane to maintain a relative position of zero from the road edge.

If you want a vehicle to stay in the same lane throughout a scenario, then you must set a predefined path for it. For an example of setting a predefined path, see Design Path Following Scenario.
Relocate Scenario to New Scene
RoadRunner Scenario provides both an interactive and a programmatic way to load an existing scenario into a new scene.
Note
When you load a scenario into a new scene, the new scene must contain anchors with the same names as the parent anchors of the scenario actors. If no such anchors exists in the new scene, then you must manually place your anchors into the scene.
When developing scenes for use with multiple scenarios, consider using consistent names for all scene anchors in the scenario. To change an anchor name, select the anchor and update the Name attribute. To add new anchors to scenes, use the Scene Anchor Tool. For more information on anchors, see Scenario Anchoring System.
To move or edit an anchor in a scene or scenario, you must activate the Scene Anchor Tool or Anchor Tool, respectively.
Relocate Scenarios Interactively
By default, when you open a scenario, the scenario opens into the scene that it was last saved with. To open a scenario into a different scene, follow these steps:
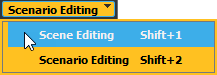
Switch to scene editing mode. From the top-right corner of the RoadRunner application, select Scenario Editing, then Scene Editing.
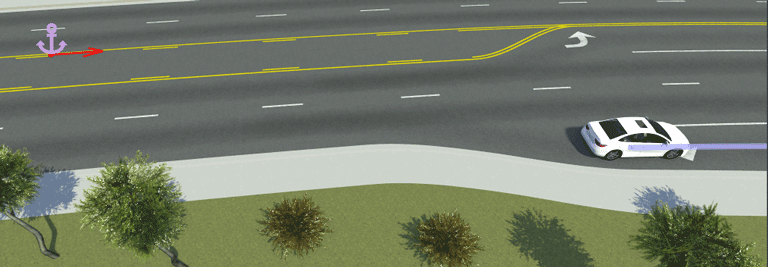
Open the scene that you want to load the scenario into. From the File menu, select Open Scene and, in the file explorer, select the scene file you want to use. For example, this figure shows the
SanAntonioscene, which is one of the scenes included by default in theScenesfolder of RoadRunner projects.
Switch to scenario editing mode. From the top-right corner of the RoadRunner application, select Scene Editing, then Scenario Editing.

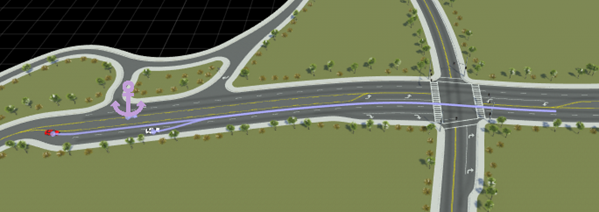
Load the scenario into the opened scene. From the File menu, select Open Scenario into Current Scene and, in the file explorer, select the scenario file you want to use. For example, this figure shows the
TrajectoryCutInscenario, which is one of the scenarios included by default in theScenariosfolder of RoadRunner projects.
In this example, loading the TrajectoryCutIn scenario into the
SanAntonio scene works because:
The scene contains a scene anchor named
ScenarioStart.The actors in the
TrajectoryCutInscenario have the scene anchorScenarioStartas their parent.
The ScenarioBasic scene also has a scene anchor
named ScenarioStart, so you can load the scenario into this scene
as well.
If you load a scenario into a new scene that does not have anchors with names corresponding to those in the scenario, RoadRunner displays this warning at the bottom of the RoadRunner Scenario interface, in the Attributes pane, and in the Output pane.
![]()
To resolve this issue, remap the unmapped anchors. RoadRunner provides a list of all anchors in your scenario in the Unmapped Anchors section of the Attributes pane. To place an anchor and the accompanying scenario objects in the scene, select an anchor from the Unmapped Anchors pane, and then right-click the location on the road where you want to place it. The new anchor inherits the name and actors of the selected anchor in the Unmapped Anchors section of the Attributes pane.
Alternatively, you can remap unmapped anchors to existing anchors in the scene. First, select an anchor from the Unmapped Anchors pane, and the left-click an existing anchor on the road. An existing anchor inherits actors, but does not inherit the name of the selected unmapped anchor.
Note
Remapped anchors match the default anchor type specified in the Application Preferences.

Relocate Scenarios Programmatically
You can programmatically relocate a scenario to a new scene by using MATLAB® functions. For example, this MATLAB code reproduces the example of loading the
TrajectoryCutIn scenario into the
SanAntonio scene. The code assumes that you have a project
located in the directory C:\RR\MyProject, and that you are using
Windows®.
projectFolder = fullfile("C:","RR","MyProject");
rrApp = roadrunner(projectFolder);
openScene(rrApp,"SanAntonio");
openScenario(rrApp,"TrajectoryCutIn",keepCurrentScene=true);
For more details on using these functions to relocate scenarios, see SaveScenario.
Alternatively, you can use the language-neutral gRPC® API. This command-line code is equivalent to the previously shown MATLAB code.
AppRoadRunner --projectPath="C:\RR\MyProject" CmdRoadRunnerApi "LoadScene(file_path='SanAntonio')" CmdRoadRunnerApi "LoadScenario(file_path='TrajectoryCutIn' keep_current_scene='true')" |
For more details on using the gRPC API to relocate scenarios, see Reuse Scenarios in Multiple Scenes Using gRPC API.
Troubleshooting
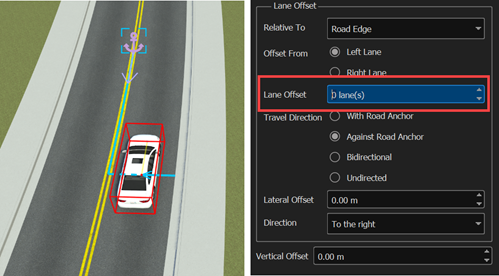
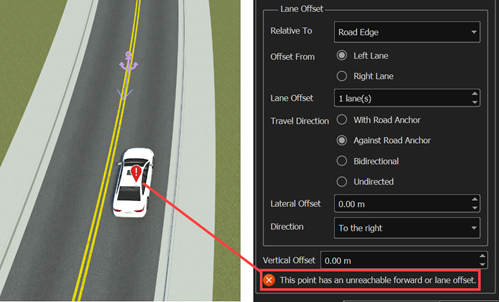
When you relocate your scenario to a new scene, you must remap your anchors to roads
compatible with the Lane Offset and Forward
Offset values of the associated actors. For example, suppose you place an
actor on a road with two lanes in your original scene and set Lane
Offset to 1 lane(s). If, in a new scene, you remap the
anchor for that actor to a road with only one lane, the Lane Offset
value becomes invalid.
Actors with invalid Lane Offset or Forward
Offset values display a red exclamation icon and this error in the
Attributes pane: This point has an unreachable forward
or lane offset. Lane offset errors occur when the original Lane
Offset value of an actor is greater than the number of additional lanes,
traveling in the same direction as the actor lane, on a road. Similarly,
Forward Offset errors occur when the original forward offset
value of an actor is greater than the distance from its anchor to the end of the road in
its direction of travel.
To fix these errors, select the affected actor. Then, in the Attributes pane, replace any invalid Lane Offset or Forward Offset values with values that are valid for the new road. Alternatively, you can remap the anchor to a road compatible with the existing forward and lane offsets of the associated actor. To learn more about the Lane Offset and Forward Offset attributes, see Lane Offset and Point Offsets, respectively.