Path Planning Using Keyboard Control for Parrot Minidrone
This example shows how to use the keyboard of the host computer to control the position of Parrot® minidrone using Simulink® Support Package for Parrot Minidrones.
Prerequisites
If you are new to Simulink, complete the Create a Simple Model.
To setup and run Simulink model on a Parrot minidrone, follow the example described in Spin the Motors of a Parrot Minidrone Without Flying the Drone.
Required Hardware
To run this example, you must have the following hardware
Parrot Rolling Spider Or Parrot Mambo minidrone with a fully charged battery and propellers connected to the motors
Micro USB type-B cable
Bluetooth® Low energy (BLE) 4.0 support on the host computer
Required Products
Simulink Support Package for Parrot Minidrones
Model
The support package includes an example project that starts the flight of the Parrot minidrone. The position of the drone is controlled using the keyboard.
Task 1: Simulate the Drone in 3D Simulator Window
1. Open the ParrotMinidroneKeyboardControl project by executing this command at the MATLAB® command prompt.
openExample('parrot/PathPlanningUsingParrotMinidroneExample');
Note: If you are using R2023a or an earlier version of Simulink Support Package for Parrot Minidrones, then you can run the following command at the MATLAB command prompt to launch the project.
parrotMinidroneKeyboardControlStart
To access the archived documentation page from previous release, see Path Planning Using Keyboard Control for Parrot Minidrone (R2023a).
2. Once the Simulink project is open, click the Project Shortcuts tab on the MATLAB window and click the type of drone you are using. For example, if you are using Parrot Mambo, click Set Mambo Model.

3. To simulate the model, go to the Simulation tab of the Simulink model window and click Run. The lower-left corner of the model window displays status while Simulink prepares to run the model on the host computer.
Observe that the drone in the Minidrone Flight Visualization 3D Simulator takes off and starts flying along a square path twice, and then stops.
Note: The command openExample('parrot/PathPlanningUsingParrotMinidroneExample') creates a new project everytime you run the command. The modifications (if any) that you made in the previous project will not appear in the new project.
Task 2: Configure Keyboard and Landing Logic in Path Planning Subsystem
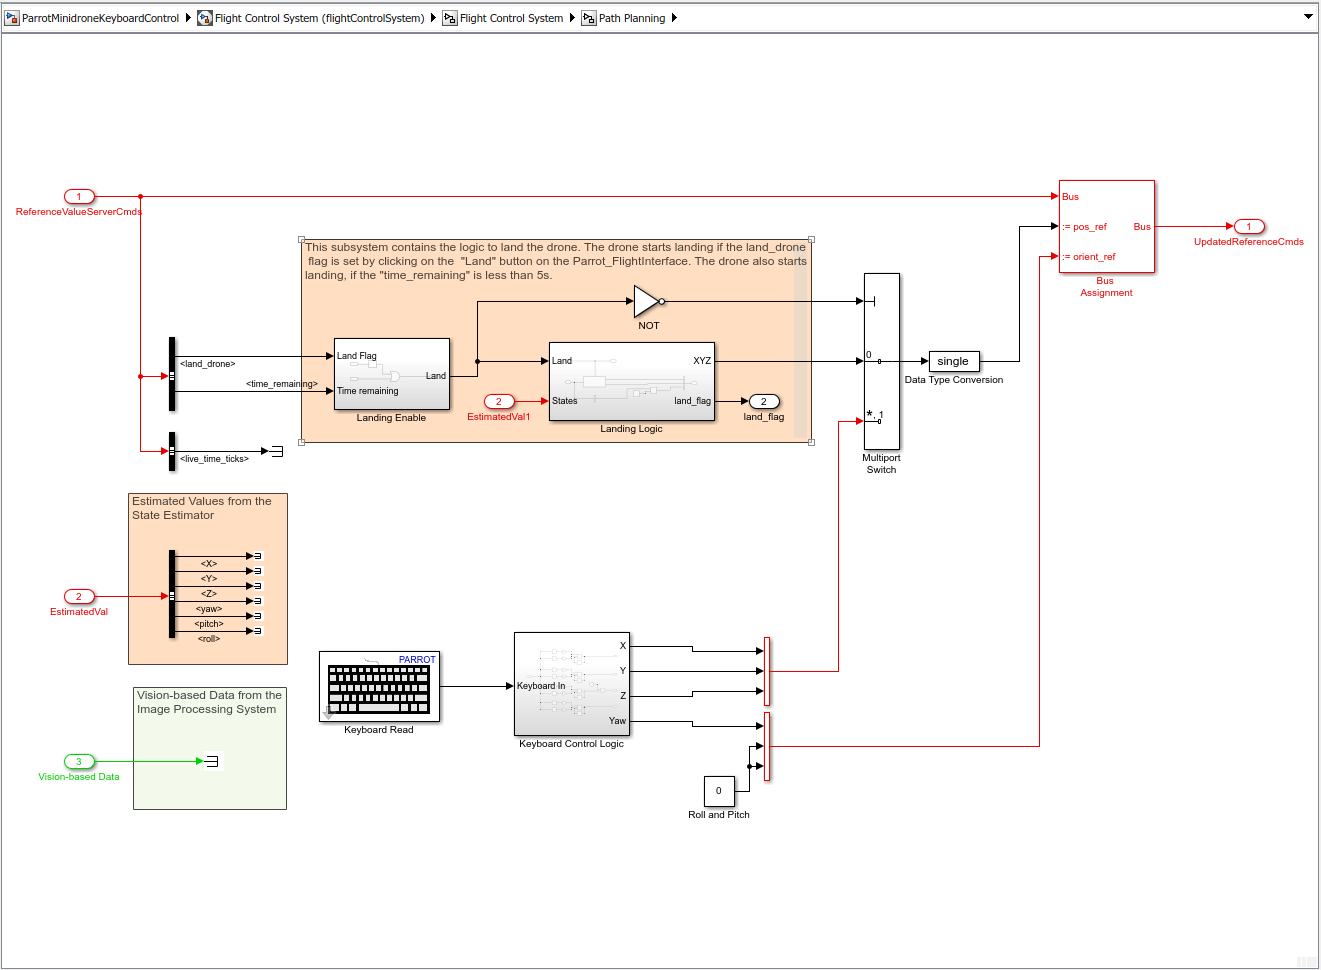
In the parrotMinidroneKeyboardControl Simulink model, the keyboard and landing logic are modeled inside Flight Control System > Path Planning subsystem. Double-click the Path Planning subsystem to view the logic.

There are three subsystems inside the Path Planning subsystem:
Keyboard Control Logic
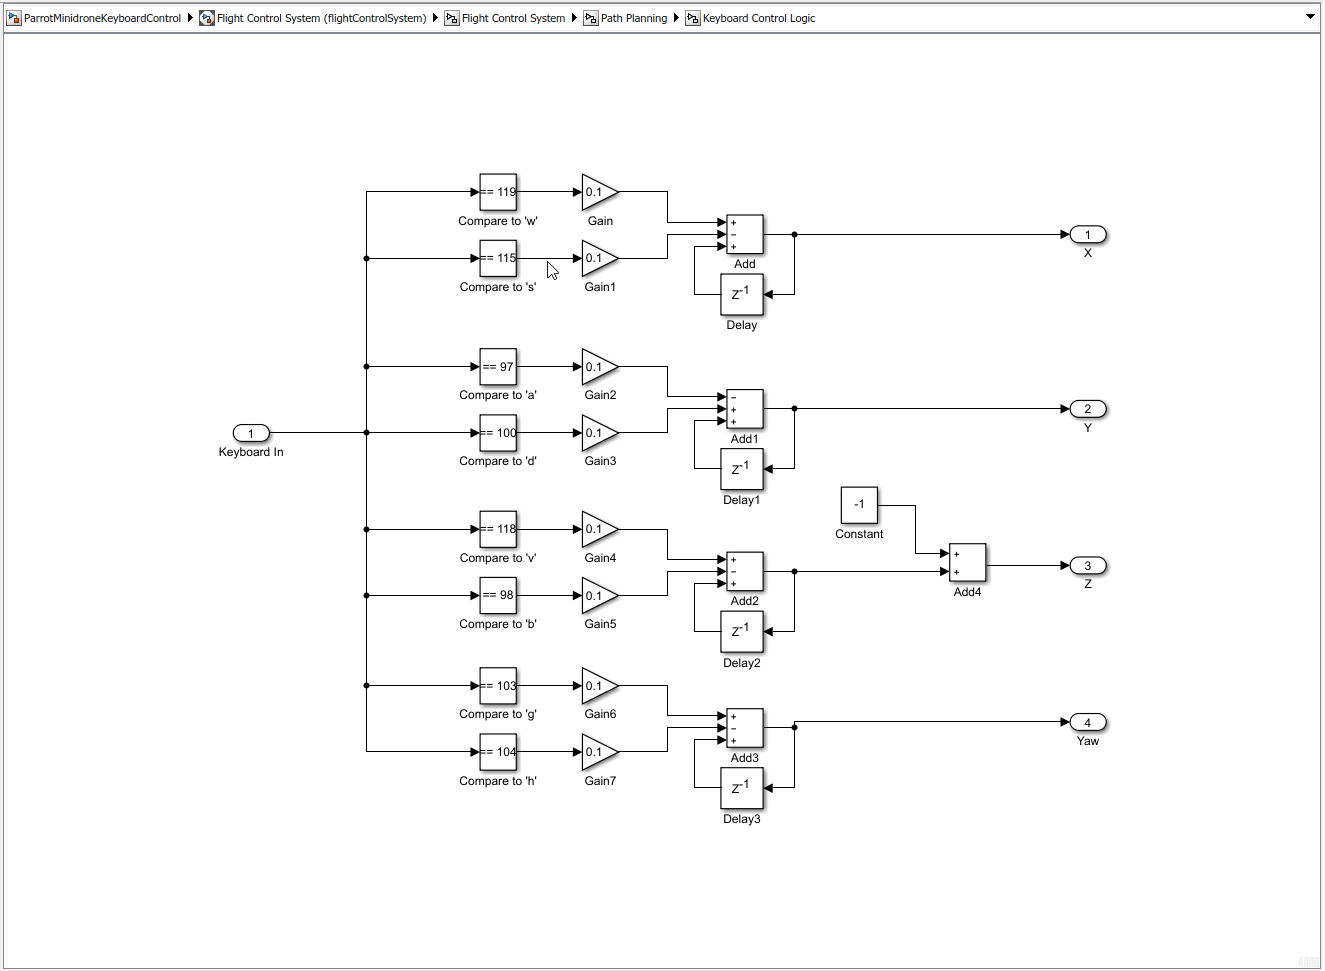
The Keyboard Control Logic subsystem is used in the parrotMinidroneKeyboardControl project for the following:
Define the set of keys on the keyboard for Parrot minidrone to follow, using [x y z Yaw] coordinates. In this project, we use eight keys to control the path of the drone. The keys are defined using a Constant block by entering the Constant value as follows:
Here the X axis value represents the direction at which the drone navigates in X axis and the value is determined by 'w' and 's' keys on the keyboard. Press the key 'w' to move the drone 0.1 meter forward along X axis or press the key 's' to move the drone 0.1 meter backward along X axis.
Here the Y axis value represents the direction at which the drone navigates in Y axis and the value is determined by 'a' and 'd' keys on the keyboard. Press the key 'a' to move the drone 0.1 meter forward along Y axis or press the key 'd' to move the drone 0.1 meter backwards along Y axis.
Here the Z axis value -1 represents the drone's take off height from the ground (1 meter). After the drone takes off, the value is determined by 'v' and 'b' keys on the keyboard. Press the key 'v' to move the drone 0.1 meter upwards or press the key 'b' to move the drone 0.1 meter downwards.
Here the Yaw value represents the yaw of the drone and the value is determined by 'g' and 'h' keys on the keyboard. Press the key 'g' to change yaw of the drone by 0.1 radians in clockwise direction or press the key 'h' to change yaw of the drone by 0.1 radians in anticlockwise direction.
Note: The value 0.1 for the keys can be changed by modifying the Gain values in the Keyboard Control Logic subsystem.

Task 3: Deploy the Model on Parrot Minidrone
1. In the Modeling tab of Simulink model window, click Model Settings to open the Configuration Parameters dialog box.
2. Go to the Hardware Implementation pane, and select the drone from the Hardware board list - either Parrot Mambo or Parrot Rolling Spider. Click Apply and OK.
3. In the Hardware tab of the Simulink model window, click Build, Deploy & Start. The lower-left corner of the model window displays the status while Simulink prepares, downloads, and runs the model on the hardware.
After the model is successfully deployed, the Parrot minidrone takes off from the ground to a height of 1 meter. Use the configured keys to control the drone's position.