Configure Instance-Specific Values for Block Parameters in a Referenced Model
When you reference the same model using multiple Model blocks, you can configure a block parameter to use either the same value or a different value for each instance of the model. For example, you can configure instance-specific values for the Gain parameter of a Gain block. To use different values, create and use a model argument to set the value of the block parameter. For some applications, you can reuse a referenced model only if you can configure each instance to use a different value for a block parameter (such as the setpoint of a controller or a filter coefficient).
Note that a model argument cannot be used inside a parameter expression to calculate the
value of a Simulink.Parameter object. For example, for parameter object
my_param and model argument my_modelarg, the value
assignment my_param.Value = slexpr('my_modelarg*2') is not
supported.
Specify a Different Value for Each Instance of a Reusable Model
For a block parameter in a reusable referenced model, to specify a different value for each instance of the model:
Create a MATLAB® variable or
Simulink.Parameterobject in the model workspace of the referenced model.Use a MATLAB variable for ease of maintenance.
Use a
Simulink.Parameterobject for greater control over the minimum and maximum value, the data type, and other properties of the model argument.
Use the variable or parameter object to set the block parameter value. Optionally, use the same variable or object to set other block parameter values.
In the Model Data Editor, configure the variable or object as a model argument by selecting the Argument property.
Specify a default value for the variable or
Simulink.Parameterobject. When you simulate this model directly, the block parameters use the value that the variable or object stores in the model workspace. When this model is simulated as a referenced model, a parameter configured as a model argument gets its value from its parent model.Optionally, you can leave the value for a
Simulink.Parameterobject empty. See Define Model Arguments Without Specifying a Default Value.In each Model block that refers to the reusable model, specify an instance-specific value for the block parameter. The dimensions and data type of the instance-specific value must match that of the model argument definition. If you do not specify a value, the argument uses the last value specified below it in the model hierarchy. In the top model, you can configure the diagnostic configuration parameter No explicit final value for model arguments to generate an error or warning when the topmost Model block that can set the value for a model argument uses this default value instead of providing an explicit value.
In intermediate models, in addition to specifying an instance-specific value for the block parameter, you can specify if the parameter can be overridden at the next higher level of the hierarchy by selecting the Argument property.
Define Model Arguments Without Specifying a Default Value
If you use a Simulink.Parameter object to set the block parameter
value, you can compile and simulate the model as a referenced model with the value for
the object left empty (Value set to '[]') as
long as you provide an explicit value somewhere in the parent model reference hierarchy.
In this case, you cannot simulate the model directly. When the value is empty, you must
provide the Data Type and Dimensions for the
object. You can also specify the Min, Max, and
Complexity properties. Although you have specified an empty
value, Simulink® still synthesizes a Value using the properties you
have specified (see Simulink.Parameter).
Combine Multiple Arguments into a Structure
When you configure a model to use multiple model arguments, consider using a structure instead of separate variables in the model workspace. This technique reduces the effort of maintenance when you want to add, rename, or delete arguments. Instead of manually synchronizing the arguments in the model workspace with the argument values in Model blocks, you modify structures by using the Variable Editor or the command prompt.
You can use a Simulink.Bus object as the data type of the structures.
The object ensures that the characteristics of the instance-specific structures, such as
the names and order of fields, match the characteristics of the structure in the model
workspace.
If you have a Simulink
Coder™ license, this technique can also reduce the ROM consumed by the formal
parameters of the referenced model functions, such as the output
(step) function.
To create and use structures to set block parameter values, see Organize Related Block Parameter Definitions in Structures.
Configure Referenced Model to Use Model Arguments
This example walks you through a model reference hierarchy representing a system of pressure sensors. The example demonstrates how to configure block parameters in a referenced pressure sensor model to use different values for each instance of the model.
For an example using only commands that you enter at the command prompt, see Parameterize a Referenced Model Programmatically. For an example that involves code generation, see Specify Instance-Specific Parameter Values for Reusable Referenced Model (Simulink Coder).
Explore the Model Hierarchy
Open the pressure sensor model PressureSensor.
open_system('PressureSensor')

This model checks the input pressure against minimum and maximum pressure values. If the pressure falls outside of this range for the duration of the specified timeout period, then the output signal is set to 1. Model workspace parameters sensor_params.min_press, sensor_params.max_press, and sensor_params.timeout represent the minimum pressure, maximum pressure and timeout period.
Open the model SensorArray.
open_system('SensorArray')

This model contains four Model blocks that reference the PressureSensor model.
Open the model SensorHarness.
open_system('SensorHarness')

This test harness contains a Model block that references the SensorArray model. The harness feeds each pressure sensor an increasingly larger input pressure and sends the output signal for each sensor to a scope.
Examine Block Parameter Assignments in the PressureSensor Model
In order for each instance of the pressure sensor model to use its own value for a block parameter, you must set the block parameter value by using a MATLAB® variable or Simulink.Parameter object. The assigned variable or parameter object must be stored in the model workspace and must be configured as a model argument.
To examine the block parameter assignments in the pressure sensor model:
Update the model hierarchy. In the
SensorHarnessmodel, on the Modeling tab, click Update Model.In the
PressureSensormodel, on the Modeling tab, click Model Data Editor.In the Model Data Editor, select the Parameters tab.
In the filter box, type
sensor.
In the filtered table you can see that the model workspace contains the parameter sensor_params. The parameter sensor_params is a structure with fields min_press, max_press, and timeout. The fields of the structure are assigned as values to block parameters in the maxPressX and minPressX blocks, and in the Compare To Constant block that generates the output signal.

To allow Model blocks that reference the pressure sensor model to override the default values and provide instance-specific values to these block parameters, observe that sensor_params has the Argument check box selected to configure the parameter as a model argument.
To see the default values for the sensor_params structure, click in the Value column. Then click the button with three vertical dots and select Open Variable Editor.

Examine Instance-Specific Block Parameter Assignments in the Sensor Array
The SensorArray model contains four Model blocks that reference the PressureSensor model.
To examine the instance-specific block parameter assignments for each referenced pressure sensor model:
In the
PressureArraymodel, on the Modeling tab, click Model Data Editor.In the Model Data Editor, select the Parameters tab.
In the Model Data Editor you can see that the model workspace contains four parameters p1, p2, p3, and p4. The value of each of these parameters contains a structure with fields min_press, max_press, and timeout. The parameters p1, p2, p3, and p4 provide the instance-specific values for the sensor_params parameter in Sensor1, Sensor2, Sensor3, and Sensor4, respectively.

Note that p1, p2, p3, and p4 have the Argument check box selected so that the parent SensorHarness model can override block parameter values supplied by the SensorArray model and provide its own values for testing purposes.
To view or change the values assigned to the block parameters for each Model block, click in the Value column for p1, p2, p3, or p4. Then click the button with three vertical dots and select Open Variable Editor.

Examine Instance-Specific Block Parameter Assignments in the Test Harness
The top model in this hierarchy, SensorHarness, is a test harness for the SensorArray model.
In the Model Data Editor you can see that the model workspace contains a parameter pSensorArray that contains a nested array of sensor_params structures that provide new values for the model arguments p1, p2, p3, and p4.

Using the Variable Editor you can update the values of these structures and test the sensors in the array using different minimum and maximum pressures, and timeouts. In the Model Data Editor, click in the Value column for pSensorArray, then click the button with three vertical dots and select Open Variable Editor.

Once you have selected testing values, on the Modeling tab, click Run to test the model. The attached scopes display the output signals for the pressure sensors so that you can see when the pressure becomes out of range for each sensor.

Change Model Argument Name or Value
To rename a model argument in the context of the referenced model:
Find all Model blocks that refer to the model and save the instance-specific parameter values that each block specifies. Use the
get_paramfunction to query theInstanceParametersparameter of each block, which is a structure array. The structure contains four fields:Name,Value,Path, andArgument.You must save the instant-specific parameter values because the renaming operation discards the values in the Model blocks.
In the Model Data Editor, right-click the variable or object in the model workspace of the referenced model and select Rename All. The renaming operation changes the name of the variable or object and changes references to it throughout the model. For more information, see Create, Edit, and Manage Workspace Variables.
Reapply the argument values to the Model blocks by using the new name of the argument. To programmatically set argument values in a Model block, see Instance parameters.
Customize User Interface for Reusable Components
When you design a reusable referenced model for use by other members of a team, you can apply a mask to the entire referenced model. You can then customize the way that your users interact with Model blocks, including setting instance-specific values.
Using this technique also makes it easier to programmatically specify
instance-specific values. If you create and use a mask parameter named
gainMask to programmatically set the value to
0.98 for an instance of the model named
myModelBlock, your users can use this command at the command
prompt:
set_param('myModelBlock','gainMask','0.98')
If you apply a mask to the referenced model, the model mask shows only the instance-specific parameters from the direct child model. It does not show instance-specific parameters promoted up from descendant models.
If you do not mask the model, to set the instance-specific value, use the
InstanceParameters parameter of the block. For more information,
see Parameterize a Referenced Model Programmatically.
For information about masking models, see Introduction to System Mask.
Configure Instance-Specific Data for Simulink.LookupTable and Simulink.Breakpoint Objects
When you use Simulink.LookupTable objects to store
and configure lookup table data for ASAP2 or AUTOSAR code generation, for example,
STD_AXIS or CURVE, you can configure the objects as model arguments. You can also
configure a Simulink.Breakpoint object that is referenced by a
Simulink.LookupTable as a model argument. You can then specify
unique table data and breakpoint data for each instance of a component.
You can specify the instance-specific value of a Simulink.LookupTable
argument as a new Simulink.LookupTable object in the parent model or as
a simple MATLAB structure or array.
Specify an instance-specific value for a Simulink.LookupTable object
based on the value of the Breakpoints specification
property.
When the Breakpoints specification property is set to
Explicit valuesorEven spacing, the instance-specific value of the lookup table object can be:A
Simulink.LookupTableobjectThe name of a valid MATLAB structure variable, such as
Model1_LUT2A literal structure expression, such as
struct(‘Table’,
                                    …, ‘BP1’, …, ‘BP2’, …)
Other expressions that return a valid structure, such as
Params.Model1.LUT2or a call to a MATLAB function
When the Breakpoints specification property is set to
Reference, the instance-specific value of theSimulink.LookupTableobject can be:A
Simulink.LookupTableobject. In this case, Simulink passes only the Table property of the lookup table object to the child model. This allows you to configure model arguments forSimulink.LookupTableobjects andSimulink.Breakpointobjects independently of each other and reuse these objects as instance parameters for multiple Model blocks.A literal numeric array value, such as
[1 5 7; 2 8 13].The name of a numeric array variable, such as
Model1_LUT2.Other expressions that return a valid numeric array, such as
Params.Model1.LUT2or a call to a MATLAB function.
In this case, if you configure the
Simulink.Breakpointobject that is referenced by theSimulink.LookupTableas a model argument, the instance-specific value for theSimulink.Breakpointobject can be:A
Simulink.Breakpointobject.An array of numeric values that define the breakpoints. The array must match the design definition for the breakpoint object. Simulink synthesizes a
Simulink.Breakpointobject by using the values in the array.The name of a numeric array variable or a field of a structure.
When you specify the instance-specific value of a
Simulink.LookupTable argument as a structure, these rules
apply:
Each field of the model argument definition must be specified in the structure, and the number of fields and the names of the fields must match. For example, while only the table data from a
Simulink.LookupTableobject of typeReferenceis passed to the child model, you must still specify the breakpoint data in your structure or Simulink reports and error.The dimensions of the table and the breakpoint data in the structure must match that of the model argument definition.
If the data type of a structure field is
double, the value is cast to the data type of the corresponding model argument field. Otherwise, the value must match the data type of the corresponding model argument field.
You can specify the value of a Simulink.LookupTable object as a
simple numeric value for any simulation mode and for code generation. For code
generation, if you configure the model argument with a storage class of
Auto, the structure or numeric array variable is not preserved in
the generated code. If you set the storage class to any other value, the value of the
structure or numeric array is used to initialize the tunable argument in the generated
code, similar to other model arguments.
Specify Instance-Specific Value of Simulink.LookupTable Object
This example shows how to specify the instance-specific value of a
Simulink.LookupTable argument as a new
Simulink.LookupTable and as a MATLAB structure.
For an example that parameterizes a referenced model by using lookup tables and the command prompt, see Configure Instance-Specific Data for Lookup Tables Programmatically.
First, create a model that represents a reusable algorithm. Configure a Simulink.LookupTable object as a model argument to be
used by your model.
Create a model
ex_arg_LUT_ref, which represents a reusable algorithm.
Using the Model Explorer, add a
Simulink.LookupTableobject in the model workspace. You can use the Add Simulink LookupTable button . Name the object
LUTArg.In the Contents pane, for
LUTArg, select the check box in the Argument column.Set Number of table dimensions to
2. In the Table and Breakpoints tabular area, specify values for theTable,BP1, andBP2data. For example, configure the table and breakpoint data by entering these values in the MATLAB expression box.Table—[3 4;1 2]BP1—[1 2]BP2—[3 4]
When you simulate or generate code directly from
ex_arg_LUT_ref, the model uses these values.Under Struct Type definition, set Name to
LUTArg_Type.Click Apply.
In the Contents pane, for
LUTArg, select the check box in the Argument column.In the referenced model, in the n-D Lookup Table block, set Data specification to
Lookup table
                            object
. Set Name toLUTArg.Save the model.
Next, create a model that uses the reusable algorithm and specify
instance-specific values for the Simulink.LookupTable object.
Create a model
ex_arg_LUT, which uses the reusable algorithm twice.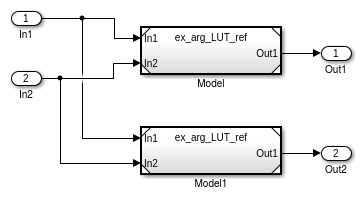
At the command prompt, create a
Simulink.LookupTableobject in the model workspace. Alternatively, you can create theSimulink.LookupTableobject in a data dictionary or in the base workspace.LUTForInst1 = Simulink.LookupTable;
Specify breakpoint and table data for the object.
LUTForInst1.Table.Value = [8 7; 6 5];
LUTForInst1.Breakpoints(1).Value = [5 6];
LUTForInst1.Breakpoints(2).Value = [3 4];
Specify a structure type name. Match this name to the name specified by the object in the referenced model workspace.
LUTForInst1.StructTypeInfo.Name = 'LUTArg_Type';Use a structure to create the instance-specific argument value for the second Model block. Specify the breakpoint and table data for the structure.
StructForInst2.Table = [9 8; 7 7];
StructForInst2.BP1 = [3 4];
StructForInst2.BP2 = [5 6];
In the
ex_arg_LUTmodel, for model instanceModel, on the Instance parameters tab, set the value of LUTArg toLUTForInst1.For model instance
Model1, set LUTArg toStructForInst2.
One instance of ex_arg_LUT_ref uses the table and breakpoint
data stored in the Simulink.LookupTable object in
the model workspace. The other instance uses the table and breakpoint data stored in
the structure.
Specify Instance-Specific Values for Simulink.LookupTable and Simulink.Breakpoint Object
This example shows how to specify an instance-specific value of a
Simulink.LookupTable object as a new
Simulink.LookupTable object. The example also shows how to
specify an instance-specific value for a Simulink.Breakpoint object
that is referenced by the Simulink.LookupTable object.
First, create a model that represents a reusable algorithm. Configure both a
Simulink.Breakpoint object and the Simulink.LookupTable object that references the
Simulink.Breakpoint object as model arguments.
Create a model
ex_arg_BP_ref, which represents a reusable algorithm.
Using the Model Explorer, add a
Simulink.LookupTableobject in the model workspace. You can use the Add Simulink LookupTable button. Name the object
LUTArg.In the Contents pane, for
LUTArg, select the check box in the Argument column.Set Number of table dimensions to
1.Specify the value of the table data as
[1 2].Set Breakpoints specification to
Reference.In the Breakpoints section, set the Names to
BP1.Add a
Simulink.Breakpointobject in the model workspace. Name the objectBP1and specify the value as[3 4].In the Contents pane, for
BP1, select the check box in the Argument column.
Next, create a model that uses the reusable algorithm and specify
instance-specific values for the Simulink.LookupTable object and the
Simulink.Breakpoint object.
Create a model
ex_arg_BP, which uses the reusable algorithm twice.
At the command prompt, for model instance
Model, create aSimulink.LookupTableobject and aSimulink.Breakpointobject in the model workspace. Alternatively, you can create these objects in a data dictionary or the base workspace.LUTForInst1 = Simulink.LookupTable; BPForInst1 = Simulink.Breakpoint;
Specify breakpoint and table data for the objects. You must specify breakpoint information for
LUTForInst1so that the specification of the instance-specific value matches the model argument specifications. However, only the table data is pushed to the child model.LUTForInst1.Table.Value = [7 8]; LUTForInst1.BreakpointsSpecification = 'Reference'; LUTForInst1.Breakpoints = {'BPForInst1'}; BPForInst1.Breakpoints.Value = [5 6];
In the
ex_arg_BPmodel, for model instanceModel, on the Instance parameters tab, set the value of LUTArg toLUTForInst1and the value of BP1 toBPForInst1.For model instance
Model1, create anotherSimulink.LookupTableobject in the model workspace and specify the table and breakpoint data. Alternatively, you can create theSimulink.LookupTableobject in a data dictionary or in the base workspace.LUTForInst2 = Simulink.LookupTable; BPForInst2 = Simulink.Breakpoint; BPForInst2.Breakpoints.Value = [11 12]; LUTForInst2.Table.Value = [9 10]; LUTForInst2.BreakpointsSpecification = 'Reference'; LUTForInst2.Breakpoints = {'BPForInst2'};
For this model instance, use an array to specify the instance-specific value for the
Simulink.Breakpointobject.BPArrayForInst2 = [11 12];
In the
ex_arg_BPmodel, for model instanceModel1, on the Instance parameters tab, set the value of LUTArg toLUTForInst2. For this model instance, set the value of BP1 to the arrayBPArrayForInst2.
See Also
Objects
Blocks
Topics
- Parameterize a Referenced Model Programmatically
- Configure Instance-Specific Data for Lookup Tables Programmatically
- Specify Instance-Specific Parameter Values for Reusable Referenced Model (Simulink Coder)
- Organize Related Block Parameter Definitions in Structures
- Parameter Interfaces for Reusable Components
- Tune and Experiment with Block Parameter Values