Create and Edit Attribute Mappings
The ReqIF™ format represents a requirement as a SpecObject. The
SpecObject has a SpecObjectType, which defines
attributes to store requirements information. The SpecObjects contains
values for these attributes.
After you import requirements from a ReqIF file, you can customize how attributes from ReqIF requirements map to Requirements Toolbox™ requirement properties and custom attributes. For more information, see Add Custom Attributes to Requirements. You can also save this mapping for reuse.
Edit the Attribute Mapping for Imported Requirements
You can import requirements from ReqIF files in the Requirements Editor. For more information, see Import Requirements from ReqIF Files.
When you import requirements from ReqIF files, you must choose an import mapping to use. The imported requirement type, properties, and imported link type depend on the import mapping that you choose. For more information, see Choose an Import Mapping.
After you import requirements from a ReqIF file, you can edit the attribute mapping for the imported requirements:
Open the Requirements Editor and import the ReqIF file. For more information, see Import Requirements from ReqIF Files.
Select the Import node or the top-level requirement, depending on if you imported referenced requirements or requirements. For more information, see Select an Import Mode.
You can see the attribute mappings in the right pane, under Attribute Mapping.
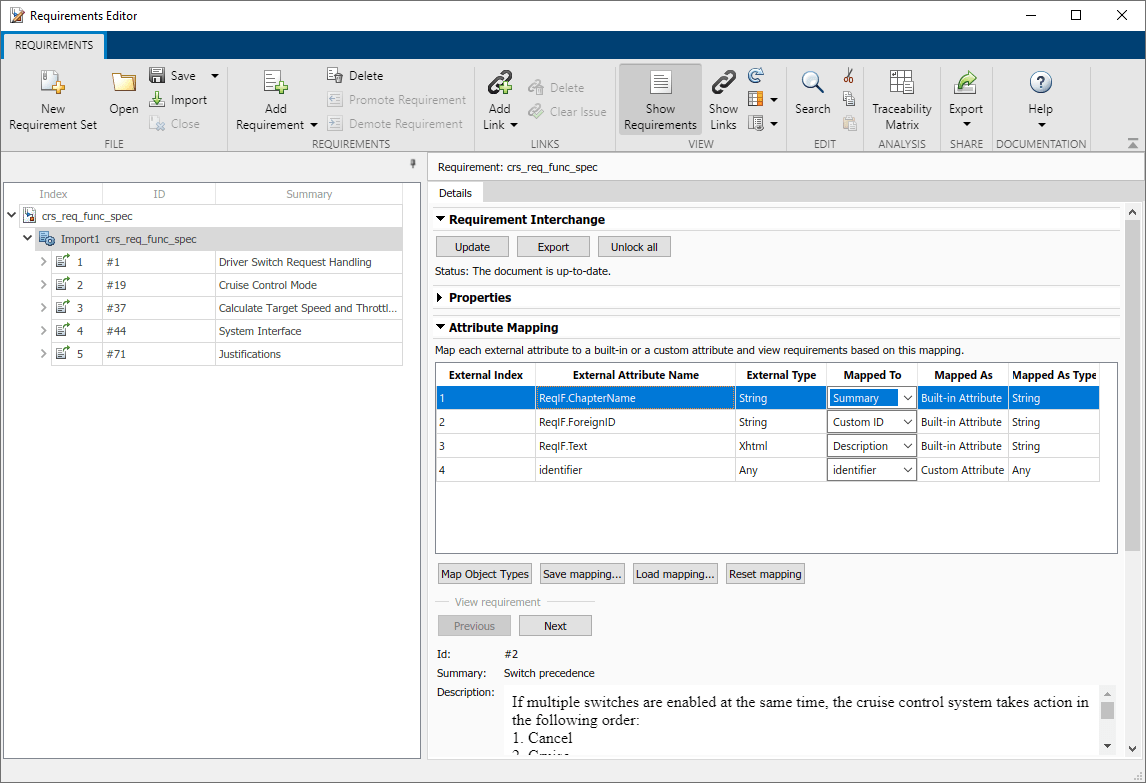
Edit the mapping by selecting a property or attribute from the drop-down in the Mapped To column.
Note
When editing the attribute mapping, you can only map an attribute to a built-in requirement type. You cannot select a custom attribute from the drop-down in the Mapped To column.
You can save the current attribute mapping by clicking Save mapping. The mapping saves as an XML file. You can load a saved mapping by clicking Load mapping.
Specify Default ReqIF Requirement Type
Some external requirements management tools, such as Polarion™, support multiple types of requirements. In this case, modify the attribute mapping file to specify the default ReqIF requirement type to use when exporting to ReqIF. For example:
<thisType>SpecObject</thisType>
<thisSubType>System Requirement</thisSubType>
<thisSubType> tag indicates that
each exported SpecObject will have the SpecObject
type as System Requirement.Specify ReqIF Template
Some external requirements management tools, such as Polarion and IBM®
DOORS®, require a specific set of ReqIF data type, attribute, and SpecObject type definitions.
They may also require that the ReqIF specification be of a certain type. You can supply these definitions by
specifying the name of a template ReqIF file in the mapping file produced by the external requirements management
tool. During ReqIF export, Requirements Toolbox imports the template file and uses it to generate and export a ReqIF file with a format that is compatible with the external tool.
Save the template files in the same folder as the attribute mapping file,
fullfile(matlabroot,"toolbox","slrequirements","slrequirements","attribute_maps").
To specify a template file in the attribute mapping, open the attribute mapping file
that corresponds to the external requirements management tool in a text editor. Modify
the value of the <templateFile> tag to match the name of the
template file. You might need to restart MATLAB® to be able to select the mapping file in the Importing Requirements
dialog.