TriggerConfiguration
Description
Use the TriggerConfiguration object to define a trigger event to
identify the simulation time of specified input signal characteristics. You can use trigger
events to stabilize periodic signals such as a sine wave or capture nonperiodic signals such
as a pulse that occurs intermittently.
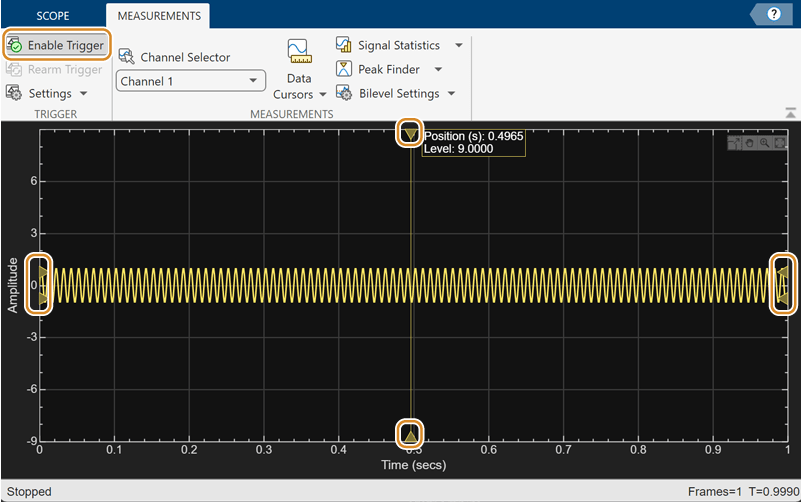
You can enable the trigger events either from the Time Scope toolstrip or from the command line. To enable a trigger event from the toolstrip, open the Measurements tab and click Enable Trigger.
Creation
Description
trigger = TriggerConfiguration() creates a trigger configuration
object trigger.
Properties
All properties are tunable.
For more information on these triggers and the associated parameters, see Scope Triggers (Simulink).
Display update mode, specified as one of these:
"auto"–– Display data from the last trigger event. If no event occurs after one time span, display the last available data."normal"–– Display data from the last trigger event. If no event occurs, the display remains blank."once"–– Display data from the last trigger event and freeze the display. If no event occurs, the display remains blank. Click the Rearm button ( ) to look for the next trigger event.
Scope Window Use
On the Measurements tab, in the Trigger section, click Settings and set Mode to one of the available options.
Data Types: char | string
Type of trigger, specified as one of the following:
"edge"–– Trigger when the signal crosses a threshold."pulse-width"–– Trigger when the signal crosses a low threshold and a high threshold twice within a specified time."transition"–– Trigger on the rising or falling edge of a signal that crosses the high and low levels within a specified time range."runt"–– Trigger when a signal crosses a low threshold or a high threshold twice within a specified time."window"–– Trigger when a signal stays within or outside a region defined by the high and low thresholds for a specified time."timeout"–– Trigger when a signal stays above or below a threshold longer than a specified time.
Scope Window Use
On the Measurements tab, in the Trigger section, click Settings and set Type to one of the available options.
Data Types: char | string
Trigger polarity, specified as one of the following:
"rising","falling", or"either"–– WhenTypeis set to"edge"or"timeout"."positive","negative", or"either"–– WhenTypeis set to"pulse-width"or"runt"."rise-time","fall-time", or"either"–– WhenTypeis set to"transition"."inside","outside", or"either"–– WhenTypeis set to"window".
Scope Window Use
On the Measurements tab, in the Trigger section, click Settings and set Polarity to one of the available options.
Data Types: char | string
Automatic thresholding of edge-triggered signal, specified as
true or false. When you set this property to
false, specify the threshold manually using the Level property.
Scope Window Use
On the Measurements tab, in the Trigger section, click Settings. Under Level Settings, select Auto Level.
Data Types: logical
Horizontal position of the trigger on the screen, specified as a positive scalar in the range (0 100].
Scope Window Use
On the Measurements tab, in the Trigger section, click Settings and specify a positive scalar less than or equal to 100 in the Position (%) box.
Data Types: double
Threshold of an edge-triggered signal, specified as a finite real scalar.
Dependency
To enable this property, set AutoLevel to
false and Type to "edge"
or "timeout".
Scope Window Use
On the Measurements tab, in the Trigger section, click Settings. Under Level Settings, clear Auto Level and specify a real scalar in the Level box.
To enable this property, set Type to
Edge or Timeout.
Data Types: double
Noise reject value, specified as a finite real scalar. For more information on hysteresis, see Hysteresis of Trigger Signals (Simulink).
Dependency
To enable this property, set AutoLevel to
false and Type to "edge"
or "timeout".
Scope Window Use
On the Measurements tab, in the Trigger section, click Settings. Under Level Settings, clear Auto Level and specify a real scalar in the Hysteresis box.
To enable this property, set Type to
Edge or Timeout.
Data Types: double
Lower trigger level of window-triggered signal, specified as a finite real scalar.
Dependency
To enable this property, set AutoLevel to
false and Type to
"pulse-width", "transition",
"runt", or "window".
Scope Window Use
On the Measurements tab, in the Trigger section, click Settings. Under Level Settings, clear Auto Level and specify a real scalar in the Low box.
To enable this property, set Type to Pulse
Width, Transition,
Runt, or Window.
Data Types: double
Higher trigger level of window-triggered signal, specified as a finite real scalar.
Dependency
To enable this property, set AutoLevel to
false and Type to
"pulse-width", "transition",
"runt", or "window".
Scope Window Use
On the Measurements tab, in the Trigger section, click Settings. Under Level Settings, clear Auto Level and specify a real scalar in the High box.
To enable this property, set Type to Pulse
Width, Transition,
Runt, or Window.
Data Types: double
Minimum pulse width for a pulse or runt-triggered signal, specified as a nonnegative scalar.
Dependency
To enable this property, set Type to
"pulse-width" or "runt".
Scope Window Use
On the Measurements tab, in the Trigger section, click Settings. Under Level Settings, specify a nonnegative scalar in the Min Width (s) box.
To enable this property, set Type to Pulse
Width or Runt.
Data Types: double
Maximum pulse width for a pulse or runt-triggered signal, specified as a nonnegative scalar.
Dependency
To enable this property, set Type to
"pulse-width" or "runt".
Scope Window Use
On the Measurements tab, in the Trigger section, click Settings. Under Level Settings, specify a nonnegative scalar in the Max Width (s) box.
To enable this property, set Type to Pulse
Width or Runt.
Data Types: double
Minimum duration for a transition or window-triggered signal, specified as a nonnegative scalar.
Dependency
To enable this property, set Type to
"transition" or "window".
Scope Window Use
On the Measurements tab, in the Trigger section, click Settings. Under Level Settings, specify a nonnegative scalar in the Min Time (s) box.
To enable this property, set Type to
Transition or Window.
Data Types: double
Maximum time duration for a transition or window-triggered signal, specified as a nonnegative scalar.
Dependency
To enable this property, set Type to
"transition" or "window".
Scope Window Use
On the Measurements tab, in the Trigger section, click Settings. Under Level Settings, specify a nonnegative scalar in the Max Time (s) box.
To enable this property, set Type to
Transition or Window.
Data Types: double
Timeout duration for a timeout-triggered signal, specified as a nonnegative scalar.
Dependency
To enable this property, set Type to
"timeout".
Scope Window Use
On the Measurements tab, in the Trigger section, click Settings. Under Level Settings, specify a nonnegative scalar in the Timeout (s) box.
To enable this property, set Type to
Timeout.
Data Types: double
Trigger offset in seconds, specified as a finite real scalar.
Scope Window Use
On the Measurements tab, in the Trigger section, click Settings. Under Delay/Holdoff, specify a real scalar in the Delay (s) box.
Data Types: double
Minimum time between trigger events, specified as a finite nonnegative scalar.
Scope Window Use
On the Measurements tab, in the Trigger section, click Settings. Under Delay/Holdoff, specify a nonnegative scalar in the Holdoff (s) box.
Data Types: double
Trigger channel, specified as a positive integer.
Scope Window Use
On the Measurements tab, in the Measurements section, select a channel.
Data Types: double
Enable trigger, specified as true or false.
Set this property to true to enable trigger.
Scope Window Use
On the Measurements tab, in the Trigger section, click Enable Trigger.
Data Types: logical
Examples
View a sine wave in the Time Scope window. This sine wave is
streaming constantly in the display and cannot be captured without stabilization. To
stabilize the sine wave, enable a trigger event programmatically on the scope display
using the Enabled property of the
TriggerConfiguration object. Alternatively, you can enable the trigger
by clicking the Enable Trigger button on the
Measurements tab of the toolstrip.
Create Sine Wave
Create the input sine wave using the sin function. Create a
timescope
MATLAB® object to display the signal. Set the TimeSpan property
to 1 second.
f = 100;
fs = 1000;
swv = sin(2.*pi.*f.*(0:1/fs:1-1/fs)).';
scopeNoTrigger = timescope(SampleRate=fs,...
    TimeSpanSource="property", ...
    TimeSpan=1);
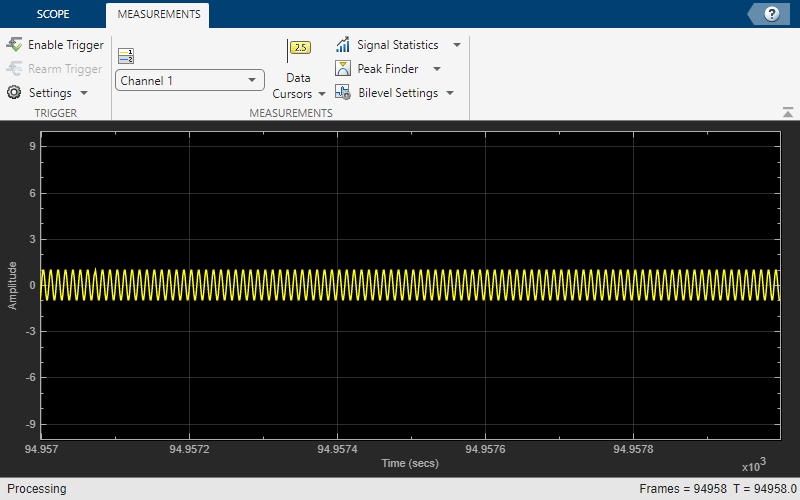
Display the sine wave in the scope. You can see that the signal in the scope is constantly moving.
while(1)
    scopeNoTrigger(swv)
end
release(scopeNoTrigger)
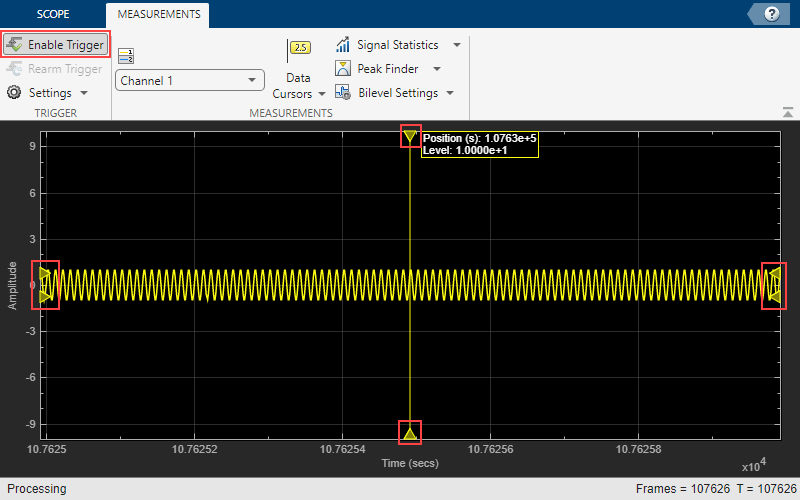
Enable Trigger
Now enable a trigger event to stabilize the signal.
You can enable the trigger event in the scope during simulation or enable the trigger event programmatically when creating the object.
To use the programmatic approach, create another timescope object
and enable the trigger event programmatically while creating the object.
scope = timescope(SampleRate=fs,...
    TimeSpanSource="property",...
    TimeSpan=1);
scope.Trigger.Enabled = true;
scope.Trigger.Type = "transition";
scope.Trigger
 TriggerConfiguration with properties:

           Mode: 'auto'
           Type: 'transition'
       Polarity: 'rise-time'
      AutoLevel: 1
       Position: 50
       LowLevel: 0.2000
      HighLevel: 2.3000
    MinDuration: 0
    MaxDuration: Inf
          Delay: 0
        Holdoff: 0
        Channel: 1
        Enabled: 1
Stream in the sine wave signal again.
while(1)
    scope(swv)
end
release(scope)
The display freezes once you enable the trigger.
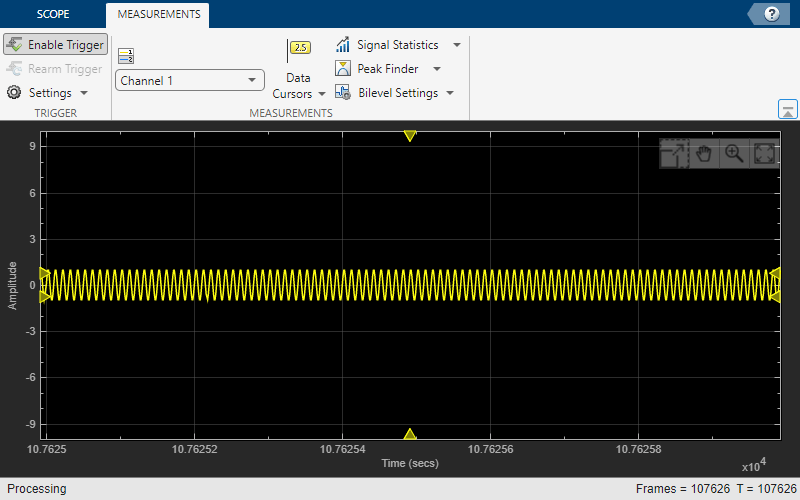
The triangle markers show the trigger positions and levels. For more information on the trigger, hover over the triangle.
Version History
Introduced in R2022a