Validating Mask Parameters Using Constraints
A mask can contain parameters that accept user input values. You can provide input values for mask parameters using the mask dialog box. Mask parameter constraints help you to create validations on a mask parameter without having to write your own validation code. Constraints ensure that the input for the mask parameter is within a specified range. For example, consider a masked Gain block. You can set a constraint where the input value must be between 1 and 10. If you provide an input that is outside the specified range, an error displays.
Create and Associate a Constraint
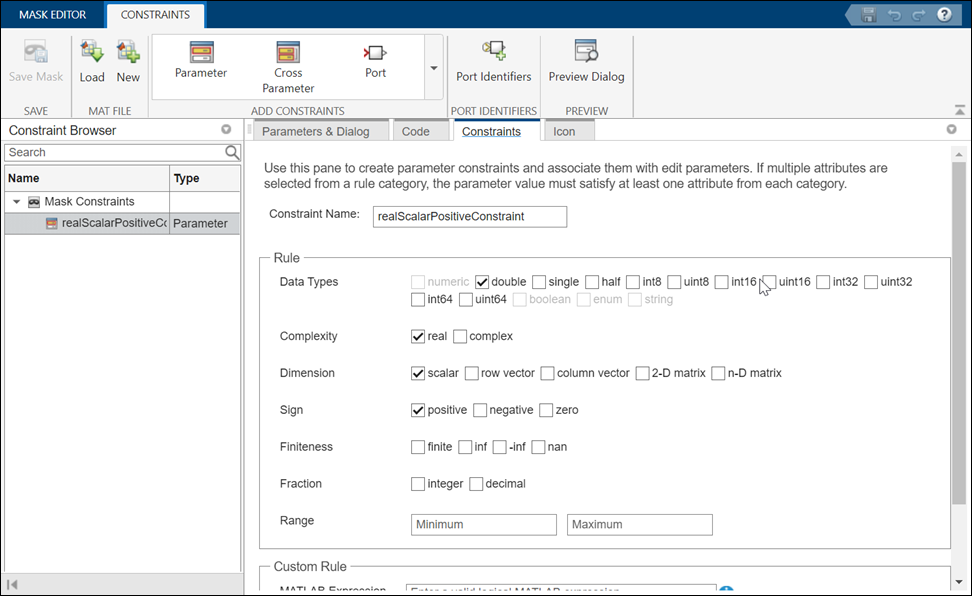
Constraint Manager is embedded inside Mask Editor with attributes and options to create your constraints. Click Constraints tab to create or load an existing constraint.
Create a Constraint
You can create constraints according to your specification using the built-in attributes in the Constraint Manager. To create a constraint:
In the Mask Editor, click Constraints tab and then click New in the toolstrip to create a constraint.
Select attributes for the constraint in the Rule section. Based on the data type selection, the applicable rule attributes gets enabled/disabled.
For more details on rule attributes, see Rule Attributes.

Associate the Constraint to a Mask Parameter
Once a constraint is created, you can associate it with any Edit or Combobox parameters in the Mask Editor.
In the Mask Editor, select the parameter you want to associate a constraint with.
Select the constraint name from the Constraint drop-down menu.

Validate the Constraint
To check if the parameter is in adherence with the associated constraint:
Select a parameter with a constraint associated with it.
Provide the input values for the parameter in the Property editor. If the input is outside the specification for the associated constraint, an error displays.

Note
The parameter callback code gets executed after validating the parameter value against the associated constraint. If the validation fails, the callback code is not executed.
Create a Cross-Parameter Constraint
Cross-parameter constraints are applied among two or more Edit or Combobox type mask parameters. You can use a cross parameter constraint when you want to specify scenarios such as, Parameter1 must be greater than Parameter2.
In the Mask Editor, click Constraints tab.
Click Cross-Parameter Constraints.
Click Create Constraint. A new cross-parameter constraint is created with a default name (Constraint_1). You can change the constraint name.
Specify the following values for the new constraint:
Name – Specify a name for the constraint
MATLAB® Expression – Specify a valid MATLAB expression. This expression is evaluated during edit time and simulation
Error Message – Specify the error message to be displayed when the constraint rule is not met. If no error message is specified, a default error message displays.
Rule Attributes
Rule attributes to create constraints are shown in the table:
| Rule Attribute | Attribute Value | Description |
|---|---|---|
Data type |
| Specify the acceptable data type of the mask parameter value. You can
choose multiple data types. To validate the parameter value against a specific
range, use the Minimum and Maximum properties because the Data Type property does not validate the parameter value against
the range. For example, to validate the parameter value against the data type
numeric and range 0 - 127, select |
Complexity |
| Specify if the mask parameter value can be a real or complex number. |
Dimensions |
| Specify the acceptable dimensions for the mask parameter. |
Sign |
| Specify if the input value must be positive, negative, or zero. |
Finiteness |
| Specify the acceptable finiteness of mask parameter value. |
Fraction |
| Specify if the input value must be an integer or decimal. |
Range |
| Specify the acceptable range of mask parameter value. |
Custom Rule | Valid MATLAB expression | Specify custom constraint for the mask parameter using a valid MATLAB expression. You can use the value token to parameterize the expression. During validation, the evaluated value of the parameter replaces the value token. |
Error Message | Character vector | Specify a custom error message for the custom constraint. You can specify the error message as character vector or as a message catalog ID. |
Support Constraints on Literal Edit Parameters
You can associate constraints to literal edit parameters. If the Evaluate option is not selected, Simulink® takes a literal reading of the input entry as you type it in the mask parameter dialog box. For example, the IP address stored in a literal edit parameter is validated against a custom rule.