Navigate to Requirements in IBM DOORS Databases from Simulink
Enable Linking from IBM DOORS Databases to Simulink Objects
By default, the RMI does not insert navigation objects into requirements documents. If
you want to insert a navigation object into the requirements document when you create a
link from a Simulink® object to a requirement, you must change the RMI’s settings. The following
tutorial uses the sldemo_fuelsys example model to illustrate how to
do this.
To enable linking from the DOORS® database to the example model:
Open the model
sldemo_fuelsys. At the MATLAB® command line, enter:openExample("simulink_automotive/" + ... "ModelingAFaultTolerantFuelControlSystemExample")
Note
You can modify requirements settings in the Requirements Settings dialog box. These settings are global and not specific to open models. Changes you make apply not only to open models, but also persist for models you subsequently open. For more information about these settings, see Requirements Settings.
In the Apps tab, click Requirements Manager. In the Requirements tab, ensure that Layout > Requirements Browser is selected. In the Requirements Browser, in the View drop-down, select
Links. In the Requirements tab, select Link Settings > Linking Options.The Requirements Settings dialog box opens.
Click the Selection Linking tab.
Select Modify destination for bidirectional linking.
When you enable this option, every time you create a selection-based link from a Simulink object to a requirement, the RMI inserts navigation objects at the designated location. Using this option requires write access to the requirements document.
Select Store absolute path to model file.
For this exercise, you save a copy of the example model on the MATLAB path.
If you add requirements to a model that is not on the MATLAB path, you must select this option to enable linking from your requirements document to your model.
In the Apply this keyword to new links field, enter one or more user keywords to apply to the links that you create.
For more information about user keywords, see User Keywords and Requirements Filtering.
Click Close to close the Requirements Settings dialog box. Keep the
sldemo_fuelsysmodel open.
Insert Navigation Objects into IBM DOORS Requirements
When you enable Modify destination for bidirectional linking as
described in Enable Linking from IBM DOORS Databases to Simulink Objects, the RMI
can insert a navigation object into both the Simulink object and its associated DOORS requirement. This tutorial uses the sldemo_fuelsys example model
to illustrate how to do this. For this tutorial, you also need a DOORS formal module that contains
requirements.
Rename the
sldemo_fuelsysmodel and save it in a writable folder on the MATLAB path.Start the DOORS software and open a formal module that contains requirements.
Select the requirement that you want to link to by left-clicking that requirement in the DOORS database.
In the
sldemo_fuelsysmodel, select an object in the model.This example creates a requirement from the
fuel_rate_controlsubsystem.Right-click the Simulink object (in this case, the
fuel_rate_controlsubsystem) and select Requirements > Link to Selection in DOORS.The RMI creates the link for the
fuel_rate_controlsubsystem. It also inserts a navigation object into the DOORS formal module—a Simulink reference object ( ) that enables you to navigate from the
requirement to the model.
) that enables you to navigate from the
requirement to the model.
Close the model.
Note
When you navigate to a DOORS requirement from outside the software, the DOORS module opens in read-only mode. If you want to modify the DOORS module, open the module using DOORS software.
Insert Navigation Objects to Multiple Simulink Objects
If you have several Simulink objects that correspond to one requirement, you can link them all to that requirement with a single navigation object. This eliminates the need to insert multiple navigation objects for a single requirement. The Simulink objects must be available in the same model diagram or Stateflow® chart.
The workflow for linking multiple Simulink objects to one DOORS requirement is as follows:
Make sure that you have enabled Modify destination for bidirectional linking.
Select the DOORS requirement to link to.
Select the Simulink objects that need to link to that requirement.
Right-click one of the objects and select Requirements Traceability > Link to Selection in DOORS.
A single navigation object is inserted at the selected requirement.
Double-click the navigation object in DOORS to highlight the Simulink objects that are linked to that requirement.
Navigate Between IBM DOORS Requirement and Model Object
In Insert Navigation Objects into IBM DOORS Requirements, you
created a link between a DOORS requirement
and the fuel_rate_control subsystem in the
sldemo_fuelsys model. Navigate the links in both
directions:
With the
sldemo_fuelsysmodel closed, go to the DOORS requirement in the formal module.Left-click the Simulink reference object that you inserted to select it.
Select MATLAB > Select item.
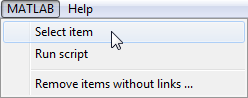
Your version of the
sldemo_fuelsysmodel opens, with thefuel_rate_controlsubsystem highlighted.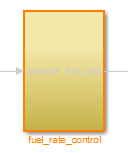
Log in to the DOORS software.
Navigate from the model to the DOORS requirement. In the Model Editor, right-click the
fuel_rate_controlsubsystem and select Requirements > 1. “<requirement name>” where <requirement name> is the name of the DOORS requirement that you created.The DOORS formal module opens with the requirement object and its child objects highlighted in red.

Why Add Navigation Objects to IBM DOORS Requirements?
IBM® DOORS software is a requirements management application that you use to capture, track, and manage requirements. The Requirements Management Interface (RMI) allows you to link Simulink objects to requirements managed by external applications, including the DOORS software.
When you create a link from a Simulink object to a DOORS requirement, the RMI stores the link data in Simulink. Using this link, you can navigate from the Simulink object to its associated requirement.
You can also configure the RMI to insert a navigation object in the DOORS database. This navigation object serves as a link from the DOORS requirement to its associated Simulink object.
To insert navigation objects into a DOORS database, you must have write access to the DOORS database.
Customize IBM DOORS Navigation Objects
If the RMI is configured to modify the destination for bidirectional linking as
described in Enable Linking from IBM DOORS Databases to Simulink Objects, the RMI
can insert a navigation object into your requirements document. This object looks like
the icon for the Simulink software: ![]()
Note
In IBM DOORS requirements documents, clicking a navigation object does not navigate back to your Simulink object. Select MATLAB > Select object to find the Simulink object that contains the requirements link.
To use an icon of your choosing for the navigation object:
In the Apps tab, click Requirements Manager. In the Requirements tab, select Link Settings > Linking Options.
Select the Selection Linking tab.
Select Modify destination for bidirectional linking.
Selecting this option enables the Use custom bitmap for navigation controls in documents option.
Select Use custom bitmap for navigation controls in documents.
Click Browse to locate the file you want to use for the navigation objects.
For best results, use an icon file (
.ico) or a small (16×16 or 32×32) bitmap image (.bmp) file for the navigation object. Other types of image files might give unpredictable results.Select the desired file to use for navigation objects and click Open.
Close the Requirements Settings dialog box.
The next time you insert a navigation object into a requirements document, the RMI uses the file you selected.
Tip
You can specify a custom template for labels of requirements links to DOORS objects. For more information, see the
rmi command.
Select a Web Site
Choose a web site to get translated content where available and see local events and offers. Based on your location, we recommend that you select: United States.
You can also select a web site from the following list
Americas
- América Latina (Español)
- Canada (English)
- United States (English)
Europe
- Belgium (English)
- Denmark (English)
- Deutschland (Deutsch)
- España (Español)
- Finland (English)
- France (Français)
- Ireland (English)
- Italia (Italiano)
- Luxembourg (English)
- Netherlands (English)
- Norway (English)
- Österreich (Deutsch)
- Portugal (English)
- Sweden (English)
- Switzerland
- United Kingdom (English)
Asia Pacific
- Australia (English)
- India (English)
- New Zealand (English)
- 中国
- 日本Japanese (日本語)
- 한국Korean (한국어)