Longitudinal Vehicle Motion: Simscape Essentials for Automotive Student Teams
From the series: Simscape Essentials for Automotive Student Teams
In this video, we introduce students to the fundamental process of vehicle development for student automotive competitions such as Formula Student. Using Simscape™, we create a basic vehicle model consisting of the body and brakes. We develop a model where a non-driven vehicle applies brakes to come to a stop when freely falling down a slope.
Published: 4 Mar 2024
Welcome to MATLAB and Simulink Racing Lounge. In this video, I will talk about physical modeling longitudinal vehicle dynamics, especially about Simscape. Our main goal for today's lesson is to learn this model. After you watch this video, you will be able to create this model. Moreover, there is a link to the website where you can download the model. Find the link in the description of this video.
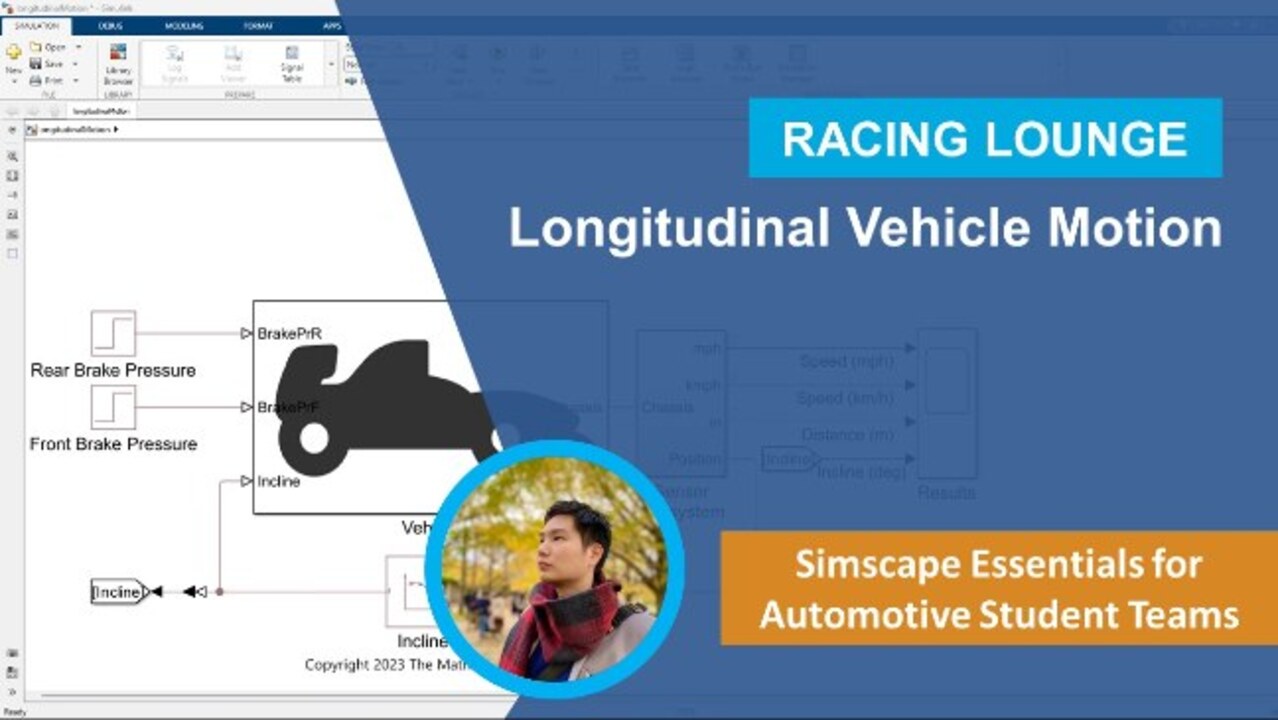
So what does this vehicle model do? This is the longitudinal vehicle model rolling down a hill. To keep things simple, the first model will have no engine or motor to power the vehicle. We want to know, how long does it take to stop the vehicle after the brakes? After we put rear and front brake, the vehicle will stop. And we want to create this model with Simscape.
First of all, to use Simscape, we need to open Simulink environment. Type ssg_new in command window and click Enter. It is the command to open generic Simscape template. To create the vehicle model, let's start from two main components, vehicle body and tires. Get the Vehicle Body block by typing "vehicle body" and a Tire (Simple) block by typing "tire." We need four tires, so copy and paste for three more tires. Locate them to the proper position and name them for front left, front right, rear left, and rear right.
Port H is the physical connection for horizontal motion. So we need to connect the vehicle body and four tires as the vehicle and each tire have the same horizontal motion. Do not forget to connect solver configuration. This block is used to set solver configuration information for simulating Simscape model.
Port V is the velocity, and we connect this port to the Scope block so that we will be able to check the simulation result of the vehicle velocity. Port W is headwind speed. We will use PS Constant block to input the value. This time, we assume that there is no headwind speed. So set the value 0. And Port beta is the road incline angle. Again, we use the PS Constant block. And we set the value-- minus 0.1.
We do not use port NF and NR. NF and NR are the normal force for front and rear. And PS Terminator block is used for end of physical signal. Since we are making simple longitudinal vehicle model, we ignore the normal force. Port A, is the mechanical rotational port associated with the axle that the tire sits on. We can directly connect this block with axle or brake. But this time, let's connect it with Rotational Free End block. This basically means there is no engine or motor, no brakes. But the vehicle is rolling down the hill with its gravity.
So this is the simulation result. As time goes, the velocity increases. Since there is no brake, nothing stops the vehicle. So let's add the brake to see how it will change the result. Remove Rotational Free End block and type "disc brake" and copy three more brakes. Locate brakes and name all of the brakes-- front left, front right, rear left, rear right.
Port S is for rotational mechanical conserving port associated with the shaft. This time, we directly connect this port to the tire. And port P is for physical signal port associated with cylinder pressure. So we need to connect these with brake pressure. We use PS Step block to create brake pressure so that we can control the timing of when to start the brake. This time, we set 100 for the final value. So this brake pressure will occur after one sec.
Front pressure is for front brake, and rear pressure is for rear brake. This is the result of simulating the new vehicle model with brake system. You can see that the vehicle velocity decreased after one sec. Now you have learned how to model simple longitudinal vehicle, and let's move on to the final model that you can download.
You can find the link to the web page from the description of this video. Go to the web page and click Download. Once you download the folder, go to MATLAB and find the folder of the location that you downloaded to. Double click and open folder. Click startup_SimscapeEssentialsAuto.m file and run it. The new window will pop up, and you can simply click longitudinalMotion.slx file to open the model.
Let's check the model from the main components. When you open vehicle subsystems, you will see two different subsystems, brake subsystem and chassis and tire subsystem. Start from chassis and tire subsystem. You see the vehicle body and simple Tire blocks, which you are already familiar with. The few difference that you see is that previously, we used PS Constant block for incline input. But this time, our input is not constant. We will explain more details on this later.
Another difference is the Simscape Bus block. This block is just gathering several physical connections to one line for showing the model compact. And we use two Outport blocks to let the physical connections out from this subsystem. If you want to customize the model for your vehicle, then you can change the parameters of each block. Just double-click the block and change the parameters.
We can directly put the numbers. But this time, we have used variables. And variable data is stocked in MATLAB.m file. Because we wanted to show you the simple vehicle model, we use simple Tire block. But if you want to create more accurate model for your vehicle, click this link below. You can find Magic Formula Tire model. You can copy and paste to use them.
Now, let's move on to the brake subsystem. Again, we use Simscape Bus block. And in the previous subfunction, physical connections of tires are connected to this Simscape Bus block. So in other words, these disc brakes are directly connected to the tires. You might be wondering where the brake pressure coming from. Brake pressures are coming from here. And this time, we put the front and rear brakes at different timing, at 12 sec and 15 sec.
From chassis and tire subsystem, physical connection of chassis is connecting to sensor subsystem. So let's check the sensor subsystem. Ideal Translational Motion Sensor block can get the position and velocity information from physical connection of chassis. Port V is the result of velocity. And there are two branches, one for mile per hour and one for kilometer per hour. Port P is for position with unit meter. And port C is standard reference to measure the difference.
Position goes out from sensor subsystem and put in the lookup table of incline. So it depends on the vehicle position. The incline of the slope will change its value. Let's check the result of this model. When you check the results, you see the top two graphs show that the vehicle speed is increasing until a certain time. And after that, the speed is decreasing slowly. And finally, it gets to 0. If you see the result carefully, you can see two time deceleration. That is because we put the brake pressure two times at 12 sec and 15 sec.
The third graph shows the total distance that vehicle moves, and the last graph is about the incline. So when it is 0 sec, the incline of the slope is steepest. And as the vehicle moves forward, the incline gets less steep.
Today, we learned how to model the vehicle rolling down the hill and added the brake system to stop it. In case of any questions, please feel free to reach out to us, racinglounge@mathworks.com. Thank you for watching the video. I hope you enjoyed it.
Download Code and Files
Related Products
Learn More


Seleccione un país/idioma
Seleccione un país/idioma para obtener contenido traducido, si está disponible, y ver eventos y ofertas de productos y servicios locales. Según su ubicación geográfica, recomendamos que seleccione: United States.
También puede seleccionar uno de estos países/idiomas:
América
- América Latina (Español)
- Canada (English)
- United States (English)
Europa
- Belgium (English)
- Denmark (English)
- Deutschland (Deutsch)
- España (Español)
- Finland (English)
- France (Français)
- Ireland (English)
- Italia (Italiano)
- Luxembourg (English)
- Netherlands (English)
- Norway (English)
- Österreich (Deutsch)
- Portugal (English)
- Sweden (English)
- Switzerland
- United Kingdom (English)