Crear redes con Deep Network Designer
Cree y edite redes de deep learning de forma interactiva utilizando la app Deep Network Designer. Con esta app, puede importar redes o crear una red desde cero, ver y editar propiedades de capa, combinar redes y generar código para crear la arquitectura de la red.
Puede utilizar Deep Network Designer para distintas tareas de diseño de redes:
Ensamble una red arrastrando bloques de la Layer Library y conectándolos. Para buscar capas con rapidez, utilice el recuadro de búsqueda Filter layers del panel Layer Library.

You can add layers from the workspace to the network in the Designer pane.
Click New.
Pause on From Workspace and click Import.
Choose the layers or network to import and click OK.
Click Add to add the layers or network to the Designer pane.
You can also load pretrained networks by clicking New and selecting them from the start page.
Para ver las propiedades de una capa y editarlas, seleccione una capa. Haga clic en el icono de ayuda situado junto al nombre de la capa para obtener información sobre las propiedades de la capa.

Para obtener información sobre las propiedades de capa, haga clic en el nombre de la capa en la tabla de la página Lista de capas de deep learning.
Una vez haya diseñado la red, puede analizarla para comprobar si hay errores. Para obtener más información, consulte Comprobar la red.
Transferencia del aprendizaje
La transferencia del aprendizaje se suele usar en aplicaciones de deep learning. Se puede usar una red preentrenada como punto de partida para aprender una nueva tarea. Ajustar una red con transferencia del aprendizaje suele ser más rápido y fácil que entrenarla con pesos inicializados al azar de cero. Puede transferir de forma rápida las características aprendidas a una nueva tarea con menos imágenes de entrenamiento.
Deep Network Designer incluye una selección de redes preentrenadas para la transferencia del aprendizaje con datos de imágenes.
Cargar una red preentrenada
Abra la app y seleccione una red preentrenada. También puede cargar una red preentrenada haciendo clic en New. Si necesita descargar la red, deténgase en la red y haga clic en Install para abrir Add-On Explorer.
Sugerencia
Para comenzar, pruebe a seleccionar una de las redes más rápidas, como SqueezeNet o GoogLeNet. Una vez que haya determinado cuál es la mejor configuración, pruebe una red más precisa, como Inception-v3 o ResNet, y compruebe si los resultados han mejorado. Para obtener más información sobre cómo seleccionar una red preentrenada, consulte Redes neuronales profundas preentrenadas.

Adaptar una red preentrenada
Para preparar la red para la transferencia del aprendizaje, edite la última capa de aprendizaje.
Si la última capa de aprendizaje es una capa convolucional 2D (por ejemplo, la capa
'conv10'en SqueezeNet):Seleccione la capa convolucional. En la parte inferior del panel Properties, haga clic en Unlock Layer. Se desbloquearán las propiedades de la capa para que pueda adaptarlas a su nueva tarea. Establezca la propiedad NumFilters en el nuevo número de clases.
Modifique las tasas de aprendizaje para aprender más rápido en la nueva capa que en las capas transferidas aumentando los valores WeightLearnRateFactor y BiasLearnRateFactor.

Si la última capa de aprendizaje es una capa totalmente conectada (la mayoría de las redes preentrenadas, como GoogLeNet):
Seleccione la capa totalmente conectada. En la parte inferior del panel Properties, haga clic en Unlock Layer. Se desbloquearán las propiedades de la capa para que pueda adaptarlas a su nueva tarea. Establezca la propiedad OutputSize en el nuevo número de clases.
Modifique las tasas de aprendizaje para aprender más rápido en la nueva capa que en las capas transferidas aumentando los valores WeightLearnRateFactor y BiasLearnRateFactor.
Para comprobar que la red está preparada para el entrenamiento, haga clic en Analyze.
Para ver un ejemplo de cómo volver a entrenar una red preentrenada para clasificar imágenes nuevas, consulte Preparar una red para la transferencia del aprendizaje mediante Deep Network Designer. Si dispone de Audio Toolbox™, también puede cargar redes preentrenadas adecuadas para tareas de audio. Para ver un ejemplo de cómo volver a entrenar una red preentrenada para clasificar un nuevo conjunto de señales de audio, consulte Adapt Pretrained Audio Network for New Data Using Deep Network Designer.
También puede utilizar la app para importar redes desde plataformas externas. Para obtener más información, consulte Import PyTorch Model Using Deep Network Designer.
Clasificación de imágenes
Puede crear una red de clasificación de imágenes con Deep Network Designer arrastrando capas de la Layer Library y conectándolas. También puede crear la red en la línea de comandos e importar después la red a Deep Network Designer.
Por ejemplo, cree una red para entrenarla para la clasificación de imágenes con un conjunto de datos de imágenes de 28 por 28 divididas en 10 clases.
inputSize = [28 28 1];
numClasses = 10;

layers = [
    imageInputLayer(inputSize)
    convolution2dLayer(5,20)
    batchNormalizationLayer
    reluLayer
    fullyConnectedLayer(numClasses)
    softmaxLayer];

deepNetworkDesigner(layers)
Para adaptar esta red a sus propios datos, establezca InputSize de la capa de entrada de la imagen para que coincida con el tamaño de entrada de la imagen y establezca OutputSize de la capa totalmente conectada en el número de clases de los datos. Para tareas de clasificación más complejas, cree una red más profunda. Para obtener más información, consulte Redes profundas.
Para ver un ejemplo de cómo crear y entrenar una red de clasificación de imágenes, consulte Introducción a la clasificación de imágenes.
Clasificación de secuencias
Puede utilizar Deep Network Designer para crear una red de secuencias desde cero o puede usar una de las redes preconstruidas sin entrenar desde la página de inicio. Abra la página de inicio de Deep Network Designer. En la sección Sequence-to-Label Networks (Untrained), deténgase en LSTM y haga clic en Open. Se abrirá una red preconstruida adecuada para problemas de clasificación de secuencias.

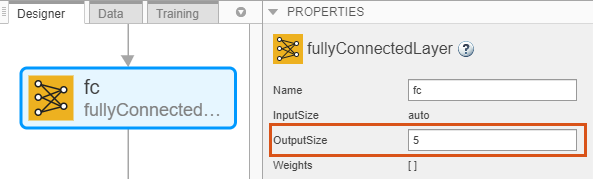
Puede adaptar esta red de secuencias para entrenar con sus datos. Supongamos que tiene datos con 10 características y 5 clases. Para adaptar esta red, seleccione sequenceInputLayer y establezca InputSize en 10.

Después, seleccione fullyConnectedLayer y establezca OutputSize en 5, el número de clases.

Para ver un ejemplo de cómo crear y entrenar una red de clasificación de secuencias, consulte Introducción a Deep Network Designer.
Clasificación de datos numéricos
Si tiene un conjunto de datos de características numéricas (por ejemplo, una colección de datos numéricos sin dimensiones espaciales ni temporales), puede entrenar una red de deep learning utilizando una capa de entrada de características. Para obtener más información sobre la capa de entrada de características, consulte featureInputLayer.
Puede crear una red adecuada con Deep Network Designer o puede crear la red en la línea de comandos e importar después la red a Deep Network Designer. También puede utilizar la red de perceptrón multicapa (MLP) preconstruida desde la página de inicio. Abra la página de inicio de Deep Network Designer. En la sección Feature Classification Networks (Untrained), deténgase en Multilayer Perceptron y haga clic en Open. Se abrirá una red preconstruida adecuada para problemas de clasificación de características.

Para adaptar esta red a sus propios datos, establezca InputSize de la capa de entrada de características para que coincida con el número de características de los datos y establezca OutputSize de la capa totalmente conectada en el número de clases de los datos. Para tareas de clasificación más complejas, cree una red más profunda. Para obtener más información, consulte Redes profundas.
Convertir una red de clasificación en una red de regresión
Puede convertir una red de clasificación en una red de regresión adaptando las capas finales de la red. La conversión es útil cuando se desea tomar una red de clasificación preentrenada y volver a entrenarla para tareas de regresión.
Por ejemplo, supongamos que tiene una red preentrenada de GoogLeNet. Para convertir esta red en una red de regresión con una única respuesta, elimine la capa softmax y establezca OutputSize de la capa final totalmente conectada en 1 (el número de respuestas).

Si la salida tiene varias respuestas, cambie el valor de OutputSize de la capa totalmente conectada por el número de respuestas.
Redes multi-entrada y multi-salida
Varias entradas
Puede definir una red con varias entradas si la red requiere datos de varias fuentes o en formatos diferentes. Por ejemplo, algunas redes requieren que se capturen datos de imágenes de varios sensores en resoluciones diferentes.
Con Deep Network Designer, puede controlar las entradas y salidas de cada capa. Por ejemplo, para crear una red con varias entradas de imagen, cree dos ramificaciones, empezando cada una de ellas con una capa de entrada de imagen.

Varias salidas
Puede definir redes con varias salidas para las tareas que requieren varias respuestas en formatos diferentes, por ejemplo, las tareas que requieren una salida tanto categórica como numérica.
Con Deep Network Designer, puede controlar las salidas de cada capa.

Redes profundas
Crear redes grandes puede resultar difícil, pero puede usar Deep Network Designer para crear redes con mayor rapidez. Puede trabajar con bloques de capas a la vez. Seleccione varias capas y, después, cópielas y péguelas o elimínelas. Por ejemplo, puede usar bloques de capas para crear varias copias de grupos de capas de convolución, de normalización de lotes y ReLU.

Para redes entrenadas, si copia capas también copia los pesos y los sesgos.
También puede copiar subredes del área de trabajo para conectarlas fácilmente con la app. Para importar una red o capas en la app, haga clic en New > Import from workspace. Haga clic en Add para añadir las capas a la red actual.
Comprobar la red
Para comprobar la red y examinar las capas más detalladamente, haga clic en Analyze. Investigue problemas y examine las propiedades de las capas para resolver discrepancias de tamaño en la red. Vuelva a Deep Network Designer para editar capas y, después, compruebe los resultados haciendo clic en Analyze de nuevo. Si el analizador Deep Learning Network Analyzer no detecta ningún error, la red editada está preparada para el entrenamiento.

Consulte también
Deep Network Designer | dlnetwork | trainnet
Temas
- Preparar una red para la transferencia del aprendizaje mediante Deep Network Designer
- Crear una red para el pronóstico de series de tiempo con Deep Network Designer
- View Autogenerated Custom Layers Using Deep Network Designer
- Import PyTorch Model Using Deep Network Designer
- Example Deep Learning Network Architectures
- Trucos y consejos de deep learning