Designing Motor Control Algorithms for Optimum Performance and Efficient Operation of an Electric Two-Wheeler - MATLAB & Simulink
Video Player is loading.
Current Time 0:00
Duration 48:03
Loaded: 0.34%
Stream Type LIVE
Remaining Time 48:03
 
1x
  • Chapters
  • descriptions off, selected
  • captions off, selected
  • en (Main), selected
    Video length is 48:03

    Designing Motor Control Algorithms for Optimum Performance and Efficient Operation of an Electric Two-Wheeler

    Overview

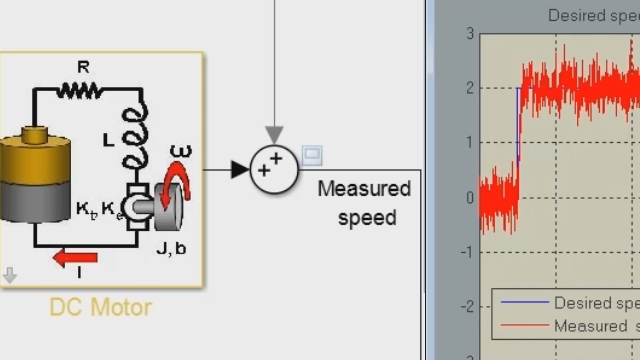
    With the advent of electrification in the 2-W industry, motor simulation and motor control design have grown significantly. Speed, torque, and other performance characteristics are regulated by motor control algorithms. The focus of this session is on latest capabilities that are unique to the development and application of motor control algorithms wherein you will discover an effective process for:

    • Motor control workflows for BLDC, PMSM, IM as well as some emerging motor types such as SRM
    • Designing and tuning control algorithms such as FOC, FWC, and MPC
    • Generating ANSI, ISO, or processor-optimized C code and HDL code for real-time testing and implementation
    • Verifying and testing control algorithms using simulation and prototyping hardware

    About the Presenters

    Rahul Choudhary, Senior Application Engineer, MathWorks

    Rahul is a Senior Application Engineer at MathWorks India and specializes in the field of System Modeling and Control Design. He has over 9 years of experience in power electronics control, motor control, multi-domain modeling, and real-time simulation. Before joining MathWorks, Rahul worked with Eaton India Engineering Centre as a Control Engineer where he was involved in developing prognostics and health monitoring algorithms for proof-of-concept projects for their electrical business using MATLAB and Simulink. He holds a master’s degree in Systems and Control Engineering from Indian Institute of Technology Bombay, Mumbai and a bachelor’s degree in Electronics and Instrumentation Engineering from Institute of Engineering and Technology, Lucknow, India.

    Ananth Kumar Selvaraj, Senior Tech Lead, MathWorks

    Ananth Kumar Selvaraj is a Senior Tech Lead at MathWorks India, specialized in Power electronics and Motor control. He and his team members work on Model Based Design workflows and tools for developing motor control solutions. Ananth Kumar brings 19 years of experience in Embedded and Control design from Industrial and Automation domain. Prior to joining MathWorks, Ananth Kumar worked for National Instruments, Schneider Electric and KONE Elevators as an expert in embedded and control engineering for Power electronics and Motion control. He holds a bachelor’s degree in electrical and electronics engineering and master’s degree in Mechatronics engineering.

    Recorded: 22 Sep 2022

    Hello, everyone. Welcome to today's webinar on designing motor control algorithms for optimum performance and efficient operation of an electric two-wheeler. MathWorks is pleased to bring you this session live in association with our industry partner, ICAT, the International Centre for Automotive Technology.

    As you may already know, this session has been part of a series that we have been hosting this week under the theme of two-wheeler electrification. If you miss any of these sessions, let me do a quick recap for you. Earlier this week on Tuesday, we started with a system-level simulation of a two-wheeler. And we started analyzing this setup with a set of specifications for batteries, motors, and other components in the vehicle to target a specific range and performance.

    With those specifications, we developed these components and built a system-level model of a two-wheeler. We then ran that with a set of drive cycle inputs to test out lots of what-if scenarios and looked at the results, as well as vehicle dynamics and its ride and handling analysis.

    Then from there, in the second session we started diving deeper at the component level. Our last session was focused on modeling battery systems and performing thermal engineering. You might remember we specifically talked about Simscape Battery, our newest product in R2022b that was released last week.

    And my colleague Abhisek showed you how we build from cell to the pack, then analyze thermal runaway behavior, and also perform state of charge estimation before building the overall battery management system. We also looked at an example of a two-wheeler onboard charger, and the power electronics and control techniques that are necessary to develop these types of systems.

    Now today, it's our turn to look through motor control development. And for that, I would like to invite my colleagues Rahul and Ananth Kumar as presenters for today's session. Welcome, Rahul and Ananth.

    Rahul Choudhary is a Senior Application Engineer at MathWorks based out of our Delhi office. He's an alumni of IIT Bombay and specializes in power electronics and control area. He has worked with many of our automotive customers, helping them develop their electric powertrains.

    Ananth Kumar Selvaraj, he's an Engineering Manager at The MathWorks based out of our Bangalore office. He leads the product development team for motor control area. Today, with his extensive experience in embedded systems, he will walk us through lots of motor control solutions, starting with which motors you choose, all the way to developing and deploying the algorithms.

    So thank you, Rahul and Ananth, for jointly hosting today's session. And with that Rahul, I would like to pass the control over to you. So take it away.

    Thanks, Shripad. Thank you for summarizing what we have learned so far. So in the first session, we saw how we can leverage system-level model to understand requirements for the subsystem, like what should be my motor type, or torque speed characteristic of the motor should look like, what should be the maximum power of the motor DC bus voltage, and whether we should mount it on the frame, or it is going to be a hub motor? So those kind of analyses, what-if analyses, we can do when we have a system-level model.

    In today's session, we are going to focus on how you can develop motor control algorithm and deploy it to the target. Depending upon who you are, your persona, there could be different challenges you might face when you are developing motor control algorithm.

    So for example, if you are, let's say, an EV startup engineer, probably you wonder how you can implement field-weakening controller for your EV. If you are a plant modeling engineer, probably you should worry about how you can get motor parameters to develop a high-fidelity plant model.

    If you're a controls engineer, probably you are good with controls, but you don't know how you can take your control algorithm to the target or to the embedded device. Finally, if you are an embedded engineer, you know, I'm good with embedded coding, but if I want to fine tune my control gains, what all techniques are available which I can use?

    These are some of the challenges which we have listed. Other than these, there could be other challenges. For example, if you are getting your motor controller from one of the vendors, you might think how we can test this motor controller without using it on the actual motor. Because there is a risk of damaging the motor, so you don't want to take that risk. How you can, basically, mitigate that by using something called hardware loop simulation or real-time simulation.

    So these are some of the challenges which we are going to address in today's session. So first, let's start on a very high level what all steps you need to take if you want to develop a motor control algorithm. So on a very high level, once you finalize what kind of motor, in terms of torque speed characteristic, power, DC bus voltage, once you identify that, then the next step is you have to create a plant model out of it. You have to digitally represent the motor.

    And this plant model is later going to be used for your control design and fine tuning. Once you're happy with your closed-loop performance, then you can generate target-specific code and finally deploy it. And then you can run the motor control model. Let's look into each and every step in a little bit more detail.

    So once you finalize your motor requirement, and if you find that motor with your vendor or off the shelf, then there is a way to use that information and parameterize the motor. If your motor does not exist, and probably you are using some of the design tools to design the motor, there is also another way to basically extract data from the design tool and parameterize your motor.

    Either of these approaches will eventually give you a plant model. And once your plant model is ready, you can basically design your control algorithm. You can fine tune control-loop gains, simulate and verify its performance in simulation environment. And if you think that, OK, if your motor quite doesn't meet the requirement, then probably you can play with motor parameters. You resize the motor and redo the whole exercise.

    Once you are happy with your controller's performance in closed-loop environment, you can generate hardware-specific code out of it. Before connecting it to the actual motor, probably you need to do some kind of sensor calibration so that you read the right set of values from the sensor. And then finally, you can deploy it. So these are the workflows what you need to perform when you want to deploy your embedded code or embedded software for your motor.

    Now, before moving to the next topic let's try to understand or see some of the popular motors used by EV industry. Let's start from the left-hand side, which is induction motor-- self-starting, low-cost motor. It's a commutator-less drive, makes it very useful. And it has less maintenance.

    On the flip side, we have seen that induction motor, they have low power factor, especially at the lighter loads. These type of motors are used by Tesla cars, primarily for their Model S and Model X.

    The next motor is permanent magnet synchronous machine. It has a high-performance and very efficient compact motor, which makes it more suitable for in-wheel application where you don't need any drive train.

    The disadvantage of PMSM is, because we are using permanent magnets, it's high material cost. And since we are using permanent magnet, performance of the motor is restricted to the overall temperature of the rotor. These type of motors are primarily used by Toyota, Audi, Jaguar. And you can also find its application in some of the household electronics items.

    The next one is externally excited synchronous machine, where instead of using permanent magnets, we are using an electromagnet. It has all the benefits of PMSM, plus it is very cost effective because you are not using any permanent magnets here. On the flip side, since we are using an additional electromagnet on the rotor, so it requires additional power supply. And then because of that, it can also incur some of the copper losses in the rotor. These type of motors are used by Renault, BMW cars.

    And finally, switched reluctance motors. These are not new. They have been for quite some time. They are simple and robust construction and low power, long, constant power range, makes it more suitable for current EV segment.

    But it has some sort of problems. So for example, it has high noise primarily because of torque ripples. And in order to mitigate those torque ripples, you need complex control algorithms. That's why probably it was not popular back in days. But now, slowly this motor is picking up.

    Keeping switched reluctance motor aside-- we'll talk about it in the later part of the presentation-- let's focus on rest of these motors in terms of their performance with respect to torque speed characteristic. So the induction motors, they are very good, and they outperform PMSM, especially in case of high-speed operations.

    But for the rest of the operating cycle, PMSM motors are better because of their high torque density. Externally excited synchronous machines performance is comparable to PMSM. But since it is more efficient compared to ESM, that's why we are going to go ahead with the PMSM. And probably this is one of the reasons why it is one of the preferred motor choice for many EV manufacturers.

    Now, coming back to PMSM, where based on the placement of permanent magnets, it could be two types-- so surface-mount PMSM, where permanent magnets are placed on the surface of the rotor, and then the interior PMSM, where permanent magnets are mounted inside the rotor. In this presentation, we are going to focus mainly on interior PMSM, because it has high power density and efficiency. And we can spin the motor above the base speed with the help of a field-weakening controller.

    OK. So that was about the motor. And let's see how we are going to use this motor in an EV. So even though the diagram shows a car, but this four-quadrant operation is equally important for two-wheelers as well. The first one is basically when speed and torque, both are acting in clockwise direction, its normal motoring application.

    The next quadrant is basically reverse motoring, where speed is acting in counterclockwise direction but torque is-- speed and torque both are acting in counterclockwise direction. It's basically your reverse motoring. We've already seen one of the ads from Ather, how their reverse assist feature will allow you to get away from tricky parking situations. So this feature is particularly useful for that.

    The third one is basically when your speed is acting in clockwise direction but your torque is acting in counterclockwise direction. It is basically for braking application. And finally, the fourth quadrant, which is reverse braking. In this case, your speed is acting in counterclockwise direction and torque is acting in clockwise direction. So if you're taking your vehicle up to the hill, and in order to prevent it to, basically, roll down or fall back, probably this kind of braking technique can be used.

    OK. So with that, let's start how we can parameterize the motor and create a plant model out of it. Why plant modeling is important because if you are a controls engineer, and if you want to develop a control algorithm, it is impossible to develop any control algorithm if you don't have a plant model.

    Even to design a simple on/off controller, you also need a plant model, unless you are going to use trial and error approach, which we don't recommend, because A, it's a time-consuming process, B, there is no guarantee that you are going to land at the optimal gains, and C, if you are directly testing your trial and error approach on the actual setup, it might damage the whole setup. So that's why modeling is very important.

    Now, depending upon what you have, you can choose different options. So for example, if you have access to the motor, then you can perform some instrumental test on the hardware, and you can estimate motor parameters. If you have a dyno setup and motor is connected to the dyno setup, probably you can run certain experiment on the dyno setup and collect some data, and use that data for parameterization.

    Finally, if you don't have motor but you have a design tool such as the ANSYS Maxwell, JMAG, Motor-CAD, COMSOL, in that case, you can use these motor design tools to generate appropriate data, and you can use that data to parameterize the motor model.

    Now let's go into individual steps. So if you have, let's say, access to the motor, in that case our tool Motor Control Blockset, we provide a reference application. This is basically a two-model approach where we have a host model, which is going to run on your PC, where you have to enter all the nominal parameters related to the motor such as nominal voltage, current, speed, and all those things.

    Then the second model is basically is going to be your target model which we are going to deploy to the target. And it is going to basically establish a communication between your host model and the hardware. Once we deploy the target model with a host to the target, then we can come back to the host model. And you can see host is performing some series of tests to estimate the motor parameter automatically.

    So here, by doing DC test, it is estimating of state of resistance. And then by performing high-frequency test, it is estimating Ld and Lq values. And finally, we estimate the inertial or mechanical parameters of the motor. It is performing a host of tests.

    And now you can see how automatically this host model is estimating all the parameters. You also have option to see some of the signals which is being sent by the host model to the target model. And then finally, you can save all these parameters in the form of MAT, file which you can use with your motor model. OK.

    The next one is if you have a dyno setup like this. In that case, what you can do, you can run various applications-- run various tests on this particular application, basically to capture the flux data for different Id Iq value at different rotor position. And once you populate these tables, you can use these lookup tables to parameterize one of the blocks available in Simscape Electrical Library.

    Similarly, if you don't have access to your motor, and your motor exists in one of the design tools, you can use the design tool to again generate a similar kind of data, which is flux versus Id Iq for different rotor position. And then you can use this data to parameterize the tool.

    Now, with all these three approaches we are going to get a different fidelity motor model. So the first one, which is running instrumental tests on the hardware, you are going to get a linear lumped parameter-based motor model. These type of models are very fast running and probably good for quickly designing your control algorithm.

    But if you are designing a controller for, let's say, traction motor, which is going to run into saturation, in that case capturing the behavior or detail of saturation is also equally important. So in that case, you can rely on latter two methods, where you can use a flux Id Iq position data to basically parameterize the motor and get more details, more nonlinearities in your motor, in terms of saturation and spatiality.

    Why we need to have different model fidelities? Because depending upon what you are currently doing, you have to vary the model fidelity. Why can't we go with highest model fidelity to begin with? Because accuracy and speed, it doesn't go hand in hand most of the times. So if you try to add more and more details, it is going to cost in terms of simulation speed.

    So if you are designing a control algorithm where you have to linearize the plant model, then probably you can go with linear lumped parameter-based motor model and average-value inverter. Once your algorithm is designed and you want to test it, then probably you can go with high-fidelity motor model with the nonlinear effects and then actual switch-based inverter.

    The question is, since we discussed that we are going to use different model fidelities depending on what we are doing, so do we have to maintain multiple models throughout the development process, to have all these varying fatalities? The answer is no. There is a workflow called-- or feature called Variant Subsystem in Simulink, which will allow you to have multiple variants of your model in one single file.

    So here, we have a low-fidelity or linear lumped parameter-based motor model, where you are parameterizing it based on the data what we have captured by running the instrumental test. You can also parameterize it from the datasheet of the motor. And then here, we are using average-value inverter because we are going to use this variant to basically quickly design the control algorithm.

    We can also have the second variant where, instead of using linear lumped parameter-based model, we are using slightly detailed motor model. And in terms of inverter, if you go inside that subsystem, you'll see that here we are using a switch-based inverter rather than going with average-value inverter. So this Variant Subsystem is very useful where you want to maintain different model fidelities in one single file which you can switch from one fidelity to the other fidelity without having a different file.

    So this brings me to the first section of the presentation, where we discussed how you can identify or choose between multiple motor types. We discussed that to demonstrate the field-weakening controller, the interior PMSM is going to be motor of choice. And then how you can use various steps to basically parameterize your motor model, and then how you can play with different model fidelities using Variant Subsystem.

    By performing all these things, we are able to address questions or challenges posed by the modeling engineer, which is how you can get the motor parameters. So by running instrumental test or a dyno test or FEA simulation, we can easily parameterize the motor model, which can be later used for control design and calibration.

    This time to pass on the control to my colleague, Ananth, who is--

    Thanks, Rahul, for giving an introduction. So how to parameterize the motor, and how to do your plant modeling, and how to have a variant approach so that you can switch between several fidelity levels, which will help control engineers, or power electronics engineers, or system level engineers to work with the same model. This is one of the biggest pain points earlier.

    So I'm going to talk about the second chapter, about the control algorithm implementation. So how it is going to use the parameters from the previous section, and how we are going to develop a control algorithm with these existing parameters.

    So here, it involves four steps. In brief, you can come up with a control strategy, and tune the control-loop gains, and simulate and verify whether this is going to match your system-level requirements. And in case if you find if it is like overrated or underrated, you can go for the motor resizing. This is what we are going to talk about in this chapter.

    So I will showcase-- I will start with the portfolio of different control strategies, what we are like shipping as reference examples as part of motor control block set product. So it starts with V/F control, which is a very simple control which is used for mostly diagnosing the hardware or it's more like a open-loop track.

    And follows by six-step commutation. This is one of the widest used one for simplest approach, where it involves Hall and lookup table-based approach. And it will spin the motor in a very low-end processor, too.

    And the third one is the field-oriented control. This is one of the preferred controls for automotives, especially when it comes to two-wheelers and three-wheelers. But what it lacks is the optimum performance point, which we are going to address in the fifth section, which is the field-weakening control.

    Also, we have direct torque control, which is preferred for a few cases where we need less torque control. So in coming chapters, I'm going to talk about field-weakening control, because it's going to give me an optimized point for the operations, and this will allow me to max utilize my motor.

    So with this, I will give you the brief overview of field-oriented control. So I'm not going to dive deep into the algorithm, but I will point you how the field-weakening control is going to take care of by the block MTPA control reference. So this is one of our shipping examples where we are demonstrating the field-weakening control.

    Especially if you see the left-hand side, the speed feedback and the speed reference, the pink one is the speed feedback. And you could see the speed feedback is going beyond the base speed, which is like 1.0. So this is actually using the field-weakening-- achieved using the field-weakening control.

    On the right, corner whatever you are seeing the vector plot, where you can see the phase current of Id and Iq. And I will have couple of slides to explain what this really means.

    So this is the phase plot, what we are-- what we have seen in our earlier examples. And the right-hand side, I'm comparing this against the theory. So the theory says the red curve is the maximum torque for x. This is the most optimal code to spin a motor to extract its maximum torque for the given x.

    So this is what is achieved with this algorithm. So with this algorithm, we choose like we are operating in the optimal point. So it's not only maximum torque, perhaps. So with the algorithm, we need to work on maximum torque. But I'm still following this code. And this code, we will be working on the field-weakening region. And in this point, we will be working on the maximum torque per volt region.

    So these are the optimal points. Below within this region is the optimal operating point which a interior PMSM motor should work to get its maximum operating conditions. So though it looks complex, so in terms of implementations, it's made simpler using a block.

    So this block will accept torque and omega as the input, and it's going to compute the Id reference Iq reference, which you are seeing on the right bottom, based out of these algorithms. So the complexity is between the block. And for the users, it is simpler to use a block with the parameters what we get from Rahul's earlier workflow.

    So I hope that that's a very simplest approach we extract the maximum possible operating point. So also, you have a utility to play around with the motor parameters and voltage constraints, to check what is the maximum optimal operating point your motor should spin. And this will give you an idea whether your motor is a fit for your-- meeting the criterias-- your criterias.

    So this is one of the videos we captured with the field-weakening control. So the right-hand side, you could see at the setup where the motor is-- base speed of the motor is like 6,224 RPM. So we are implementing this field-weakening control. And we are stressing the motor to go beyond, say, like 16,000 RPM. So it's almost like close to 3 times more than its base speed.

    So this strategy is demonstrated as a shipping example. And you can find this as part of our product. Yeah. So with this, I will move on to other novel control strategies which is we are shipping as part of the product. So you could find reinforcement learning for PMSM, and model predictive control for PMSM. And this model predictive control is running both on simulation as well as in the hardware. And you can compare the results.

    It's a big challenge to put the algorithm in the conventional DSPs. But in the optimized algorithm, and it will fit in the conventional DSPs. You can use-- go for model predictive control for your applications as well.

    Also, we are demonstrating gain scheduling example for the nonlinear motors-- in the different nonlinear regions. Maybe it's better to segment the regions and have different gains for each of the regions. Also for multiprocessors for SOC, there are examples available where we are partitioning the motor control algorithm between the processors or between the real-time processor and the FPGA in the SOC, and we are demonstrating this simulation and deploying capability.

    So the next biggest challenge-- so now we have the control algorithm in hand, the next biggest challenge is control-loop gain tuning. So this is one of the challenges for embedded software engineers or even others to do it. Mostly, we are seeing people are starting with trial and error and fiddling around it for a very long while, which is not recommended in practice.

    So here I'm going to talk about four strategies which-- I mean, you can pick any one of these two-- look beyond the control-loop gains. The first one is the empirical computations. So here, we can input the motor parameters, maybe from datasheet or maybe from the instrumental test, what Rahul has demonstrated as a video. So you can input the motor parameters and also the delays involved in the control loops.

    So by using this script, you will be able to get a set of control gains for your control loops for the current control loops and the speed control loops, which will spin the most-- in most of the cases. This is a good point to start with. And this will work for almost most of the cases. So if you have any specific bandwidth in mind, or if you have any specific gain margin or phase margin in mind, so the next two methods will help you to meet the gain margin.

    So again, what are the complexities involved? The complexity is already taken care in the algorithm. So if the motor is spinning in a closed loop at the steady state, this algorithm will trigger the sine perturbations. And it estimates the planned frequency response and computes the gain of it.

    I have a short slide here to show how this algorithm works. So the green one is the speed reference. The purple one is the speed feedback. You could see there is a lot of overshoot, and they are not meeting as expected. And this is the FOC autotuner at which like it perturbs the sinusoidal frequencies on the reference signals.

    So there are like four control loops here. One is D-current control loop, Q-current control loop, field-weakening current control loop, and speed loop tuning. So it will inject sine perturbations in each of the current loops and estimate the control gains. So this is the tuned speed profile.

    If you see here, the speed feedback is meeting the speed reference much better than the earlier case. If you see that transient behavior is between the before tuning and after tuning, you could see the performance is much better. So this is one of the simplest approaches. If you're able to spin your motor in closed-loop speed control loop, this will help you to tune your parameters in the hardware as well.

    So the third method, again, still it works both in hardware as well as in simulation. So here, we are demonstrating the online frequency estimation, it's more kind of a semi-automated way of FOC autotuner, where it will inject the perturbations and identify the frequency plot. It's more like a Bode plot.

    So this is the algorithm how it works. And on the right-hand side, what you're seeing is the frequency plot comparison between the simulation and the hardware results. You could see they both are matching very close.

    So the next step, once you have the frequency plot, take it to PID tuner app. That PID tuner app will allow you to input your step response requirements, or overshoot and step response in terms of time, or if it is a frequency response, input your gain margin and phase margin, and you can play with the tuner sliders, and you can estimate your control gains. This is the, again, another better approach for tuning the control gains.

    The fourth one is more like plant modeling, and linearizing the plant modeling, and using SYSTUNE to compute the control gains. So all these 1, 2, and 3, are like the SISO, the Single Input, Single Output model, whereas the fourth one is like multiple input and multiple output model.

    So now I pull back the questions where one of the-- where Rahul presented in just the earlier slide. So the embedded engineer, she is fine in doing embedded coding, but she lacks expertise in control gains. So here is a list of a few control gain tuning strategies which she can use to tune her control gains.

    With this, I will pass on to the third section of this chapter, Simulate and Verify. So since we have the control algorithms in place and control loop gains are tuned, so we can do the simulation, and we can ensure our algorithm is working in all four quadrant operations and meeting our requirements.

    So the results may be two ways. Either we are meeting the requirements, or sometimes we may be-- our motors may be overrated. So here we can retrospect our motors. So if a motor is overrated or underrated, the conventional step is you have to redesign your motor, and you have to reparameterize your motor.

    So there is a strategy called "motor resizing." So what this will do is this will help you to tune your motor parameters so that you can increase or decrease, play with the length and diameter of the motors. So in turn, this will help you to resize your motor. But you don't need to reparameterize again.

    So you can use a factor on the earlier parameterization, and you can re-use the parameters. That's the benefit. This will avoid the time to market, and you don't need to spend time on dyno test, or you have to wait for the motor to be fabricated and get ready to do the parameterization again and do the control tuning again.

    So with the fact that you will be able to reuse those existing earlier parameters, and you tune you-- you can continue with your control algorithm implementation. This is one of the biggest advantages, and this will save time to market.

    So in summary, so now we have a control strategy. We can pick any of the control strategies. Also we discussed about novel control strategies. Also, we discussed the field-weakening controls, where the MTPA, MTPV is also part of it, and how the block is going to help us to get these values.

    And also, we discussed different control gains tuning strategies, and how it is going to help us in tuning the control gains. Also, if it is underrated or overrated, we can go with a motor resizing workflow. And this also saves our time.

    So with this, I will move on to the third chapter, where we are going to see the code generation and deployment. So far, we have motor parameters in hand, and we have control algorithms in plan, and we verified in simulation. So now it's time to go to the real hardware target.

    So I will start with the first step, which is more like the processor peripheral driver code generation. So there are two approaches to get the processor peripheral driver code. Either one is handwritten C code, which is time consuming and requires some expertise to do it. The other approach is there is hardware support package with MathWorks, which means you can find the library blocks-- yep, sorry.

    Yeah. So there are library blocks with Simulink, which will offer you the device driver blocks. ADC, PWM device drivers, interrupt trigger device drivers, and the serial communication device drivers, are all required for the processor peripherals. This will be part of the Simulink Library blocks, which you can pick and you can design your device driver for.

    And with this, you can generate the code. This will help you to move with the device driver codes. So MathWorks supports a lot of hardware support packages. Out of this, I am listing few here, which is the relevant part, like motor control hardware kits. It starts with TI, Microchip, Infineon, NXP STM. And also, we have hardware support package for like Xilinx FPGA, which will allow you to spin the motor in FPGA target We have support for rapid prototyping using Speedgoat. So this support package will give the device driver blocks for Speedgoat hardware.

    So the next step is code generation. So I can select my processor on the configuration setting. This will help me to generate the C code out of it. This is a big topic. I don't want to dive deep into the topic. But all what you can see here is your C code and your blocks are-- go hand in hand. So you can switch from the block to code and code to block. This will help you to debug, understand, and also understand the logic behind the blocks as well.

    So it's not only limited C code generation. Also, you can go with the VHDL code generation using HDL code. So this will allow you to deploy on the FPGA hardware target. And we are shipping examples with Trenz motor control kit, where we are generating the code for HDL, and we are deploying on the FPGA hardware target.

    So being said that, now we have device drivers, and whey have algorithm in code. Are we ready to go for the hardware? There is one step before that, which is sensor calibration. So we have various sensors, like current sensor or-- the ADC of the current sensor. And the position sensors, it could be like quadrature encoder or Hall sensor, or like the resolver, or some sensorless strategies to measure the initial positions.

    So to do this, we have shipping reference examples. So how do you calibrate your encoder? And this will-- the algorithm will spin the motor in open loop. And it will align with the d-axis. And it will calibrate the d-axis 0 with the index pulse. That is the calibration process of the encoder.

    To move on, the identify the Hall sensor sequence. This is one of the biggest pain points, because the Hall sequence may go wrong when we are plugging the motor phases or Hall phases. So this example will spin the motor in open loop, again estimates the Hall sequence. This will be input to your rest of the control strategies, and they will-- for example, six-step commutations or FOC-- they will use the sensor input, and they will spin the motor in closed-loop control.

    Similarly, we have novel strategy for identifying the initial rotor position by means of high frequency injection. So this is more like sensor strategies, where it will inject a high frequency and identify the rotor position. So this will allow you to identify the rotor position even without spinning a rotor. That's a good advantage of it.

    And also the resolver. We have another novel strategy. Usually, the resolvers, the primary signals are sinusoidal. So here, we are going with-- offer one more option, where you can use square pulses because square pulses are easy to generate, and it will allows you to get the secondary position using primary square pulses. So this will help us to calibrate the initial positions and also help us to proceed with the algorithm further.

    So now it's the very important part of the workflow, which is deployment. So now we have our control algorithm in hand. So we are good to deploy it on the hardware. There are a few recommendations before how to deploy it on the hardware.

    So you can run model advisor on your Simulink models and ensure like your model is compatible with Misra-C ISO26262. This compliance will help you some of the functional safety issues. And you can generate code using the Embedded Coder. And you can do your static analysis using Polyspace. So we have demonstrated you can use static code analysis on the generated code and address the issues.

    And the fourth one is you can go with the processor in loop. Basically, in processor in loop you will ensure your algorithm is not overflowing. So you are able to compute your algorithm within the control-loop with that.

    So once you go through the steps, you are pretty confident like your generated code is good enough for deployment, and next step is you can integrate with the driver code. And this will go on the hardware, and it will spin the motor. Right-hand side, what you are seeing is one of the electric hub motor, which spins the motor on the TI evaluation kit.

    So now I think I'll pull the questions from one of the control engineer. So he's good in control engineering, but he lacks expertise in the embedded software areas. So here is his accommodations. He can use hardware support package for generating the device drivers and go with one-click solution where you can deploy the code to the hardware target.

    So here is the list of hardware kits, what we are-- I mean, we are shipping reference examples for this list of hardware kits. You can see from the top vendors the TI, STM, NXP, Microchip, Infineon. We are shipping for the embedded DSPs. And Trenz, this is the FPGA motor control kit. And this Speedgoat is the rapid prototyping machine. So we are shipping reference-- various reference examples across all these motor control hardware kits.

    So in summary, so we are able to get the motor requirements. From motor requirements to code generation and deployment, we are able to follow the steps, and we are able to deploy it in the hardware, and we are able to spin the motor. This is the very-- one of the workflow what we are demonstrating, how to deploy the algorithm to the motor.

    So I will pull back to workflow. And we have spoke about this parameterization, control algorithms, and code generation deployment. So this answers the EV engineer, one of the student researchers, where his question is like, the steps-- what steps I should follow to implement a motor control for EV?

    So here is one of the workflow what we are proposing, so to help him to start and follow to deploy the motor control algorithm in the hardware. There are a few reference examples we are shipping as part of the product, which will allow you to explore the algorithm in four quadrant operations. In the motor and dyno setup, the motors are connected back to back. And one motor will act as a load, and the other motor is the motor under test.

    So basically, this will help you to load the motor with various loads of all four quadrant operations you can test. And you have a simulation model and also the hardware model. Both works-- the same model works both in simulation and hardware with a variant approach. So almost all our examples will work both in-- both work in both simulation as well as in hardware.

    Also, we are shipping reference examples to showcase the switching losses and harmonics for various PWM strategies. This is a simulation-only example, where we can figure out the switching losses and harmonics with various PWM switching strategies.

    If you are working as a bigger team, and you have more number of team members working on a project, so how to divide into your components and how to use the SLDD, Simulink Data Dictionaries, for underlying component? It's demonstrated using a MATLAB project example, which will help you to work as a team. Yeah.

    So with this, I will hand over to Rahul to continue the talk with the hardware in loop testing. Here, Rahul.

    --for walking us through control design, tuning, and deployment steps. So with this, we have our controller ready in form of actual control hardware. Now what we need to do is we need to connect it with the inverter and the motor. Let's say we don't have access to inverter and motor. In that case, what we can do?

    In that case, we can take advantage of the same closed-loop simulation model what we used to design the control algorithm. And with the help of Simulink Real-Time Toolbox, we can convert it to a real-time application and deploy it to the Speedgoat hardware.

    Speedgoat is our partner company. They make real-time target machines which comes in different shapes and sizes. And since they are partners, we have a one-click or really seamless integration with them. So you can convert your model, desktop model, into real-time application, and you can deploy it to the Speedgoat hardware.

    And then you can interface with your control card, and you can quickly test the performance of your control algorithm. So with this real-time simulation, you'll be able to inject certain faults. And you can look for controls performance when there is some communication error. This is a very good method to basically test your control hardware with actual physical signals and communication interfaces.

    So typically, especially for the motor control setup, motor normally runs at lower speed, whereas the inverter, which operates in several kilohertz frequency. If you want to achieve this high switching rate in real time, then you can also leverage the HDL or FPGA part of the Speedgoat, where the actual high-frequency switching part can run on the FPGA, and then rest of the model and the load can run on the CPU-based workflow.

    So with this brings us to the end of the session. So if you want to learn more about MathWorks solutions for motor control, powertrain control, we have a dedicated web page where you can visit and go through various offerings in terms of shipping example, and webinars, and white papers. If you want to learn these tools in detail, we also have several hands-on trainings designed for modeling physical systems and control design with Simulink and Simscape.

    So coming back to the switched reluctance, which we left in the beginning. So if you are working on switched reluctance motor, and you want to deploy a motor control algorithm on FPGA, and you are willing to collaborate with us for some advanced workflows, you can write to us. You can contact our colleague Swathy. Her email address is given here. So we are looking forward to any such collaboration with you.

    Thank you, Rahul and Ananth, for lots of insights and technical details throughout the last hour. I see with a lot of our customers bringing motor control development in-house for their two-wheeler electric vehicles. It's a trend, especially with the FAME-II subsidies. So thanks for showing us all the tools and techniques that will make motor control design easy.

    For our audience, I know a lot many of you joined for this session in the series. But if you are interested in joining or reviewing the other two sessions, please scan the QR code which you see on the top right-hand corner. We will be making the recordings available in about a week. So you can review them. You can also share it with your colleagues.

    Also, in the chat of Webex you will see all the slide decks that will be shared with you so you can have that content ready to use later as well. Now it's your turn. You have seen how we went from a system-level simulation to component-level design, tuning the algorithms, and deploying them to the hardware.

    MathWorks latest release of R22b came out last week. So definitely, you can go on MathWorks.com, download a trial, and explore these features. We also have a number of free online trainings available. So from MATLAB Academy at MathWorks.com, you can access these trainings and try to build your proficiency within the tool.

    View more related videos