Add Interactive Controls to Live Scripts
R2026bYou can add sliders, spinners, drop-down lists, check boxes, edit fields, buttons, file browsers, color pickers, and date pickers to your live scripts to control variable values interactively. Adding interactive controls to a live script is useful when you want to share the live script with others. Interactive controls let you set and change the values of variables in your live script using familiar user interface components.
Insert Controls
To insert a control into a live script, go to the Live Editor tab, and in the Code section, click Control. Then, select from the available options. To replace an existing value with a control, select the value or place the cursor next to it and then insert the control. The Control menu shows only the options available for the selected value. To configure the control, right-click the control in the live script and then select Configure Control.
If your live script already contains a control, in some cases, you can replace
that control with another control that has similar functionality. To replace a
control with another control, right-click it and select Replace with
Control Name. You also can select
the control in the live script, go to the Live Editor tab,
click Control, and select from the available options. Replacing
one control with another preserves relevant configuration values, such as range and
default values.
This table shows the full list of controls.
| Control | Description | Configuration Details |
|---|---|---|
Button
| Use a button control to interactively run code on button click. | To change the text displayed on the button, in the Label section, enter the label text. To specify what code runs on button click, in the Execution section, specify a Run option. For more information, see Modify Control Execution. |
Check Box
| Use a check box to interactively set the value of a
variable to either the logical value The displayed state of the check box (selected or cleared) determines its current value. | Not applicable |
Color Picker (since R2023b)
| Use a color picker to interactively select a color. The color displayed in the color picker is its current selected color. | In the Format section, select from the available options to specify the format of colors in the color picker. Valid formats include:
|
Date Picker (since R2024a)
| Use a date picker to interactively select a date. The date displayed in the date picker is its current selected date. | In the Format section, select from the available options to specify the format of dates in the date picker. |
Drop-Down List
| Use a drop-down list to interactively change the value of a variable by selecting from a list of items. Hover over any item displayed in the drop-down list to see its value. | In the Items > Item labels field, specify the text that you want to display for each item in the drop-down list. In the Items > Item values field, specify the values for each item in the drop-down list. Make sure to enclose text values in single or double quotes. You also can populate the items in the drop-down list using values stored in a variable. For more information, see Link Variables to Control Values. |
Edit Field
| Use an edit field to interactively set the value of a variable to any typed input. The text displayed in the edit field and the configured data type determines its current value. | In the Type section, in the Data type field, select from the available options to specify the data type of the text in the edit field. |
File Browser (since R2023a)
| Use a file browser to interactively select a file by opening a file selection dialog box or a folder by opening a folder selection dialog box. The text displayed in the edit field determines its current value. | In the Type section, select File to use the file browser to select a file, or Folder to use the file browser to select a folder. To display text next to the Select File button, in the Label section, enter the label text. |
Range Slider (since R2024b)
| Use a range slider to interactively select a range by moving the left and right range slider thumbs to the desired minimum and maximum range values. The value to the left of the range slider is its current value. | In the Values section, specify a Min, Max, and Step value or select a workspace variable from the drop-down list. For more information about specifying the range slider values using variables, see Link Variables to Control Values. |
Slider
| Use a slider to interactively change the value of a variable by moving the slider thumb to the desired numeric value. The value to the left of the slider is its current value. | In the Values section, specify a Min, Max, and Step value or select a workspace variable from the drop-down list. For more information about specifying the slider values using variables, see Link Variables to Control Values. |
Spinner
| Use a spinner to interactively increment or decrement the value of a variable by clicking the up and down arrow buttons to the right of the value. You also can enter a numeric value for the spinner in the numeric edit field. The value in the numeric edit field is the current value of the spinner. | In the Values section, specify a Min, Max, and Step value or select a workspace variable from the drop-down list. For more information about specifying the spinner values using variables, see Link Variables to Control Values. |
State Button (since R2023b)
| Use a state button to interactively set the value of a logical variable by clicking the button on or off. The displayed state of the state button (pressed or not pressed) determines its current value. | To change the text displayed on the state button, in the Label section, enter the label text. |
Variable Selector (since R2026b)
| Use a variable selector to interactively select a workspace variable or set the value of a variable to a workspace variable. The value of the selected variable is the current value of the variable selector. | To only show variables of a specific type in the variable
selector, in the Items > Data type field, select the data type of variables to show.
For example select To specify the types of
variables to show using a regular expression, select
|


Modify Control Labels
You can hide the code in a live script and display only formatted text, labeled controls, tasks, and output. Hiding the code is useful when sharing and exporting live scripts. To hide the code, click the Hide code button to the right of the live script. You also can go to the View tab, and in the View section, click Hide Code. To show the code again, click the Output inline button or the Output on right button .
When the code is hidden, labels are displayed next to the control. To modify the label for a control, right-click the control and select Configure Control. Then, in the Label section, enter the label text. The label text is also the text that is displayed on button controls in all views. Press Tab or Enter, or click outside of the control configuration menu to return to the live script.
Specify Default Values
You can set the default value for some controls, including sliders, spinners, drop-down lists, check boxes, edit fields, state buttons, color pickers, date pickers, and variable selectors.
To set the default value for a control, right-click the control and select Configure Control. Then, in the Defaults section, specify a default value by entering the value or by selecting a workspace variable from the list. The list shows only valid variables for the control. For drop-down lists and variable selectors, select the default value from the list of items.
To restore the default value for a control, right-click the control and select Restore Default Value. To restore the default values for all controls in a live script, right-click any control in the live script and select Restore Default Values for All Controls.
Link Variables to Control Values
You can link workspace variables to slider values, spinner values, and drop-down items to create dynamic controls. You also can link workspace variables to the default values of sliders, spinners, check boxes, edit fields, and state buttons.
Sliders and Spinners
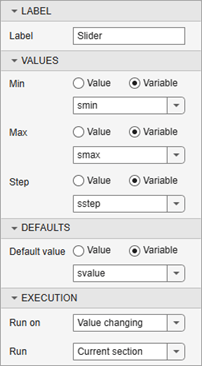
To specify the minimum, maximum, and step values for a slider or spinner using workspace variables, right-click the control and select Configure Control. In the Values section, select Variable, and then select workspace variables for Min, Max, and Step. Only variables with numeric values appear in the drop-down lists.
If the variables that you want to select are not listed, run the live script to create them in the workspace. Changes to the selected variables are automatically reflected in the slider or spinner.
Before R2026a: Only variables with numeric values of type double are supported.
Drop-Down Lists
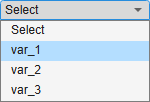
To populate a drop-down list using the values stored in a workspace variable, right-click the control and select Configure Control. Then, in the Items section, select a workspace variable from the Variable list. Only variables that contain string arrays, categorical arrays, character arrays, cell arrays, or numeric arrays appear in the list.
If the variable you want to select is not listed, run the live script to create it in the workspace. Changes to the selected variable are automatically reflected in the drop-down list.
Before R2024b: Only string arrays are supported.
For example, create a live script and define the variable
lastnames containing a list of last
names.
lastnames = ["Houston","Vega","Obrien","Potter","Rivera","Hanson","Fowler","Tran","Briggs"];
Run the live script to create lastnames in the workspace.
Then, go to the Live Editor tab, and in the
Code section, select Control > Drop Down. In the Items section of the control
configuration menu, select lastnames as the
Variable.

Close the configuration menu to return to the live script. The drop-down list
now contains the last names defined in lastnames.

If you add, remove, or edit the values in lastnames,
MATLAB® updates the items in the drop-down list.
Note
If the items in a drop-down list are linked to a variable, and one or more of the values in the variable are deleted while the live script is running, an error can occur if one of the deleted values was the selected list item. To minimize the potential for this error, avoid deleting values from a linked variable while the live script is running.
Default Values
To specify the default value of a slider, spinner, check box, edit field, or state button using a workspace variable, right-click the control and select Configure Control. In the Defaults section, select Variable, and then select a workspace variable. Only variables with valid values for the control value appear in the drop-down list. For example, sliders and spinners display only variables with numeric values. Edit fields display only variables with values that match the specified text data type.
When you set the default value of a control to a workspace variable, the control is linked to that variable. The control value updates automatically as the variable value changes. The link remains active until the control value is changed manually, for example, by moving the slider thumb.
Modify Control Execution
You can modify when and what code runs when the value of a control changes. By default, when the value of a control changes, MATLAB runs the code in the current section. To configure this behavior, right-click the control and select Configure Control. Then, in the Execution section, modify the values of the fields described in the table. Press Tab or Enter, or click outside of the control configuration menu to return to the live script.
| Field | Options |
|---|---|
| Run On (sliders and spinners only) | Select one of these options to specify when the code runs:
|
| Run | Select one of these options to specify what code runs when the value of the control changes:
Tip When using a button control in a live script,
consider setting the Run field
for all other controls in the live script to
|
Share Live Script
When the live script is complete, share it with others. Users can open the live script in MATLAB and experiment with it by using the controls interactively.
If you share the live script as an interactive document, consider hiding the code in the live script before sharing it. When the code is hidden, only formatted text, labeled controls, tasks, and output are displayed. If a task in the live script is configured to show only code and no controls, the task does not display when you hide the code. To hide the code, click the Hide code button to the right of the live script. You also can go to the View tab, and in the View section, click Hide Code.
If you share the live script as a PDF file, Microsoft® Word document, HTML file, LaTeX file, Markdown file, or Jupyter® notebook, MATLAB saves the controls as code. For example, if the Create Live Script with Multiple Interactive Controls example live
script is exported to HTML (using the Export options on the
Live Editor tab), the file browser control is replaced with
its current value ("patients.xls"), the drop-down list control is
replaced with its current value (locationStrings(1)), the check
box control is replaced with its current value (false), the
slider control is replaced with its current value (31), and the
text box control is replaced with its current value ("e"). The
Filter Data button is not displayed.


